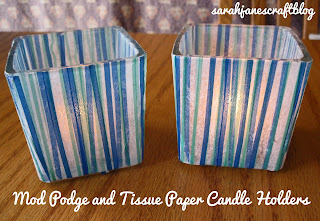
Mod Podge and Tissue Paper Candle Holders
I was inspired to Mod Podge some tissue paper onto glass candle holders from the dollar store by a cute post I saw online with carefully punched tissue paper. I brought out a bunch of colored tissue paper and my paper punches in hopes of creating a masterpiece. Guess what--my paper punches won't punch tissue paper--not even my more expensive paper punches. I tried several of my paper punches, and then I tried neatly folding the paper over to provide a thicker punching surface--no luck, it just mangled the tissue paper (Update: I totally figured out how to do it!). Well, I already had all of the stuff out for this project, so I switched gears and tried something else.
You'll need:
Mod Podge and a brush for applying
A scissors and/or rotary cutter
Work surface you can get glue on (I used the paper plate in the photo above)
Cut strips of your chosen tissue paper the right size for your candle holder. My tissue paper ended up being 3 inches by 12 inches. I got my candle holders at Dollar Tree. They worked really well for this project since they had pretty straight corners (they do angle slightly). I found that cutting the tissue paper with my rotary cutter (just a cheap one I use for crafting--not my good fabric rotary cutter) leaves you with much straighter lines than cutting with a scissors (and I could see the lines from my cutting mat through the tissue paper).
Paint some Mod Podge onto the candle holder and line your tissue paper up as best as you can with the top of the candle holder.
Gently Lay it down onto the glue and smooth it out. It is very delicate when wet. It may tear, but don't panic, we'll fix/cover that later. Just be very careful when handling it when the glue is wet.
As you can see from the picture, you have to fold the slightly angled corner a bit, and I was left with a little tear in the top corner. It wasn't my only tear.
The first layer looks a bit sloppy, but let it dry completely (leave it alone for at least 20-30 minutes).
Next we put on a second coat to cover up any tears and make it a little less translucent, and in the case of my paper--stripy-er!
Use the same process as before, but this time since you're painting onto the tissue paper with your glue--be gentle. I dabbed with my foam brush. Then I carefully laid down the paper.
After the second layer is on, it will probably still look a bit sloppy. Let it dry again Then come back and trim any excess tissue paper from the top. I then glued the extra paper that hung over the bottom edge down better, but you could trim that too if you like.
Next up is a good couple of top coats to get everything to lay down smooth and to make it a bit glossy. Be sure to let the glue dry between coats (I sometimes don't when working with Mod Podge, but this tissue paper is super delicate).
Even though it didn't work out quite the way I anticipated, I think they look pretty good. Just be prepared for a little tearing on your first layer and you should be good to go.
P.S. The tissue paper I used for this project is from Target--I got it on clearance a while back--it probably doesn't exist any more.


Comments
Post a Comment