Posts

Showing posts from 2013

As Seen on Pinterest: Cloudy Solar Light Fix

Image
A few years ago, we picked up these great color changing solar light orbs.  After years outside (including our harsh winters), the solar cells had clouded over and the lights had mostly stopped working.  I tried wiping them down with a wet rag, but the cloudiness was not just dirt.  So I thought I'd try one of the fixes I'd seen online.  On Pinterest I have seen folks use clear nail polish and acrylic sealer.  I figured the acrylic sealer would be a better long term fix, so I propped my lights up, wiped off any dirt, then sprayed them with clear sealer. The results were downright miraculous.  The solar cell went from cloudy white to clear and black again in seconds.  I let the sealer dry, and they were still perfect black.  You could once again see the metal lines in the solar cell. Unfortunately, I can only give this As Seen on Pinterest review a "Sort of Works" verdict.  After they dried, I put them back outside, and even after several sunny days

Clothespin Ornaments

Image
The clothespins they sell at Dollar Tree are really chintzy.  They don't really pin and the wood is jagged and sometimes broken.  Needless to say, they didn't work very well for traditional clothespinning tasks; however, I figured they would work pretty well for crafting.  So I took apart 12 clothespins--just popped the springs off.  Then I used some wood glue (but white school glue would work fine too) to glue the two flat sides of the clothespin together. Once the glue was dry, I arranged them into a snowflake pattern (you could also use 5 clothespins and make a star instead). I ended up using a glue gun to glue the clothespins together as straightly as I could.  I knew the glue gun glue would set quickly and provide a little bit of flexibility to that I could try to straighten them.  Since these clothespins are so wonky, they didn't all fit together perfectly, so the glue gun helped me fill the gaps between the clothespins. After the glue was coo

Melted Pony Bead Ornaments

Image
A few months back I melted plastic pony beads in a muffin tin to make some cute rainbow colored sun catchers . I had just enough beads left to make another project, so I thought I'd try my hand at melting some in cookie cutters.  I lined a pizza pan with tinfoil and arranged my cookie cutters. Next I filled the cookie cutters with a single layer of beads.  Instead of mixing all of the colors together, I sorted them and put 2 or 3 different complimentary colors in each one. Next I used the same method for cooking the beads as last time.  I preheated the oven to 400 degrees and opened a bunch of windows (be sure to do this on a day you can open windows--it stinks).  I let them cook for about 30 minutes before they were mostly flattened.  One the cookie cutters didn't work so hot--the beads didn't melt into the crevices, and so it had to be tossed after melting.  But the rest all turned out great. They all popped right out of the cookie cutters once they ha

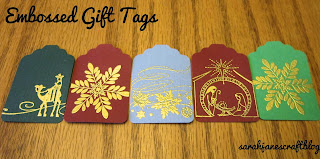
Embossed Gift Tags

Image
I'm just getting started using embossing powders (I did a basic tutorial a couple months back).  If you've never used them before--this is a pretty straight forward project.  I used a tag punch to make some gift tags and then used rubber stamps and pigment ink in a similar color to the embossing powder I wanted to use. All of the ones pictured happened to be gold because they turned out the most vibrantly. After you've stamped on the ink, then cover the ink completely with embossing powder.  I found that it worked out pretty well with these little tags to scoop up the leftover powder and shake it off. Once it's covered in powder, place it on a heatproof surface and use a heat gun to melt the embossing powder to a shine. After it's raised and shiny--your tag is all done. Now I just have to wrap some packages to put these tags on.  Happy gift wrapping!

Scrabble Tile Ribbon Ornaments

Image
I've been meaning to make some ornaments using Scrabble tiles for ages.  We're big gamers at our house, and I love Scrabble.  I decided to go with something simple and streamlined. I had picked up a couple of boxes of Scrabble for crafting purposes at the local Goodwill a while back.  Since most of these sets are missing a tile or two, they work perfect for crafting. I happened to have some ribbon in my scrap bin that was just a bit wider than the tiles.  I think it was salvaged from a gift a few years back, so it has the Christmas spirit already in it.  I chose some festive words, found my tiles, and laid them out on the ribbon. Next, I just glued the tiles onto the ribbon using a dot of hot glue on the back of each tile.  I made sure to trim the edges of the ribbon at an angle so they wouldn't fray as much, and then I made a loop at the top and glued it neatly to the back with a thin line of hot glue.  Next I slipped the loop of the ornament over one

Paper Strip Ornaments

Image
After I made my paper strip pumpkins , I knew I wanted to make some ornaments for the tree out of paper strips too. I cut 8-3/4 inch strips from a piece of 12 inch scrapbook paper. I then cut the 8 strips into 4 inch pieces so that I could make 3 ornaments.  Then I punched a hole on either end of each strip in about the same spot on each one. Use a metal brad to attach the strips together.  Then bend paper gently so the brads are at the top and bottom of what will become a sphere and carefully pull the strips apart so they create a ball. You'll end up with these lovely paper orbs.  I also made a larger sphere using some green paper (also 3/4 inch thick, 6 inches long, with about 14 strips).  When I was done, I just pulled the top brad out and poked it through a piece of ribbon and then poked it back through the paper ball.  Then I tied the ribbon at the top.  I'm sure there are more elaborate ways to attach a bow and decorate these spheres--but with w

Alcohol Ink Glass Ornaments

Image
Last week I watched a  video from Ranger  (the folks who make alcohol inks) of a project where you drip ink into a glass ornament and then spray it around with a can of air.  It looked easy and fun, so I thought I'd give it a try! If you want to try it out too, you'll need: alcohol inks, glass ornaments, and a  can of air with a straw on the nozzle. Start out with your plain glass ornaments. Drip 3-5 drops of alcohol ink into the ornament. You can then swirl it around a bit if you'd like, or you can just stick the straw from the can of air into the ornament and spray and see what happens. You get something that looks like the pink ornament above once you've blown it around with the air. I left the pink one alone for a few minutes while I worked on a second ornament so that I could let the pink ink dry a bit and not mix quite as much with the next color I put in the ornament. Then I layered the ink until the inside was covered. I end

Crafting Revisit: Alcohol Ink Coasters

Image
The first time I decorated tile  coasters with alcohol ink , I had just started using alcohol inks--I was a total newbie.  I had read a tutorial online that just dripped the ink on the coasters and mixed with rubbing alcohol, so I gave that a try.  It turned out well enough (though not like the example photos) to encourage me to play with the inks more.  After  making my own applicator  (because I'm too cheap to buy the  real one ), I learned how much quicker and easier applying these inks could be.  So I thought I'd revisit decorating ceramic tiles to make coasters--this time using an applicator. So this time I took out my homemade applicator and dripped on the alcohol ink. I used all 6 different colors (because that's what's in my current stash--I have the  Nature Walk   and   Farmer's Market   sets). You can squeeze multiple drops in one spot or single drops all over. The "blotches" you'll get will change a bit in size. Once you

Washi Tape Pencils

Image
A few weeks ago I spotted a cute craft that I knew I needed to try: Washi Tape Pencils! They looked quick, easy, and cute--that's my kind of craft.  So I picked out some smooth round hardwood pencils from my stash of office supplies (What, you don't have a stash of office supplies?  Well then these are the ones I used .) Next, I picked out some washi tape from my collection that I thought would cover well enough that you wouldn't see the black of the pencil (or the printed logo on the side of the pencil) through the tape.  I then stuck the tape along the metal eraser edge of the pencil and ran the tape down to the end, being careful to center the pencil in the middle of the tape as I went so it wouldn't go on crooked. I trimmed the tape off with my scissors.  Then I smoothed the tape onto the pencil and repeated the process on the opposite side. When I was done I had a covered pencil.  Cute for jazzing up any office pen cup and putting a smile on your

Paper Strip Pumpkins

Image
Just in time for Thanksgiving decor--out with the jack-o-lanterns and spiders and in with the pumpkins and gourds--I made some paper strip pumpkins.  I read a few different tutorials for these online (even one from Martha Stewart ), but I ended up adjusting the instructions slightly to minimize the amount of paper needed.   To create two large pumpkins and four small pumpkins you will need: 2 orange 12 x 12 sheets of scrap book paper 1 sheet of green scrap book paper (for the leaves--an 8 1/2 x 11 sheet or some scraps should work) 12 metal brads two green pipe cleaners one paper lunch sack hot glue gun Cut your 12 x12 sheets of orange paper into 7/8 inch thick strips.  The first piece of paper I chose had an ombre effect that took the pattern from yellow to dark orange (so it looks like different piece of paper--but it was all cut from the same sheet).   You should end up with 14 strips of paper.  Cut the strips into 8 inch pieces with 4 inch pieces lefto