Posts

Showing posts with the label thrift store craft

Spray Painted Galaxy Tray with Vinyl Decal

Image
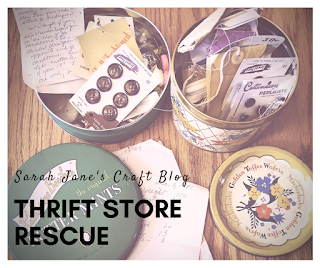
Sometimes a craft takes a long and winding road to get to a finish line. This craft begins over  a year ago when I went to the local Goodwill Outlet  and brought home a pile of junk (I try not to go often because I always bring home a pile of junk--some of it is awesome junk--but it's still junk). So, I started out with this lovely tin duck tray. At the store it looked sturdy, mostly un-dented, fairly light (it's pay by weight), and kinda ugly. Which is a perfect recipe for a thrift makeover. I figured I'd spray paint it a solid color. So I picked out this hammered steel spray paint. I figured the texture of the paint would hide any little blemishes or scratches. If you're curious, this lovely duck tray was brought to you by Avon. High class as always. So I sprayed it evenly with this lovely hammered paint. The surface came out perfectly. The only problem--I had just painted it to look like a pizza pan. I never used it. It languished for months...

Thrift Store Rescue: Sewing Notions Tins

Image
They recently opened up a Goodwill Outlet nearby my house. Goodwill Outlets are where all the stuff they can't or don't want to try to sell in their regular stores goes. So there are often lots of oddities (and sometimes some really awesome stuff that just didn't sell)...the only catch, it's pay by weight--oh and you have to dig through these trough-like tables piled with stuff to find your treasures. Since the stuff is often just dumped onto these tables, you never know what you're going to get...maybe you'll find a left shoe and never be able to find the right. But it's a total treasure hunt! So, on my recent trip, I saw these old tins. Tins don't typically weigh much, so if they are neat and old, I'll often at least pick them up to take a look at them. When I picked these up, they weren't light--they definitely had stuff in them. So I took a peak inside and saw sewing stuff--old sewing stuff. I figured a tin full of old buttons wa...

Wooden Bead Garland Refresh

Image
As a child of the 80s, I saw a few Christmas traditions and decorations fall in and out of style. One of those was wooden bead garlands on Christmas trees. They were very popular in the 80s but were replaced with ribbons in the 90s and never quite regained their popularity. While shopping at a thrift store after Christmas last year, they had sets of wooden bead garland that were an exact match to a string I had from my childhood, so I picked up a couple more strings for a dollar. I figured it would be really easy to spray paint the beads a single color to lose the 80s blue and rustic vibe. I ran out of my good silver spray paint (which would have been super schnazzy), so I opted for bright red instead. I used a couple of big boxes and coiled the beads around the bottom and sprayed on a coat, and then another coat, and then another coat. A couple of the beads didn't want to take color. It was also annoyingly just above freezing, so I had to keep bringing the boxes...

Thrift Store Makeover: Paper Mache Reindeer

Image
The Holiday season has officially begun. I know it's still early, but I gotta get a jump on my crafting before crunch time.  Besides, I found this paper mache reindeer way back last spring at the Goodwill Outlet (where they bring all the crap that doesn't sell and can't be recycled from the area Goodwills and let people fill up their carts and pay by weight). Paper Mache is light and I could see his potential, so I tossed him in my cart. I'm sure I paid like a quarter for it. Upon closer examination of my new reindeer, I noticed he had a crack in one of his antlers. This is what he looked like before: So my first step was fixing the crack in his antler. I put some tacky glue in the crack (figuring a slightly flexible glue would work better, but elmers probably would have worked fine). After I let the glue dry, I set about making my reindeer a little antler bandage. I grabbed some white tissue paper and my Mod Podge.  I ripped some small strips of tis...

Silver Striped Spray Painted Vase

Image
I found this great heavy weighted glass vase/candle holder at the thrift store a couple of weeks ago.  It was really nice--department store quality.  Unfortunately, it had a little defect.  There was a small blob (less than a 1/4 inch) of gray/green glass on the side of this otherwise really nice clear glass vase.  It was marked for 99 cents so I decided to rescue it and spray paint it with stripes.  I had been wanting to do that anyway, and the defect gave me the perfect opportunity. I set up my stripes so that the paint would cover the defect.  I tried measuring with the width of the tape, but found that between imperfections in the glass and the stretch of the tape, I was better off just eyeballing it.  I filled the vase up with plastic bags to keep spray paint from going inside the vase and gave it a good coat. I used  Rust-Oleum Metallic Spray, Silver  for this project. I came back for a second coat and it was pretty much...

Two Frosted Glass Spray Paint Projects

Image
We had quintuple credit card rewards at Home Depot this month...so when we were in the spray paint aisle, I knew I wanted to try out some frosted glass spray paint to see if it's any easier to use than glass etch for decorative projects. I started out with a glass cylinder vase that I had picked up at the thrift store for 99 cents.  I had originally tried to use my circle punch on some painter's tape, but even when I stuck the tape to wax paper, it didn't get a clean punch, then I remembered I had these circle stickers for color coding some school stuff.  They don't always peel off of surfaces very easily--but I thought it was worth a try.  I spaced them evenly but randomly on the glass.  When I was done sticking them on the glass, I went back and pressed each sticker down to make sure it was stuck to the glass well. I figured that since I was already spray painting the vase, I might as well spray another project at the same time.  Stripes on...