Posts

Showing posts with the label washi tape

Mod Podge and Washi Tape Stick Pens

Image
The inspiration for this week's craft came from an unusual place. I was cleaning out some digital files and came upon an untitled document file. When I opened it, all it said was: decoupage tissue paper or fabric on stick pens. I don't remember jotting that down, but I thought, hey, that's not a bad idea. Especially after last week's post with jazzed up binder clips , I guess I'm starting a series on office supplies ...well, probably not, but here goes nothing. So, I gathered my supplies: Mod Podge , Stick Pens , a foam brush , a scissors, some patterned tissue paper, and a large paper plate to keep the glue off the table. I cut my tissue paper the length of my stick pen and a couple inches wide. I crumpled this paper to see if it made a different with the finished texture (it did not, so you don't need to do that). I used the foam brush to spread the mod podge onto the pen, then I lined the pen up on the paper so it would be straight. Then I rolled the paper on...

Washi Tape Binder Clips

Image
Like many of you, I'm working from home right now, so I thought I'd revisit a craft project from several years ago to upgrade some of my office supplies and add some color to my home office. I used washi tape to decorate some tiny binder clips ( that were the same width as my wider  washi tape ) back then, so this time I wanted to try to decorate some larger binder clips. So I got out some well used binder clips and my bin of washi tape . I used both a scissors and a craft knife in this project. The scissors worked better when cutting off the role and if the tape was very paper-y. But the craft knife worked well for cutting the tape when it was on the binder clip. I tried applying the tape horizontally on the binder clips, but the edges wanted to peel at the corners, so vertically worked better. I used two pieces of tape on the wider (3/4 inch and 15mm) rolls and 3 pieces of tape for the narrower rolls of tape. After I applied the tape along the edge of the binder clip, I fli...

Washi Tape Altar Candles

Image
I love Dollar Tree's white glass altar candles. They are the largest and cheapest jar candles you can get just about anywhere...and I have shown them my love in several different projects over the years ( altar candle projects ). I have accumulated a nice sized stash of washi tape  (decorative paper tape--it's masking tape with designs on it) that I have picked up at various sales and discount stores, and it occurred to me that washi tape and my favorite dollar store candles were a match made in heaven. I went through my stash and decided that I had plenty of black and white tape and that it would look cute stacked with all of the various patterns. So I dug out all of the black and white tape rolls--eliminated a couple because didn't look sticky enough or had a little bit too much off-white in them and then started sticking it to the candle jars. The great part about washi tape (on glass at least) is that if you don't like it, you can just peel it off. ...

Washi Tape Easter Eggs

Image
It's that time of the year again! Time to start hauling out your Easter decorations! When I opened up my tote I noticed I had two unopened bags and a gallon ice cream sized bucket of plastic Easter eggs . I don't host a hunt, so it was time to do something with all my plastic Easter eggs. Of course you could make a wreath or decorate them with alcohol ink , but I wanted to do something a bit different. In addition to my crazy stash of Easter eggs, I also have a growing stash of washi tape . Washi tape is just decorative masking tape, so the projects are always super easy (as easy as peeling and sticking most of the time). So I dug out all of my pastel or bright colored tape and got to work. My first attempt was a traditional horizontal stripe. It looked a bit wonky, but undeterred I kept taping. I added another stripe and yep, total wrinkly mess. Turns out flat tape on very curved surface is not such a hot combo. I finally discovered that carefully t...

Recycled Tin Can

Image
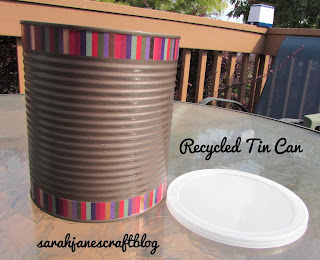
We bought a giant can of peanuts a while back at Big Lot. After my husband devoured them, I was about to toss the can in the trash when I realized it wasn't the usual foil lined cardboard, but was instead a full fledged corrugated metal can. It looked just like a big old coffee can with its resealable lid and all. So I knew I had to save it, if for nothing else than to throw nails in it in the garage. In my mind, I thought I could do something a little snazzier, though. Probably the hardest part of this project (and not all that hard) was a step that I didn't get any photos of--removing the glue after I ripped the label off. It was that hard non-sticky label glue. My usual go to for excess glue is goo-gone . I sprayed it on the glue and waited a minute--nothing happened. So then I grabbed a butter knife and started to try to scrape it off. I didn't make much of a dent. Then, I decided to run the glue under hot water. This made the glue tacky again and I was abl...

Recycled Pill Bottle

Image
My dog needed some medication recently and our vet puts the pills in these lovely cobalt blue pill bottles. I had seen some great ideas for reusing pill bottles floating arounds, so I knew that decorating one of these pretty blue bottles would make a great organizer for my purse. I picked out some coordinating washi tape and wrapped it around the top and bottom edge of the bottle. This washi tape was 97 cents at my local Wal-mart in the craft section. It's very papery and not much comes on a roll, but it did the trick for this project. Now to figure out what to store in it: over the counter medication, coins, bobby pins or barrettes, q-tips, matches, emergency candy stash, ear buds, screws or nails (though probably not in my purse), sewing kit, mini first aid kit, the options are nearly endless. When I decide, I'll let you know. 

Recycle Craft: Washi Tape Storage Bin from Pretzel Container

Image
I had this plastic container with a jar lid leftover from buying some peanut butter filled pretzels .  I knew the container would work great for storing something, but I didn't have a clue as to what.  Then I found some inexpensive washi tape on clearance and suddenly the container I had been using to store washi tape in was just too darn small.  So cue the perfect use for this container. I spent a good deal of time cleaning the goo off of this container from its labels.  I think I used 3 coats of Goo Gone on each label before it came squeaky clean. I poked around the internet looking for free frames and stumbled upon this one.  Then I used a font that had a similar line and printed it out so that it would be just the right size for my container. I printed it on cardstock, but it was still white, so I knew it would get dirty and smudged without a sealer over top, so I coated the back of the cardstock with mod podge and then stuck it down.  ...