Posts

Showing posts from June, 2015

Alcohol Ink Decorated Tin

Image
A while back I bought this tin filled with three Christmas cookie cutters (I'm sure on clearance). They weren't really a set that went together, so I took them out of the tin and threw them in with the rest of my holiday cookie cutters to save space. I was left with this cute little copper colored tin. I knew I wanted to decorate it--alcohol ink seemed like a perfect fit, but I wanted to try something different. But as we all know...the best laid plans.... So I stamped up the lid of my tin with some brighter lighter colors so that I could stamp something over the top. The process was pretty standard. I dripped several colors of alcohol ink onto my felt applicator and stamped across the lid until I got the coverage I wanted. I added a couple of colors to the felt after I filled in the lid to go back over the color and get more stippling and texture. Then it was ready for my experiment. I used a dye based ink and stamped over my pattern. When I pulled the st

Campfire Eclairs

Image
I keep seeing photos and posts online about what are essentially the same campfire dessert: campfire tarts, dough boys, woof'ems, campfire eclairs, etc... They are all made by roasting biscuit or crescent roll dough (I've also seen it done with bisquick) on a stick of some kind over the fire. Then you slide it off of the stick and fill it with whatever your heart desires. I had wanted to try them out for a while. I was going to make the sticks that were explained on this website . But I couldn't find the charger for my drill, so when we went camping, I just threw the dowel rod in the car and off we went. Before I stretched my biscuit over the end of the stick, I soaked it in some vegetable oil and and made sure to wipe it down with the oil before each new biscuit. The first biscuit I tried, was doughy in the center--too doughy to eat, so I scrapped it and tried again. I tried to stretch it thinner and handed it off to my husband, who is much more patient, to roa

Recycled Pill Bottle

Image
My dog needed some medication recently and our vet puts the pills in these lovely cobalt blue pill bottles. I had seen some great ideas for reusing pill bottles floating arounds, so I knew that decorating one of these pretty blue bottles would make a great organizer for my purse. I picked out some coordinating washi tape and wrapped it around the top and bottom edge of the bottle. This washi tape was 97 cents at my local Wal-mart in the craft section. It's very papery and not much comes on a roll, but it did the trick for this project. Now to figure out what to store in it: over the counter medication, coins, bobby pins or barrettes, q-tips, matches, emergency candy stash, ear buds, screws or nails (though probably not in my purse), sewing kit, mini first aid kit, the options are nearly endless. When I decide, I'll let you know. 

Homemade Fire Starters Time Test

Image
Last week I restocked my supply of fire starters before a camping trip we took to Lacey-Keosauqua state park in Southeastern Iowa. So, while we were there, we took the opportunity to test out the fire starters and see how they each work. We lit them all (at roughly the same time) and timed them as they burned. There was very little wind, so it was a pretty good test of their burn time. I lined up the cotton rounds, the new shredded paper versions, the old trusty dryer lint variety, and a store bought Coleman/Diamond brand strike on box sawdust and wax fire starter in a neat line. The cotton round fire starter lasted about 7 and a half minutes before flaming out. Next up was my new experimental shredded paper fire starters. They lasted just over 8 minutes before dying out, but they make a nice big flame as they burn. Hubby's biggest complaint about the shredded paper starters is that they shed. Little pieces of shredded paper come flaking off and float all over the pla

Crafting Revisit: Homemade Fire Starters

Image
It's camping season once again, so as we plan our next trip, I decided to stock our fire bag (a sturdy tote bag that I've stocked with a plastic bag of newspapers, fire starters, lighters, matches, and a couple small marshmallow roasters) with some freshly made fire starters. I loaded up a cardboard egg carton with dryer lint for some traditional egg carton fire starters . Next I filled another cardboard egg carton with some paper from my shredder. This is a new experiment, so I'll let you know how they work after our first camping trip. You could also fill them up with sawdust if you happened to have some lying around (I do not). Next up, melt some wax. You could buy some wax , but I almost always have some crappy or old candles laying around. You can also pick them up at the dollar store or thrift store and melt them down. This one was a pumpkin spice jar candle from Wal-mart where the wicks burned way faster than the wax did, which left me with extra wax that

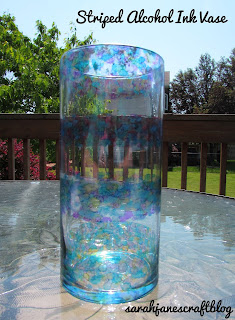
Striped Alcohol Ink Vase

Image
These great cylinder vases are only 97 cents at  our local Wal-mart. They are so versatile and can be used in all different kinds of ways (candle holder, flower vase, tall greenery vase, floating candle holder, etc...). So I picked one up the last time I was at Wal-mart and knew I wanted to decorate it with alcohol ink, but in a way I hadn't tried yet. So stripes it is. I used some painter's tape to tape off some stripes on my vase. I knew from previous experience , that trying to measure and be really precise would be nearly impossible, so I just eyeballed it.  I wanted each stripe that I was going to decorate to be a bit smaller as it went up the vase. Then I used my homemade applicator to stamp some colors on the bottom stripe. I've found that the most important first step is to try to get as much coverage as possible before you re-ink your applicator, that way it will remain a fairly consistent color. You can drop more ink onto your felt to make a s