Posts

Showing posts from March, 2018

Easter Craft Collection

Image
Check out all of Easter Craft Tutorials here: Sarah Jane's Craft Blog Easter Craft Collection

Blown Alcohol Ink Plastic Easter Eggs

Image
A while back, I dyed some plastic Easter eggs with the traditional alcohol ink stamping method. When I found a few white eggs in a set of pastel plastic Easter eggs, I knew I needed to revisit the process for even crisper colors. This time, though, I tried a different method: canned air. The egg halves are pretty light and it's nearly impossible to ink them put together as an egg. So I inked them in their halves and used a bamboo skewer through the holes in the eggs to hold them in place. I dripped some ink onto the eggs and then used the canned air to spread it out. It's pretty simple. The only thing you have to watch out for the ink mixing and getting brown. It's especially problematic along the connection half line. Otherwise layer colors and blow it around until you like the way it looks. I tried to use the same colors on the top and bottom halves of the eggs so they'd match up and then set them aside to dry. In the end, they

Easter Egg Wreath Repair

Image
6 years ago I made a wreath out of plastic Easter Eggs . It was one of my first in depth projects I posted on the blog. I was super pleased with how it turned out since it was made out of old plastic eggs and Easter grass that I just had laying around, but it looked brand new. Every year since then I have dutifully hung my egg wreath on the door each Easter season. This year, I discovered that the wreath had fallen off of the shelf (it probably got bumped when getting out Christmas decorations) and broke. Two eggs fell off and a few got broken when it fell on the concrete basement floor. One of the broken eggs I was able to find a matching egg in my stash and simply swapped out the top halves. I added a little extra glue to it just in case it didn't fit perfectly together. The other egg--the purple one, I couldn't find a matching half for, but I did find a few eggs that were pretty much the same color. The top half of the egg wouldn't fit on the old bott

Spray Painted Plastic Galaxy Eggs

Image
Over the last couple of weeks I have been digging into my stash of plastic Easter eggs to jazz them up. I used washi tape and decoupaged Easter napkins  to decorate the eggs, but this week, I decided to break out the spray paint. And, arguably, I think this project turned out the best of all of my plastic Easter egg projects this year. I grabbed a cardboard box and split the eggs open so they would lay flat and not roll around in the box. I started out with a teal spray paint ( Rustoleum's Lagoon ).  I made a few quick swipes across the eggs and then let it dry for a few minutes. Next I grabbed a purple spray paint ( Krylon Plum ) and followed up with a Blue ( Krylon True Blue ). I knew I didn't want complete coverage of any one of the colors, so I painted in stripes and zig zags across the eggs trying to cover the plastic underneath, but not the other colors of paint. I finished it off with some silver spray paint ( Rustoleum Metallic Silver ) that

Decoupaged Plastic Easter Eggs

Image
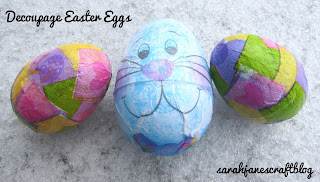
Last week I used washi tape to decorate some plastic Easter eggs . This week I wanted to use decoupage to decorate the eggs. So this craft post starts out with a craft fail. I wanted to make comic book eggs. I thought they'd be adorably geeky. I had a bunch of free comic book day comics in a stack, and I thought as long as I cut out the small panels and perhaps spritz the paper with water (a trick to make the paper more malleable and less likely to wrinkle), it'd work perfect. I even grabbed a larger plastic egg to try it out on. But no matter how much mod podge I used, the paper just wouldn't wrap around the egg, and, therefore, wouldn't stick. So I had to switch gears. I knew I needed to use tissue paper or a napkin to get the paper to adhere to the egg. So I used what I had on hand--some old Easter napkins. They had design that consisted of a big bunny surrounded by pastel colored squares. I used a larger egg and applied glue to the whole

Washi Tape Easter Eggs

Image
It's that time of the year again! Time to start hauling out your Easter decorations! When I opened up my tote I noticed I had two unopened bags and a gallon ice cream sized bucket of plastic Easter eggs . I don't host a hunt, so it was time to do something with all my plastic Easter eggs. Of course you could make a wreath or decorate them with alcohol ink , but I wanted to do something a bit different. In addition to my crazy stash of Easter eggs, I also have a growing stash of washi tape . Washi tape is just decorative masking tape, so the projects are always super easy (as easy as peeling and sticking most of the time). So I dug out all of my pastel or bright colored tape and got to work. My first attempt was a traditional horizontal stripe. It looked a bit wonky, but undeterred I kept taping. I added another stripe and yep, total wrinkly mess. Turns out flat tape on very curved surface is not such a hot combo. I finally discovered that carefully t

Mod Podge and Tissue Paper Tin Can

Image
Well, hubby finished off another giant tin of peanuts, and I couldn't very well just throw it in the recycling (any one else suffer from this problem?). The last peanut tin I spray painted . This one I decided I would opt for some classic tissue paper and mod podge . I've used tissue paper and mod podge on glass and plastic in the past, but never on a tin can, but it's the perfect choice for covering things that have curves....the ridges on these cans mean tons of curves. I picked out a tissue paper that had all over color on it because they are a little sturdier to work with and because the can is darker in color and I didn't know how much would show through when the paper was wetted with the glue. I measured the paper against the can and folded the paper over. I find this to be the easiest way to get a fairly straight cut with a scissors. I just slid my scissors along the fold to cut my piece of tissue paper out. Using a rotary cutter and a big ru