Posts

Showing posts from April, 2016

Ceramic Tile and Tissue Paper Wall Plaque

Image
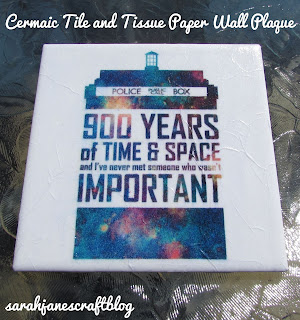
I picked up some tiles at the hardware store to make coasters , but I also grabbed some 6x6 ceramic coasters to make some other projects with. This white tile turned into a decorative wall plaque with one of my favorite Dr. Who quotes. The first step is to find a design that you want to use. I found this one online. It had been posted to Pinterest and Tumblr. I think it was originally on a t-shirt, but after a little searching, I couldn't track down it's original source. If you know who designed this, let me know in the comments so that I can give them credit. After I found the design I wanted to use, I pasted it into word and made sure the design was just under 6 inches so that it would fit neatly on my tile. Then I used the technique from my first Tissue Paper Photo Transfer project  to print the design onto tissue paper that had been taped onto a piece of card stock. After the print came out clean (I replaced the 10 year old printer from the other project), I

DIY Scarf Hanger

Image
I had this spare package of plastic shower curtain rings (they came with a shower curtain liner that I picked up on clearance for 2 dollars) and I needed a better way to store my scarves in the closet, so a quick DIY project for a scarf hanger seemed like a great idea.  I took the curtain rings out of the package and popped them onto a hanger. I chose a hanger that was a bit sturdier (for a plastic one--I'm sure a wooden hanger would work even better, but I didn't have a free one). After the rings were on, I strung my scarves through the rings, and voila! This was a super easy and quick solution to my scarf storage problem. It isn't perfect though, as the rings slide to one side and make the hanger tilt pretty easily. I may have to use some twist ties or zip ties to make one on each end and one in the middle fixed so that they don't all slide, if it works, I'll take another picture and post it.

Guide to Adult Coloring Books

Image
If you haven't heard about adult coloring books, you've been living under a rock. I have always loved coloring, so I was really excited when these books started popping up everywhere. As I have been coloring, I've learned a little bit about what to look for in your coloring books and supplies, and I thought I'd share some of my advice and a few of my colored pages. I'll try to keep this post updated as I try out more books and art supplies. First off, I use colored pencils in my coloring books. I have tried several different brands, and I have a few to recommend. Prismacolor Verithins  (pictured above) are a really nice set of hard colored pencils. Prismacolor is a very well known brand of artist quality colored pencils. Their "regular" Premier colored pencils (pictured below) are fairly expensive (about a dollar a pencil unless on sale), and are very soft and vivid. They are great for coloring large areas in bright colors. However, mos

Scrapbook Paper Poetry Coasters

Image
Happy National Poetry Month! Making coasters with scrapbook paper and mod podge was one of my earliest projects on this blog. I liked them so much that I made a whole bunch more. Since I hadn't made any in awhile and I wanted to do a project that celebrated poetry month, I thought I'd try printing text on some patterned paper and use that to make coasters. The hardest (and most time consuming) part of this project was picking the poetry lines I wanted to include. It was so hard to narrow it down. I wanted fairly classic poetry that was also uplifting. After browsing my library and lots of googling, I finally picked my poems. Then I set up a Word document to print them out. I have a large format printer, so I can set up a document that's 12 x 12 and stick the whole sheet of paper in my printer. If you don't, cut your paper down to 8 1/2 x 11. I used the rulers in Word to make sure my text was about 3 1/2 inches wide since I knew the tiles were just over 4 in

Recycled Altoids Tin First Aid Kit

Image
We've been on a spring roller coaster here lately. I started this project to recycle an Altoids tin on a day when I spray painted in my winter coat. I left the tin outside just long enough on each layer just long enough for the spray paint dust and fumes to subside, then I brought it inside to dry, then readjusted the tin and brought it back out again. Because it was cold and I kept adjusting it, the spray job was not as good as it could have been. I blame impatience--quality spray paint jobs are all about light coats. I also accidentally left the tin in the above position to dry. It made a bit of a mess along the hinge. I let it dry for a few days, scraped off any excess paint and sprayed it one last time. After I was reluctantly satisfied with the paint job, I found a piece of scrapbook paper and grabbed some mod podge . I traced around the tin on the back side of the paper with a pencil. Then I used a scissors to cut out the paper on the inside o