Posts

Showing posts from January, 2020

Flamed Alcohol Ink on Framed Glass

Image
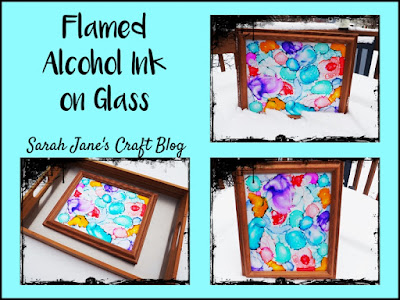
After last week's flamed bowl , the flamed alcohol ink had bitten me once again. I have been trying to go through my stash of leftovers for crafting and this old oak photo frame needed a new life, so I decided to ink the glass and make some art! I started by taking the frame apart and setting aside the wooden frame and black backing. I cleaned the glass and set it aside to dry while I gathered the rest of my supplies. I used my trusty quarter sheet pan lined in tinfoil. It was barely big enough for the 8 X 10 inch frames glass. Then I grabbed rubbing alcohol, pipettes , and my alcohol ink. I decided to start with lighter colored inks and work my way darker so that the ink wouldn't get brown or black as it mixed. So I started with some of Rangers pastel inks . After I squeezed some of the Aqua ink on the glass, I dripped some rubbing alcohol onto the glass with the pipette and then I lit it on fire. I was working on my ceramic stove top, and

Flamed Alcohol Ink Bowl

Image
It's been awhile since I did a flamed ink project . When I found these little white ceramic bowls at Big Lots a while back, I knew I wanted to ink one. I thought I'd bring back a flamed ink project and see how it would turn out on a bowl. I started out by clearing off a spot on my stove top and lining a small sheet pan with tin foil (just to keep the ink off of the pan). I gathered my alcohol ink , rubbing alcohol, a pipette , and a long handled lighter . I selected 3 colors, but I added a 4th while I was working on the project: Purple Twilight , Sailboat Blue , Pistachio , and Wild Plum .  I started out by dripping the blue into the bowl and adding a little rubbing alcohol with my pipette. Then I removed my inks and alcohol from the stove and used the lighter to start it on fire. I repeated the process with the purple and the green. I decided it needed a bit of a pop, so I added the wild plum (magenta). After the magenta ink had been add

Plastic Wrap Alcohol Ink Photo Frame

Image
The plastic wrap application method for alcohol ink is my new favorite method. I've been attempting to explore all the different kinds of surfaces it can be used on. This week I'm trying it out on a painted picture frame. I found a wooden picture frame that had some surface scratches on it in my stash in the basement. The scratches made it the perfect frame to spray paint. I grabbed a cardboard box and some white spray paint and gave it a few coats. After the frame had dried, I tore off 4 pieces of plastic wrap and placed them under each side of the frame. Then I covered the plastic wrap nearest the frame with 4 shades of alcohol ink. I dripped the alcohol ink onto the plastic randomly. Then I folded the edges of the plastic wrap up and over the frame and let it dry for a day or two before peeling it back. After the ink was completely dry, I peeled the plastic wrap back to reveal the pattern. I liked some of the results, but

Best of the Blog: 2019

Image
It's that time of the year again--time to reflect on last year's awesomeness before we move on to this year's awesomeness! So, let's look back on last year's most popular posts on Sarah Jane's Craft Blog: The #1 Most Popular Post of 2019: Flamed Alcohol Ink Washers . I have inked steel washers a few different times on the blog. Most of the time, though, I stamp the washers . Their small size makes other application methods a bit tricky, but I tried out a drip and flame method that had successful results! If you think this post looks similar to the last project, you are totally correct. The second most popular post of 2019 was Glazed Alcohol Ink Washers which was posted the following week and used the washers I created from the last project, but this time I tested different types of non-resin glazes on the washers. Since the finished result looks pretty similar to the previous project, I thought I'd throw in a process photo from te