Posts

Showing posts from December, 2012

Cardboard Tube Christmas Wreath
Image
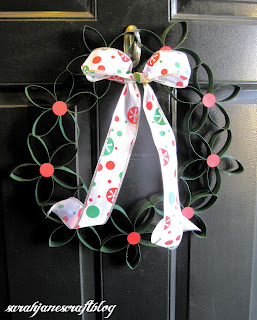
I said when I posted the Cardboard Tube Snowflake Ornament  tutorial that I had made a couple of crafts using my cardboard tubes. Well, here's the next one--a Christmas Wreath. You will need: Cardboard Tubes (toilet paper, paper towel, or wrapping paper tubes will all work) Hot glue gun and glue Green Spray Paint 1" Round Paper Punch Red Paper Festive Bow Cut your cardboard tubes into one inch pieces and pinch the ends to make them oval.  Glue five of the tube sections together at the point to create a flower. You'll need 9-10 flowers for a wreath made from wrapping paper tubes.  I ended up using 9.  Place the flowers in a circle and glue them together at two of the points to create a wreath. After the glue on the wreath is dry, spray paint it green.  I was using cheap spray paint, so it took several coats to get full coverage.  The photo below is after just a couple of passes with the spray paint.  It really felt like I was spraying t

Cornstarch Dough Ornaments

Image
Last Christmas I saw a recipe for Cornstarch Clay to make ornaments. So, after I was done baking Christmas Cookies, I whipped up a batch and made a giant mess (as seen below). The recipe is as follows: 2 cups Baking Soda 1 cup Cornstarch 1 1/4 cup Water Stir all ingredients together in a stove pot and bring to a boil. Cook the dough until it thickens to the consistency of mashed potatoes. Then remove the dough from the heat (turn it out onto some parchment paper or onto a plate) and let it cool. I found that the dough was the easiest to work with when it was luke warm--not cold and definitely not hot. When I worked with the dough too hot, the dough was too loose and stuck to everything. When it was cold, it was crumbly.  Once the dough is the right temperature, roll it out on a cornstarched surface (I used a silicone pastry mat ) and cut out with cookie cutters. Be sure to poke your hole at the top of the ornament (I used a chop stick). You can then let t

Cardboard Tube Snowflake Ornament

Image
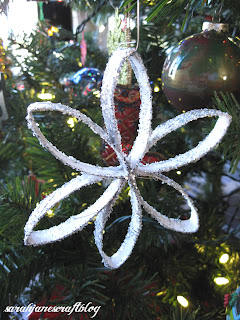
Cardboard tube crafts have been really popular on the web lately.  Last Christmas, I saved all of the tubes from the wrapping paper I used up, and chopped them into 1 inch tubes using my paper cutter. (When you cut them, they get smooshed into ovals.) After I chopped them up, I threw them in a cardboard box and shoved them in a closet, and there they sat for a year.   Last week I dug them out and made a couple of holiday crafts with them.   You'll need: A cardboard tube (a paper towel roll, toilet paper roll, or wrapping paper roll) scissors hot glue gun and glue spray paint glitter mod podge and a foam brush for application First off, I cut 6 (because thanks to my sister, I know that real life snowflakes always have 6 points) of the tubes in half so they are approximately 1/2 inch thick. I then grouped 3 together and glued them at the points with a hot glue gun (you may be able to use other glue, but the hot glue gun is probably the easiest sinc

Glitter Ornaments

Image
Most projects you see posted on the internet are not as easy as they appear.  Sometimes, the simple directions turn into a disaster.  This is not one of those projects.  These glitter ornaments are just as easy as all of the online articles make them seem.  Just swish around some floor wax inside the ornament, and the glitter sticks right to it. For this project you need: Clear Glass Ornaments Glitter Funnel  Floor Wax (it's not really wax, but it's the stuff that makes your floors shine--not degreaser or cleanser) The only "catch" to this project is that the floor wax stuff costs about $5 a bottle--and that's the cheap stuff.  Of course, you use very little in the ornaments, and you can shine the floor with the leftovers.  I bought this brand because it was less expensive than some others, it is safe for laminate floors (which I have), and has a pull spout at the top that will make squirting into the ornament easier. Squirt about a

Button Ornament

Image
This is a super easy project. I bought two bags of cheap buttons at Wal-mart and attached them to the Styrofoam ball with stickpins. I wished I had more variety in the sizes and colors of the buttons, so if you had some lying around in a jar at home, that would probably work even better. I used a T-pin to attach some red and green ribbon to the top of the ball because the weight of the ball was too much for a regular pin.  The T-pin solved the problem and kept the ribbon from pulling free of the ball.