Posts

Showing posts from August, 2022

3D Printed Deck Box and Card Tray for UNO Sized Decks

Image
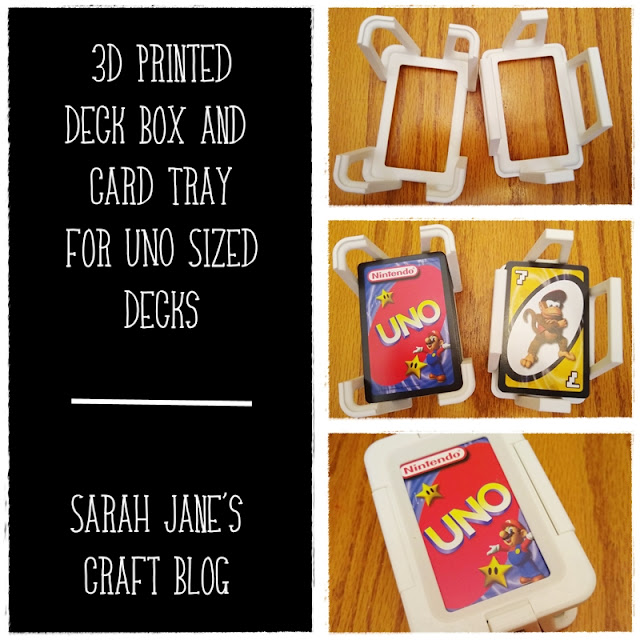
While browsing around on Thingiverse for print projects, I found a deck box that can double as a card tray. The Card Game Keeper is designed for UNO sized cards (slightly narrower than poker style playing cards) with decks of 100-120 cards.  I started out printing the bottom of the box with our Ender 3 version 2 . The instructions suggest using gyroid supports for this print. I set the infil to gyroid too, just for consistency's sake, but everything else was standard settings (.2 resolution, 20% infil).  I used white PLA filament  and the print took about 5 hours. It came out fantastic! The supports popped out easily from each of the corners (there was another support for the lip on the bottom of the box, but it came off when I peeled the print off the bed). Then I set up the top of the box to print. The instructions suggested using zig zag supports for this part of the box.  Just like last time, I set the infil to zig zag as well and used otherwise standard settings (.2 resoluti

Duct Tape Craft Collection

Image
A little throwback to a bunch of projects I created using Duct Tape. I can't wait to make more! Check them out here: Duct Tape Craft Collection

Harry Potter Perler Bead Kit

Image
  I had grand plans to do a bunch of crafting this week, but all I got done was melting some Perler beads. It turned out to be a ton of fun and a good bit of redemption since the first time I tried melting Perler beads, it was a pretty spectacular fail . I got this Harry Potter set to play with. It is a really nice kit with good projects for beginners. It has everything you need except....the tweezers. I strongly recommend tweezers of some kind. They'll make picking and placing the beads a lot easier. The kit comes with the large red plate and the patterns and all the beads you need to make them. I selected some of the smaller designs to get started and was able to fit two of them on the plate. I had the small green plate from my previous kit and was able to fit another design on it. But, since I struggled with my first Perler project, I ironed this set of designs without taking pictures. It went well, so I documented the next set. I did Hermione, Ron, and Luna in the next batch a

UV Resin: First Experiments

Image
I've been resisting resin crafting for quite a while. It's expensive, fiddly, and sometimes toxic. But once I learned about UV resin, I figured it might be a good option to try. It's used specifically for small projects, doesn't need to be mixed with a hardener, is less toxic, and sets in minutes. After trying a bunch of air dry glazes on washers, I thought that UV resin might be a good thing to try. During prime days, a starter kit from Mr. Resin went on sale and I decided to bite the bullet and give it a try. The kit came with resin, two resin spatula/stirrers, two resin cups for mixing, and a uv light. There were pretty minimal instructions with the kit. I had seen some YouTube videos of people using UV resin, but I was left to guess about a lot of things. So, it was time to do some experimenting. I bought a resin mold kit for making jewelry, though not everything in the kit is ideal for UV resin, but it was a good place to start. You will also need a silicone ma

White Alcohol Ink Backed Glass Gems

Image
So, a couple of weeks ago I posted a retrospective of alcohol ink glass gem projects . After going through the old projects, one of them was bugging me. Not long after picking up the Pinata ink sets (that come with white ink), I tried adding white ink to the back of my inked glass gems to help make it easier to see the color on the transparent surface. It was pretty much an abject failure. I figured I could make it work, now that I know so much more about inking...well...we're not quite there yet, apparently. I chose some large flat glass gems. I think I picked these up at Walmart ages ago. I don't know if they still sell them. But you can usually pick up large flat glass marbles /gems at craft stores. Or pick up cabochons somewhere that sells jewelry making supplies. I used a paint brush to apply the ink to my gems for this project, but a felt applicator also works well. I started with a layer of Ranger Mojito (green) and added Pinata Baja Blue . I dipped my paint brush i