Posts

Showing posts from 2021

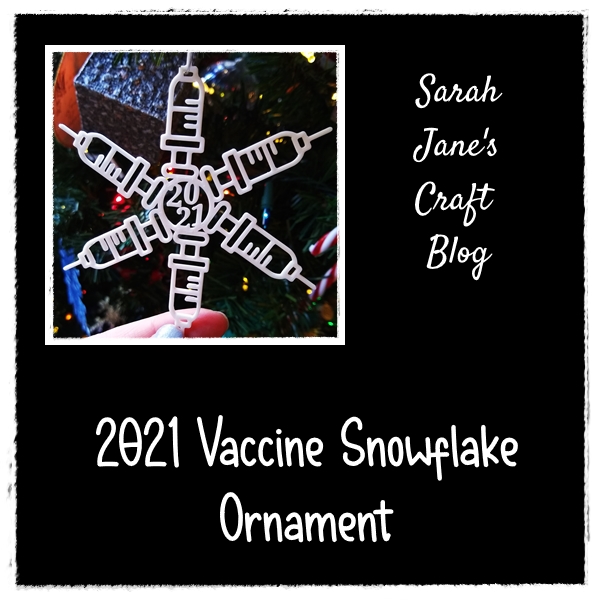
3D Printed Hollow Christmas Trees

Image
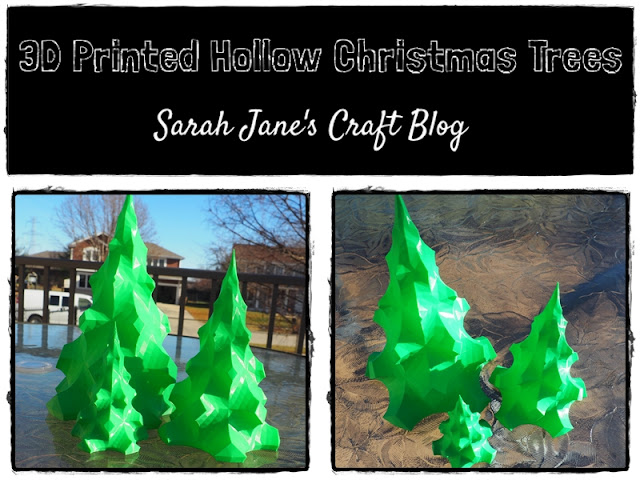
I have one last holiday print project to share with you for the year. When I first started looking for Christmas projects to print, I immediately knew I wanted to try these fancy Christmas Trees . This project was the first time we used the "vase mode" option to print a hollow design on our 3D Printer . We used some green PLA filament to print these in .2 resolution with 0% infil and checked the "Spiralize Outer Contour" box under Special Modes in Cura. These are so much fun to watch as they print. And, because they are completely hollow, they print pretty quickly for their size. I went and read a few chapters of my book and came back to check on the print past the half way mark. And then I checked again when it was almost complete. This original files for these trees are a bit bigger than what I can print on our little Ender 3, so I had to downsize the trees a bit, but I had a lot of fun trying out all the sizes. The odd thing is that they feel fairly sturdy for b

Ornament Extravaganza Wrap Up

Image
  With new ornament project posts for the last 12 days, I hope you all managed to catch some of this year's Ornament Extravaganza! If you missed any of the ornament projects (or if you want to check out some from the collages of past year's projects), be sure to check out the Sarah Jane's Craft Blog Ornament Collection . I thought I'd share one last 3D printed snowflake to finish off the Ornament Extravaganza: If you'd like to print your own, you can find the design here: Snowflake Ornament . I printed the one above at 50% to make a small flake. I hope you all enjoyed this year's Ornament Extravaganza! Happy Holidays and Happy Crafting!

2021 Vaccine Snowflake Ornament

Image
When I came across this pattern on thingiverse-- Snowflake Vaccine Christmas Tree Decoration 2021 -- I knew I needed to print some to commemorate the year. I used standard settings (.2 resolution and 20% infil) on our 3D printer and used white PLA filament to print the vaccine snowflakes. It printed perfectly in hardly any time, so I quickly made some more to share and hung mine up on our Christmas trees. Merry Christmas and stay safe out there!

Ombre Alcohol Inked 3D Printed Ornaments

Image
When I came across these stained glass inspired geometric ornaments, I knew they would be perfect candidates for alcohol inking. So I printed the set on our 3D printer using standard settings (.2 resolution and 20% infil) using white PLA filament . They printed pretty cleanly even though they were small and fairly detailed. Next, I got out my craft mat and my alcohol inks. I used a felt applicator to stamp 3 colors on each ornament. For the first ornament I used Limeade , Botanical , and Bottle . I started by stamping the lightest color on the top of the ornament (with just the Limeade on the felt of applicator), then I added a stripe of Botanical in the middle (of the applicator and then to the ornament) and then added the Bottle last. I tried to blend the ink just a bit as I transitioned from color to color. For the blue ornament, I started with Cloudy , then Sailboat , and finished with Cobalt . Then I set up a purple to pink ornament. This one used Vineyard , Boysenberry , and

3D Printed Snowflake Ornaments

Image
So, I may have gotten a little obsessed with printing snowflake ornaments. But they were so quick and easy to print in  white filament , that I just kept finding more I wanted to try. The first snowflake I printed on our 3D printer from this collection was this fractal inspired snowflake . It's recommended that this one is printed at 100% infil, but I don't think it's required. I honestly can't remember what I set mine at to print (that's the danger of printing several ornaments). This one I call the basic snowflake . It printed perfectly, but was a bit plain compared to some of the others I tried, so I only took some finished photos of the flake. It's a perfectly lovely snowflake. This one I call the dainty snowflake , because it printed so small and fine. I had to massively upscale the file for this pattern to get it to print to be a couple inches in size, and it still turned out to be this lovely lacey snowflake.  This one is so nice and dainty, that I might

3D Printed Snowflake Ornaments with Metallic Alcohol Ink

Image
These snowflakes were one of the first flat ornaments I printed on our 3D printer . They printed quickly and turned out so nicely that I just kept on printing them. This snowflake ornament pattern  was printed using standard settings (.2 resolution, 20% infil) with white pla filament .  They printed so nicely that I made a second, and then I made a third, and then I printed a fourth. So I had to figure out what I was going to do with all of these snowflake ornaments. So I got out my craft mat and decided to ink them with a little bit of metallic ink. I started by inking them with some pearl ink . It's a white ink with some metallic shimmer. I used a f elt applicator to stamp the ink all over the ornaments. It was subtle. It did turn out shimmery, but it was hard to see, and Christmas is no time to be subtle. So I decided to add some silver ink in with the pearl ink and see if I could get more of a silvery shimmer that was a bit more visible. Ah, that's more like it. It had a

3D Printed Ornament Holder Tree

Image
Taking a break from the ornament extravaganza to post an ornament holder project that we printed. This ornament holder looked like a fun project to print. Unfortunately our 3D printer isn't terribly big, so I had to print it at reduced size. It prints in two pieces (the tree and the base), and there are a few different base shapes to choose from. I printed this project with green filament using standard settings. I was able to find the perfect tiny ornament to feature. It's definitely one I'd like to print a bit bigger if I can manage to squeeze a bit more size onto our print bed.

3D Printed Star Ornament with Gold Alcohol Ink

Image
Another 3D printed ornament to add to the collection. This time we went with a 5 pointed star printed in white filament . I used some Pinata brass on a felt applicator to stamp some gold ink onto the white ornament. It was a bit hard to get even coverage on this one, so I had to stamp quite a lot and reload the felt several times to get an even gold color all over the ornament. Once it was dry, I sprayed it with some Kamar Varnish and hung it on my tree. The final photo shows it much paler than it is in person. The ornament has a pretty even coat of gold ink on it--perfect for the tree.