Posts

Showing posts from January, 2016

Dripped Alcohol Ink Domino Pendants

Image
If you've been following the blog, you know that I snagged an incomplete domino set over Christmas break and I've been putting them to good use. Today's project used a different technique than my last domino pendants ( which used stamping ). This time I brought out the canned air and dripped my alcohol ink on to create a marbled effect. Unfortunately this tutorial needs to start with a little cautionary tale. I started these thinking they'd be a quick easy project, but they took longer than I expected, and I ran into some snags along the way. I began the way I do with all of my ink projects, I laid out the craft mat and selected my inks. I dripped the ink onto the dominos and used some canned air to blow the ink around, but I soon realized that the ink was pooling under the domino, and even with the canned air (spraying it all over), the ink was tacky and not drying quickly. So I ended up with lots of smeared ink and a craft mat that looked like a colorfu

Alcohol Inked and Embossed Domino Pendants

Image
A little recap of this week's and last week's posts in collage form. Check out the tutorial for part one here and part 2 here .

Embossed Domino Pendants

Image
If you read last week's post  where I played around with stamping alcohol ink on some dominoes and were wondering what the heck I was going to do with them--today's your lucky day! I sealed the dominoes with some clear acrylic sealer  so that the ink wouldn't smudge, scratch, or have any issues with bleeding when stamped. Last Thursday it was warm...like almost 50 degrees, which is unseasonable for January. Today's high was 2 degrees, so I'm glad I got the dominoes sealed when I did. Spray a very light coat at least a foot away from the dominoes at first and then wait like 30 seconds before giving them a good spray to avoid any stippling. Then flip them over and repeat.   After the sealer had dried, I grabbed my embossing stuff ( heat gun , embossing powder , VersaMark ink pad , and a random assortment of stamps). I picked this scroll pattern stamp and stuck it to a stamp block. After tapping the clear "ink" from the VersaMark sta

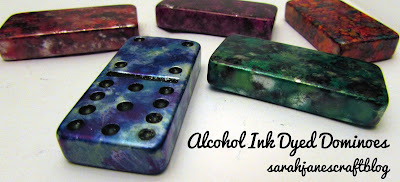
Alcohol Ink Dyed Dominoes

Image
Over Christmas I managed to snag an big set (double twelves) of dominoes. They were well used and missing two of their numbers, so they were perfect to craft with. They seemed like perfect candidates for alcohol ink since they are a smooth non porous surface. I grabbed my craft mat , inks , applicator , and some rubbing alcohol. My first step was to make sure they were clean of dirt and oil from being handled. I used a paper towel and rubbing alcohol to clean each domino. After inking my first domino, I set up two applicators with two different sets of colors dripped on them so that I could dye two dominoes at once. This worked out pretty well since you need to dye a side, let it dry for a minute, and then flip to another side. I started on the backs so that the fronts wouldn't be marred or full of fingerprints. The only downside is that the colors are more separate when you start and begin to mix a bit on the felt by the time you stamp the front of your domino

Best of 2015 Craft Projects

Image
It's the first post of 2016 which makes it a great opportunity to reflect on 2015's craft projects. I've selected the top 5 (well 6--there was a tie) most popular posts of the year (based on web traffic) and a few of my favorite projects. Most Popular from 2015 1. You may notice a bit of a trend with the most popular posts this year. The top 3 are all glass gem alcohol ink projects. Go figure. The number 1 most popular post of 2015 is my post about making glass gem necklaces . 2. My second most popular post was making alcohol ink decorated glass gems into magnets . 3. Number 3 on this year's list is backing alcohol ink gems with aluminum foil . 4. My 4th most popular post was actually a bit of a flop. It was my attempts at using Sharpies and rubbing alcohol to create an alcohol ink type effect on tiles . The above photo is when the tiles were still wet, they didn't dry nearly as vibrant, but I document the whole process if you&#