Posts

Showing posts from September, 2015

Mod Podge Jack O' Lantern
Image
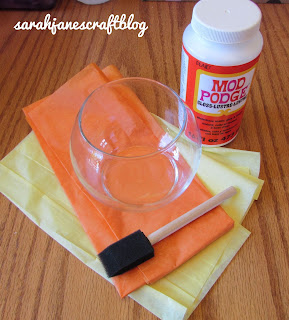
Last Halloween season I decorated some Dollar Store Altar Candles for halloween, this year I grabbed a round bud vase from Dollar Tree and decided to make it into a Jack o'Lantern. I grabbed some orange and yellow tissue paper and tore the orange paper into chunks. You could put it on in strips too, but whole sheets over the round surface would bunch in odd places, so I tore it for a rustic pumpkin look. I glued the chunks of tissue paper all over the surface until it was covered. Then I covered the outside of the tissue paper with mod podge . Then I cut out two triangle eyes and a mouth out of yellow tissue paper and tapped them onto the wet surface. Then I painted over them with the glue to seal everything in. When I was done, I was left with a nice pumpkin jack-o-lantern candle holder (or candy holder if you rather).

Dripped Alcohol Ink Vase

Image
Most of my alcohol ink projects lately have involved stamping the ink onto the surface, I felt it was high time I did some more drip projects. I even bought myself some glass eye droppers, but I didn't end up using them with the rubbing alcohol/blending solution because the drips were turning out so nice and vivid that I didn't want them to blend. I flipped the vase over so I could drip from the bottom, and I started out going around my vase with a bright shade of blue ( sailboat blue ). I made a point to drip lines of different lengths so the finished product wouldn't look too uniformly stripey. Next I added some green ( clover ) and some purple ( purple twilight ). I just continued to drip around the vase with each color in varying lengths, filling in as I went. Then I added some red ( watermelon ), some orange ( sunset orange ), a little lime green ( citrus ), and a little pink ( raspberry ) before coming back with the colors I used fi

Butterfly Watercolor Painting from a Photograph

Image
If you've been following the blog lately, you know that I've been teaching myself to paint with watercolors. Up through now I've been posting youtube tutorials and my results of following along. But today, it's time for my own tutorial. This week I painted from a photograph. I did a google search for butterfly photos on flowers and found the photo above (I don't know who originally took it, it was on a bunch of free wallpaper websites so I don't have a credit). I knew I wouldn't get all of the fine details of the butterfly in the painting since watercolor painting is sort of impressionistic in nature, but I did my best. The first step is to make a sketch on your watercolor paper. I like to tape the paper to a foam board so that I can easily turn the painting as needed. Using binder clips would work too....or an easel if you like to paint vertically. Use a light touch with your pencil so the lines aren't still visible after it's been pai

Butterfly and Tulip Watercolor Painting Tutorials

Image
I stumbled across some more watercolor tutorials to aide in my ongoing project to learn how to watercolor paint. They were a collection of old videos posted on an art supply store's youtube channel. These both come from Susan Sheewe and are very quick and easy (well they seemed easy :)).  I had wanted to paint some butterflies and this one made the whole process look like a piece of cake. It was a quick painting, but I felt like the butterfly wasn't the right shape when I was finished. After it dried, I widened some of the wings just a smidge and painted in a background with a light cerulean color wash. The painting flattened out a bit more as it dried, but I decided I didn't like working on 80lb watercolor paper that I had. The paper warped too much from the water, and the paint behaved differently on it. I believe it came with a kit, so I'll stick with the slightly more expensive stuff. Next I decided to watch a video about painting tulips--one of