Posts

Showing posts from December, 2022

Turning Perler Beads Characters into Christmas Ornaments

Image
Earlier this year, I made some Perler bead characters from a kit off of Amazon . Since I've been slowly but surely making ornaments for a small tree themed after Harry Potter , I thought it would be fun to turn the Perler bead characters into ornaments. This is a pretty quick project. On most of the characters, there was a center bead in the top rows of beads. I used a vinyl pick (but an awl or large metal needle should do the trick too) to poke a clean hole through the middle beads. For some characters, there isn't a middle bead, so to keep the ornament hanging mostly straight, I made a new hole between two beads in the middle. This required using a lighter to heat up the metal of the vinyl pick and then to poke a hole. Once the holes were poked, then I added a jump ring (small metal rings that are sold with the jewelry supplies) to the hole and pinched it closed with a pliers. Once the jump rings are added, you can use a cord or thread or, like I did, just an ornament hange
Alcohol Inked 3D Printed Ornament Blanks with UV Resin

Image
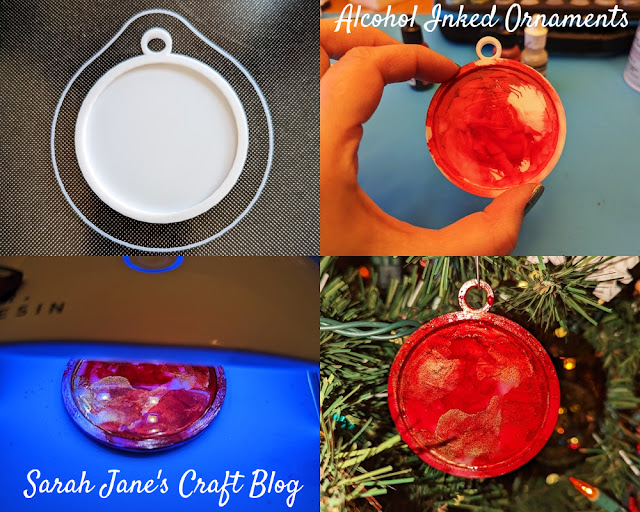
A couple of weeks ago, I posted a project where I printed ornament blanks on our 3D Printer and then topped them with recycled Christmas cards and UV resin . The blanks turned out so well, that I thought it would be fun to try to ink them. I've used alcohol ink on tons of ornaments (from plastic to glass to wood to ceramic ) and have had mostly good results, so why not. I have inked on 3D printed plastic before, but I've only stamped it (like these ornaments from last year) on. The reason I've only ever stamped 3D printed plastic is because of the grooves that are left from the printing process. The ink soaks right into those lines. So, I had an idea, why not put a tiny bit of resin on the bottom of the ornament to seal up those grooves. So I printed 3 ornament blanks and two of them got the UV Resin skim coat. As you can see in the first photo, I put very little resin on the ornament. Then I used a small piece of cardboard to swipe it around the ornament. Unfortunatel

3D Printed Geometric Snowflakes

Image
I'm at it yet again this December. I've fired up the 3D printer and can't help but print any pretty design for an ornament I can find. These little flat ornaments are so satisfying. They take very little time and filament and turn out so cool. This time, I found a set of geometric snowflakes . I printed these using standard settings (.2 resolution, 20% infil) with white PLA on our printer ( Ender 3 v. 2 ). Each snowflake took about an hour and a half to print. I actually was only going to print 3 of these (only, I know, I may have a problem), but they turned out so well, that I grabbed the whole set.

3D Printed Ornaments with Recycled Christmas Cards and UV Resin

Image
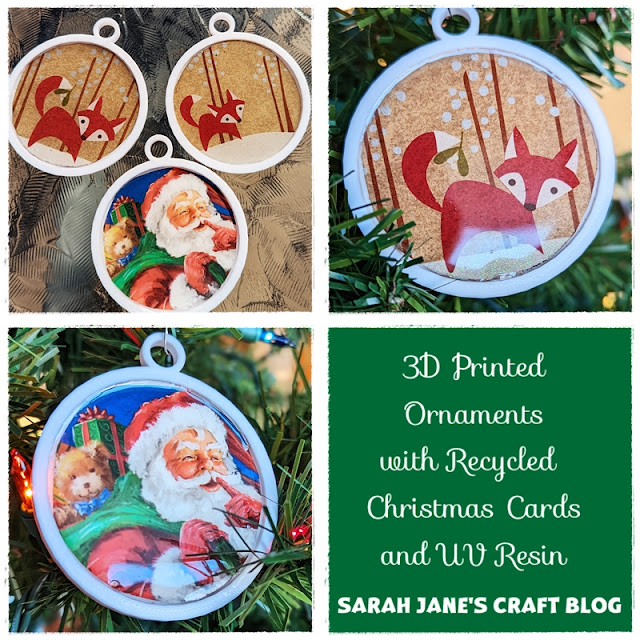
Last year I went a bit crazy printing Christmas ornaments on our new 3D printer . This year, I'm being a bit more selective. One of the things I knew I wanted to find a design file for was a good ornament blank. I knew I could do all sorts of fun crafts if I found a good one. Well I found the first one to try from someone who made and advent tree using these blanks . I followed the recommended settings (.16 resolution and 100% infil) with white PLA . The 100% infil made them pretty solid and meant that a fairly simple print still took an hour and a half to complete. After I managed to print a few of the blanks, I went through my stash of old Christmas cards which I save like a total craft hoarder (but it's not the first time I've used them: Recycled Christmas Card Ornaments ). I found a plastic lid that was really close to the the size of the inside ridge of the ornament blanks and used a pen to trace around the circle on the greeting cards and carefully cut them out. In t