Posts

Showing posts from August, 2018

Flamed Alcohol Inks on Glass Gems (Flat Marbles)

Image
Decorating glass gems with alcohol ink has been one of my most popular projects over the last several years. They are so much fun to make and make wonderful little necklaces or magnets . But I've been on this kick with alcohol ink where I try new application methods and flaming the ink has been a ton of fun. I've tried it on several different glass and ceramic surfaces, so I decided to give it a try on the gems. Honestly, I didn't think it would work very well. I grabbed some of my flawed gems from a batch I bought at Walmart to give it a try. If it didn't work, no big loss--the gems all had blotches or cracks in them. I laid them out on my alcohol ink flaming surface (a cookie sheet covered in tinfoil on top of a cork trivet) and dropped some ink on them and lit it on fire with a long handled lighter . To start, I just did a drop or two of alcohol ink . I didn't thin it with any rubbing alcohol since it was such a small area. the ink spread across
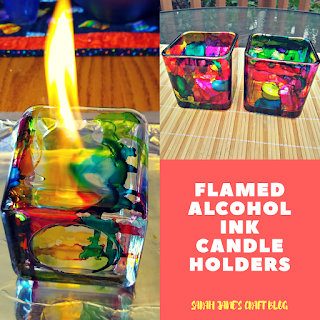
Flamed Alcohol Ink Candle Holders: Bright Colors

Image
I've been a bit addicted to setting alcohol ink on fire. Last month I tried my first set of candle holders and had so much fun that I thought I'd try some with more colors. So, when I went to Dollar Tree and saw the square candle holders, I knew their flat-ish sides would be a great choice for some flame inking. I set up my work station with a Teflon craft mat  to protect the table from heat and ink splashing. I then put a cork trivet under an old aluminum cookie sheet that I covered in foil. Then I filled a small container with some 91% rubbing alcohol and an eye dropper. Then I wiped off my candle holders with a paper towel that had a little rubbing alcohol on it and grabbed a lighter and some bright colored alcohol inks. After I set out everything I needed, I cleared all of the alcohol based liquids away from my cookie sheet and dripped a bunch of ink on one of the sides of the candle holder. Then I squirted a bit of rubbing alcohol onto the ink and lit

Back to School Office Supply Craft Collection

Image
It's that time of the year again....time to get excited about going back to school (or to buy office supplies on sale). Click here for the Collection: Office Supply Collection

Rubber Cement Resist with Alcohol Ink

Image
If you've been to this blog before, you know I like to use alcohol inks in my crafts. I'm always searching for new ways to apply the ink and new things to ink. I've tried some hair brained ideas over the years that I hadn't seen any one else try yet just to see if they'd work (like using wax paper to apply alcohol ink ) and they're always fun to try even if they don't work as you'd expect them to. So today's craft is another experiment with alcohol ink. I bought some rubber cement when I saw it on sale with the school supplies. I had the idea that I could use it as a resist (sometimes folks use it as a poor man's masking fluid/frisket for watercolor paintings). I started out by trying to brush it on in a shape....but I knew that would be a real challenge (maybe it would work with a cardboard stencil, but just being brushed on wasn't going to work). So I wiped the glue off of the ceramic tile and started again. This time I

Crafting Revisit: Galaxy Candle Stars

Image
Earlier this year I got on a bit of a galaxy spray paint kick. I sprayed composition notebooks and chipboard boxes and some dollar store altar candles . The process was pretty simple--spray it black and then swipe stripes of other galaxy-ish and nebula-ish colors over the top. I was really satisfied with the way they turned out (hence the three different projects). But for some reason the candles always looked a bit flat to me. So I decided to add some stars. I started out with my spray painted altar candles. I grabbed some tiny paint brushes and some craft paint and a paper plate. As I was assembling my supplies, I decided to go searching for nail-heads that would make good star-like dots. I raided my stash of hardware supplies and tested out a round bamboo toothpick, several nails, and my two tiny paintbrushes. I ended up really liking the first few that I tested. The toothpick and a finishing nail made nice tiny little dots. The more you tapped the paint on the

Soft Aqua Wash Alcohol Ink Candle Plate

Image
I've decorated a few of these mirrored candle plates from Dollar Tree in the past. I made one with flamed alcohol ink . I tried out stamping ink on the mirror , too. And I even tried out a regular drip and canned air blown ink method on my first mirrored plate. So I decided to try out a loose color wash method on the candle plate. I got out my craft mat , a can of air , some alcohol inks , and a small container (finally found a use for the Oui yogurt container I had lying around) with 90% rubbing alcohol and a glass eye dropper . I started out with a generous squeeze of some Clover ink on my mirror. Then I put 3 or 4 big drops of rubbing alcohol on the plate to thin everything down and move the ink around. I added some Turquoise and Stonewashed ink and moved it around with my can of air. I kept adding ink and rubbing alcohol and moving the ink, around until I had the plate nearly covered. Then I added some Gold ink/mixative and mixed th