Posts

Showing posts with the label suncatchers

Moon Lithophane Ornament Suncatcher

Image
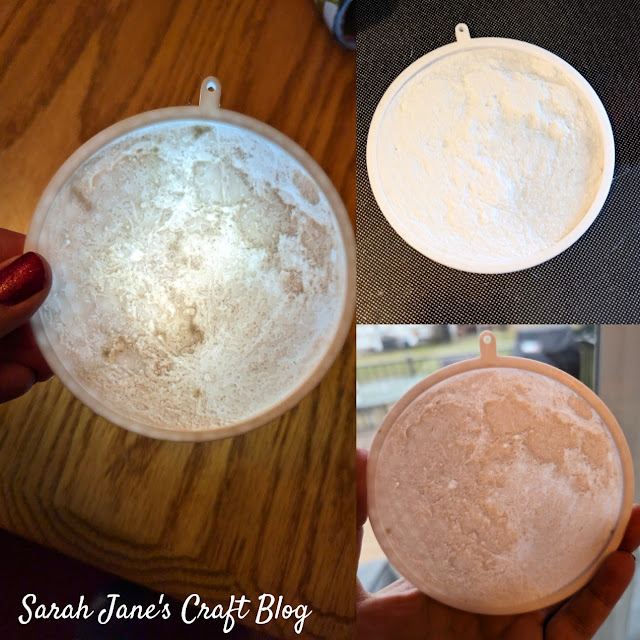
I had an idea to turn a photo my brother took of the moon into a lithophane, so I thought I'd share with you how I made it happen.  NASA has images of the moon that will totally work for this project, too. I used the website lithophane maker  to crop my moon photo down to a circle and adjusted the size of the frame and hang tag. It took a bit of fiddling to get it set up the way that I wanted. Once I was happy with it, I imported the file into my slicer and just used standard settings (.2 resolution and 20% infil). If I were to do the project again, and I think I will (Pluto is calling my name), I'd set it to 100% infil so you don't get any shadows of the shapes the printer makes coming through in the final print job. I printed it on our 3D printer with white PLA . The print took about 3 hours, and we had to run it a few times because our printer was struggling with burning filament (leaving dark marks on the print). We turned down the temp to 190 degrees, and it seemed to...

3D Printed Ghost Ornaments or Suncatchers

Image
Made a quick 3D Printing project this week to share with you. These ghosts were a fast and easy print.  I set up our printer with some white PLA filament and set the pattern to standard default settings (.2 resolution and 20% infil). Since it was a flat print, I opted not to print a skirt or a brim and just sprayed the bed down with hairspray for bed adhesion. The print went fairly smoothly, though there were some dark spots early on in the print. They were mostly covered, but I'm guessing this would work better if your last print job was also with white filament. They took a couple of hours to print all three ornament/suncatcher ghosts and they came out pretty well. The sun's angle didn't make for a good photo in the window, but you can see (below) that the infil shows through when hanging it in the window (to avoid this, set it to 100% infil). These are only a few inches tall, so I might try printing one of them big to see how it goes. If I do, I'll share it with y...

3D Printed Faux Stained Glass Cardinal

Image
I was browsing Thingiverse looking for things to print when I had the idea that I could make a faux stained glass suncatcher using UV resin. So I went looking for stained glass frames that I could fill, and found that someone went to the trouble to design a few of these lovely faux stained glass birds--including designing the "glass" pieces to snap into the frame. So I figured I had to try it out. I selected the cardinal because it was only two colors (and they were two colors that I had). I printed the frame in black pla . The instructions suggested using 100% infil for the interior "glass" pieces (so you couldn't see the infil pattern--unless that's the look you're going for). I opted to set all the pieces to 100% infil and standard resolution (.2). The frame section took about an hour and a half to print on our printer . This print was pretty easy except that there were 10 separate pieces that needed to be printed. Our printer has a tough time with ...

3D Printed Window Pumpkin

Image
I came across this cute window pumpkin and new it was the perfect 3D printing project for a busy week in October. I loaded some orange PLA into our 3D printer and set up the file using standard resolution (.2) and 40% infil. The designer of this print project was really smart to put in those divots in the bottom of the design so that when the print project was finished, it was easier to pull up from the bed. The project took about 4 hours to print in total. The finished print came out super smooth. I was really happy with the finished surface. The pry divots worked perfectly. I was able to pop it up off the print bed after letting it cool for just a little while. I used a small suction cup to hang it in the window. You can see the infil pattern and the pry spots when the light shines through it, so be sure to pick something that you'll like the look of.

3D Printed Easter Ornaments

Image
After last week's printed Bunny Egg Holders , I was on the search for more Easter themed print projects for the 3D Printer . I came across these Window Picture ornaments with Easter scenes and knew they'd be a quick and fun project. I printed the first Easter ornament using standard settings (.2 resolution 20% infil) using white PLA filament . The first ornament printed perfectly. It took a couple of hours to print, so I started up a second different design right after it finished. Since it finished when it was dark, I didn't get any pictures of the second one printing, but it turned out perfectly just like the first one. I've got these hanging in a window right now (just as the original designer intended), but I'm sure they'd look great hanging up just about anywhere in the house this time of year. Check out more Easter projects here: Easter Craft Collection Check out more 3D Printing projects here: 3D Printing Collection  

Thanksgiving Faux Stained Glass Panel

Image
I've been wanting to try this project for quite a while. Ever since I tried making faux stained glass panels with inked laminating pouches , I wanted to try making more traditional stained glass panels by painting the ink in between the sections of the vinyl. Of course, since it's a project I wanted to try for quite a while, that meant that nothing went according to plan. I tried doing this project last week, but after cutting a Thanksgiving/fall themed design out of vinyl on my old Silhouette , I tried weeding (removing the excess vinyl) and realized that most of the design didn't cut properly. So, I tried again. This time I set it to cut twice and put the vinyl on the sticky cutting mat (instead of directly off the roll). Well, about halfway through the cut, I realized what was wrong...the blade wasn't all the way down in the blade holder (facepalm). So I ended up cutting a third time after I fixed the blade, and of course, it was perfect. So this time when I weeded t...

Hanging Faux Stained Glass Panels (Made with Laminating Pouches, Alcohol Ink, and Vinyl Decals)

Image
Previously on Sarah Jane's Craft Blog : I made some faux stained glass panels by alcohol inking the inside of laminator pouches and then applying stained glass patterns that I cut out of vinyl on my Silhouette Cameo . It's been a busy couple of weeks here, but I finally managed to get my plastic "stained glass" panels hung up. I went into my sewing kit and grabbed the largest metal needle I could find and then used a lighter to heat the tip. I held it in the flames for a ten count to warm the needle. Then I stuck the warmed tip of the needle into the laminating film to create a small hole. Be careful with the needles. I grabbed it in the center once and almost burned my finger. Make sure to only heat the very tip and to only hold it on the eye end. Then I used fishing line to string up the panels. I tied a square knot in the fishing line and then poked it through the hole in the plastic panel to hang. I even connected my small squares into a hanging trio.  This m...

Faux Stained Glass made with Alcohol Ink, Laminating Pouches, and Vinyl Decals

Image
A couple weeks ago I made some rainbow-colored sheets of plastic with alcohol ink and some laminating pouches. I turned those sheets into some Easter Sun Catchers with the help of my Silhouette. I dripped ink onto the inside of the laminating pouches and then ran them through the laminating machine . I only ended up using one of the plastic sheets to make my Easter Sun Catchers, so I had two leftover pages of rainbow-colored plastic. I found some stained glass designs with a quick google search. I think this one might be a coloring page, but it was the right size, and I liked the pattern, so I traced it in Silhouette studio and sent it to the cutting machine using the preset settings for vinyl. I designed two pages of decals (since I had two sheets of rainbow plastic). I cut them out of my machine and trimmed off the excess vinyl (since the laminator sheets are 9 x 12 ish and the vinyl is 12 inches--if I had been smart, I would have cut 12 x 18 with the designs turned on their sides...