Posts

Showing posts with the label melted beads

Turning Perler Beads Characters into Christmas Ornaments

Image
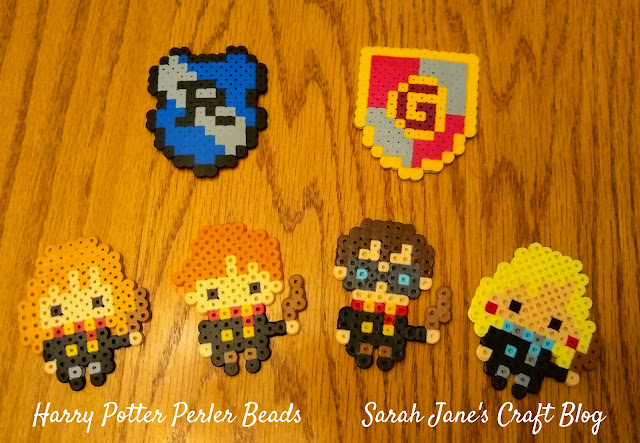
Earlier this year, I made some Perler bead characters from a kit off of Amazon . Since I've been slowly but surely making ornaments for a small tree themed after Harry Potter , I thought it would be fun to turn the Perler bead characters into ornaments. This is a pretty quick project. On most of the characters, there was a center bead in the top rows of beads. I used a vinyl pick (but an awl or large metal needle should do the trick too) to poke a clean hole through the middle beads. For some characters, there isn't a middle bead, so to keep the ornament hanging mostly straight, I made a new hole between two beads in the middle. This required using a lighter to heat up the metal of the vinyl pick and then to poke a hole. Once the holes were poked, then I added a jump ring (small metal rings that are sold with the jewelry supplies) to the hole and pinched it closed with a pliers. Once the jump rings are added, you can use a cord or thread or, like I did, just an ornament hange...

Harry Potter Perler Bead Kit

Image
  I had grand plans to do a bunch of crafting this week, but all I got done was melting some Perler beads. It turned out to be a ton of fun and a good bit of redemption since the first time I tried melting Perler beads, it was a pretty spectacular fail . I got this Harry Potter set to play with. It is a really nice kit with good projects for beginners. It has everything you need except....the tweezers. I strongly recommend tweezers of some kind. They'll make picking and placing the beads a lot easier. The kit comes with the large red plate and the patterns and all the beads you need to make them. I selected some of the smaller designs to get started and was able to fit two of them on the plate. I had the small green plate from my previous kit and was able to fit another design on it. But, since I struggled with my first Perler project, I ironed this set of designs without taking pictures. It went well, so I documented the next set. I did Hermione, Ron, and Luna in the next batch a...

Perler Bead Fail

Image
I'm not sure how I managed to make it to 36 without ever having used Perler beads, but here I am. I saw some cute projects using the melting plastic beads while I was browsing Pinterest and craft blogs, so I figured it might be fun to give them a try. I found a kit that included a mix of different colored beads, peg boards, ironing paper, and instructions for creating mandala patterns. I figured that would be a little more grown up than some of the other options and bit the bullet. The kit costs $6-8 and contained everything I needed to give these beads a whirl. After reading some tutorials online, I sprung for the tweezers (I have big hands and figured I'd be swearing if I didn't). The first thing I found out is that the bucket looks bigger in photos online than it appears in real life. The bucket is about 6 inches by 5 inches. They do manage to cram a lot of stuff into the little bucket though. It even comes with 3 peg boards (one is shrink wrapped to the li...

Pony Bead Sun Catchers: Valentine's Edition

Image
This fall I made some sun catchers out of melted pony beads using a muffin tin.  Then, I made some Christmas ornaments by melting the beads in cookie cutters.  I made a couple of heart shaped ornaments that look fantastic as Valentine's Day Sun Catchers. Check out the linked posts for full instructions! Here's a photo of one of the hearts right after I pulled it, cooled, out of the cookie cutter.  It just needed a little love from the dremel (to knock down some edges and drill a hole) before it was hung up.  Whether on the tree or in the window, these look fantastic!

Melted Pony Bead Ornaments

Image
A few months back I melted plastic pony beads in a muffin tin to make some cute rainbow colored sun catchers . I had just enough beads left to make another project, so I thought I'd try my hand at melting some in cookie cutters.  I lined a pizza pan with tinfoil and arranged my cookie cutters. Next I filled the cookie cutters with a single layer of beads.  Instead of mixing all of the colors together, I sorted them and put 2 or 3 different complimentary colors in each one. Next I used the same method for cooking the beads as last time.  I preheated the oven to 400 degrees and opened a bunch of windows (be sure to do this on a day you can open windows--it stinks).  I let them cook for about 30 minutes before they were mostly flattened.  One the cookie cutters didn't work so hot--the beads didn't melt into the crevices, and so it had to be tossed after melting.  But the rest all turned out great. They all popped right out of the cookie cut...

Plastic Pony Bead Suncatchers

Image
Recently I saw some really neat projects made by melting plastic pony beads (you know, the kinds kids use), so I thought I'd give it a try.  I wanted to use the tartlet pans shown in this tutorial , but alas, we don't have a Dollarama and I didn't see any at our local Dollar Tree.  So I thought I'd try using muffin tins.  All of the tutorials I had read said the plastic doesn't stick once it cools, and my muffin tin is a cheap one, so I wouldn't be out too much if I had to replace it (thankfully, I didn't). Next I picked up some pony beads.  You can get these in bulk for about 6-8 bucks a pound, but I didn't think I'd need that many, so I bought two 500 count bags of translucent beads from Wal-mart for $1.97 a piece.  I still have plenty left for another project and I won't have a ton laying around that I won't use. I made six little suncatchers in half of my muffin pan. For 5 of them, I just dumped some beads in it and sho...