Posts

Showing posts from 2023

Christmas Ornament Collection

Image
  Merry Christmas! Check out all of the Christmas ornament projects on the blog .

3D Printed Gingerbread Man Ornament

Image
Last week I printed a sorting hat ornament, so when I was trying to decide what to print next, I immediately went looking for other ornaments that I could print with brown filament before I switched to another color. So, with that in mind, I found a cute gingerbread man inspired by Gingy from Shrek.  A gingerbread man was the perfect thing to print on our printer with the brown filament I already had loaded! So I sliced the design using .2 resolution and the recommended 80% infil. Gingy took about an hour to print and turned out so well, that I went ahead and printed a second. Of course, I could have gone to the trouble of pausing the print and finishing the icing with white filament, but I've never done that before, so I wimped out and opted to paint the icing. I tried a few methods which failed miserably (see the messy job above). I tried spreading a thin layer on a paper plate and stamping the ornament. It didn't transfer much paint, so I used a foam paint brush to "

3D Printed Sorting Hat Ornament

Image
If you're a regular blog follower, you may know that I have a small Harry Potter tree that I've been creating ornaments for over the years. This year, I stumbled upon a design for a Sorting Hat ornament and immediately knew I needed to print it.   I used the recommended settings for an earlier version of the Sorting Hat (.2 resolution and 25% infil) and used some brown PLA on our 3D Printer . The print took a bit over 2 hours and came out great! After I took a few photos, I immediately hung it up our our tree!

3D Printed Rudolph the Truffle Nosed Reindeer Ornament

Image
This week I printed a cute design for a reindeer ornament with a nose the perfect size to fit a Lindor Truffle.  I printed the design on our printer using standard resolution (.2) and the recommended 15% infil. I used some matte brown PLA . They took about 50 minutes to print and came out great!   

Using a Scorch Marker on Wooden Ornament Blanks

Image
During the fall Prime Days, there was a sale on Scorch Markers . I saw these online a while back and thought that they looked super cool--you can burn wood without using a wood-burning tool, and since it's a marker, you can use stencils. This is not a sponsored post, I purchased this marker and thought I'd share how it went when I used it for the first time. A few weeks ago, I cut a bunch of designs out of vinyl with my Silhouette Cameo . So far I've made a bunch of signs , but this time I just used a star cut-out as a stencil. You could easily just cut a star out of some sticky shelf liner or contact paper to achieve the same results without needing to own a cutting machine. I applied my vinyl to some wooden ornament blanks  and got out my Scorch Marker. The marker needed to be primed like a paint marker, but after that, it worked really easily. I colored inside the star outline and outside of the star itself to see how the vinyl worked as a stencil and how the marker w

Thanksgiving Signs

Image
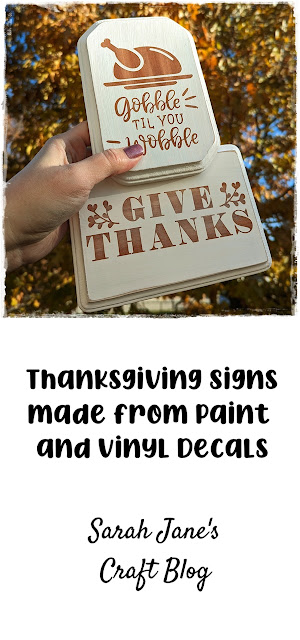
Last week I made a pumpkin spice sign out of a wooden pumpki n from Dollar Tree. The project was working so well, that I opted to turn a few more of the vinyl decals I cut from the week before that. I found some free designs and some freebies from the Sillhouette stores and made 3 pages of cuts all at once out of black vinyl I don't remember where this week's designs came from (that's what I get for cutting a bunch all at once). I used standard settings for glossy permanent vinyl on my old Silhouette and let the machine run. After cutting out all of my designs, I separated the designs from each other using scissors and set them aside for each project. I had a couple of wooden signs from a trip to JoAnne's ages ago that I hadn't made anything with, so after the Pumpkin Spice sign turned out so well, I decided to give them a similar treatment. I painted the signs with a layer of thinned-out brown craft paint and a tiny drip of maroon paint to make it warmer in c

Dollar Tree Pumpkin Sign with Vinyl Decals and Paint

Image
Last week I cut a bunch of designs out on my Silhouette Cameo (v.2--it's an oldie, but still kicking). I made a couple of signs, but I'm back this week with more. This time, I used the vinyl decals as a resist to create a painted sign. I started by setting up a bunch of designs in the Silhouette studio. I think the Pumpkin Spice design came from a page that was doing a free trial.  Then, I cut all the designs out on black permanent vinyl . The removable variety might work for this project (since I'll be peeling it off after painting), but I've used the permanent vinyl before to make signs with paint like this , so I knew it would work and hand it on hand. After the design was cut out, I separated it from the rest of the sheet of vinyl with scissors and got started weeding. I carefully peeled away the excess vinyl to prepare the design. This was so much easier now that I picked up a new blade. Then I set aside the vinyl to prepare the pumpkin. I used some brown and bur