Posts

Showing posts from October, 2018

Etched Glass Halloween Plate and Jar

Image
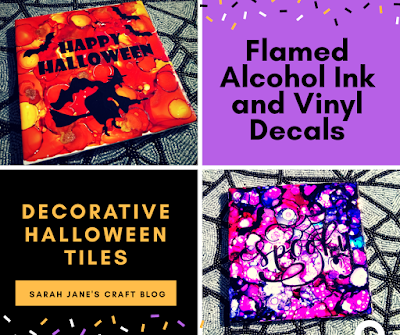
Last week, I cut out a bunch of Halloween shapes in some black vinyl on my Silhouette cutting machine and decorated some ceramic tiles . I had a couple decals left over. They were of jack-o-lantern faces so I knew I wanted to use them as a stencil or resist to make a jack-o-lantern. I knew I had an old jar of Armour Etch floating around in  my craft supplies (I made some candle holders with contact paper a while back), so I decided to etch some glass. I started by using some painter's tape to transfer my vinyl decal. I tore off two strips and used a plastic dish scraper to burnish the decal to make sure it stuck to the the tape. I just started cutting decals on my cutting machine, so I don't have a proper burnisher/squeegee or transfer tape/paper , but this worked fine for this simple design. After the design was burnished, I peeled it up and applied it to a cleaned pickle jar. With the black decal, it's easy to see through the painters tape. I

Flamed Alcohol Ink with Vinyl Decals: Decorative Halloween Tiles

Image
If you follow this blog, you know that I'll find just about any excuse to put alcohol ink on something, and lately, I've been really into lighting alcohol ink on fire . It creates such vivid and interesting patterns in the ink. So when I decided to finally dust off my Silhouette Cameo , I opted to make some Halloween tiles with flamed alcohol ink and vinyl decals. I'm a total beginner when it comes to the Silhouette, but this week I learned how to turn photo files into Silhouette files using the trace option. As long as you pick simple silhouette style (go figure) clip art type photo files, it's super easy, and addicting. So I knew it was also time to learn how to cut vinyl on the darn thing. I bought a roll of black vinyl right after I got the machine, figuring it would be good to have around, but I never used it. Cutting vinyl is actually easier than cutting paper since you don't have to mess with the cutting mat. You just load your media instead of th

Alcohol Ink Pumpkin Gems

Image
A while back I bought some enamel paint with the expressed interest of using it to back alcohol ink glass gems. I tried the white paint first with kind of mixed results ( enamel paint backed glass gems ). But I also bought black paint, and though I haven't gotten around to trying to back the gems with the enamel paint, I had a lightning bolt idea that it would be fun to use the paint under the alcohol ink. Since Halloween is coming up, I decided to try painting jack-o-lantern faces on the glass gems and then ink over them. Enamel paint is supposed to stick a bit better when painting glass (which is tricky since the surface is so smooth). So I grabbed a tiny paint brush and painted little jack-o-lantern faces on the gems. They came out a bit sloppier than I would have liked. I used a little round brush, and I might have had some slightly better luck with a stiffer brush, but I did my best. I also grabbed some metallic acrylic paint from my stash and painted some pumpkin

Adult Coloring Update 2018

Image
  It's been a while since I made a post about adult coloring . The buzz has passed a bit from the activity's height of popularity, but I still enjoy filling in patterns and designs--especially while I'm watching TV. So what's new in the coloring world? Well, you can get coloring books pretty much anywhere now, and the glut of leftovers from the sudden craze of coloring for adults means that you can often find the books at discount stores (or sometimes even on clearance racks).  When you're finding those bargains, pay attention to more than just the designs available. The thickness of the paper, whether the book will open flat (or nearly flat), how detailed the designs are (and if you have the right kind of markers, pens, or colored pencils to color those teeny tiny designs), and whether the book has designs on both sides of the paper all need to be considered to get a coloring book that you'll use and enjoy. I've picked up and been gifted