Posts

Showing posts from March, 2021

Alcohol Ink on Spray Painted Plastic Easter Eggs

Image
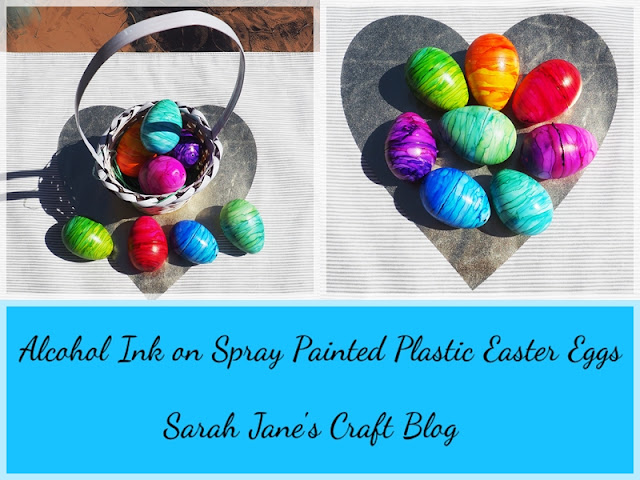
For the last several years, I've tried out various different methods of decorating plastic Easter eggs . I buy them on clearance after the holiday, so I usually have a stash in my Easter box. I have mod podged and spray painted and inked them . This year, I decided to try using alcohol ink on eggs that have been spray painted white. It can be tricky to find the inexpensive plastic Easter eggs in white--they usually come in a variety of pastel shades. Alcohol ink is so much brighter and vibrant when it's on a nice light background. So I grabbed a can of  glossy white spray paint and put some plastic eggs in a cardboard box and attempted to spray paint them. It took several coats with them opened up, then I put them back together and put them into an egg carton and tried to spray paint the sides. They are tricky to paint just because of their shape. I ended up with some paint issues (spots where they touched and some pealing, etc...), so I tried another batch, so I had more o

Alcohol Ink Easter Sun Catchers

Image
Last spring, I had an idea to try using alcohol ink on the inside of a laminating pouch and then laminating it. It worked, and ever since, I've been making sun catchers for every holiday using the technique. Later I discovered I could cut the film on my Silhouette, which opened up even more possibilities. So now it was Easter's turn to get some fun sun catchers. I laid out a few pouches of laminating film and got out a craft mat , some canned air , some rubbing alcohol, and of course, my inks . I opened the laminating pouch and dripped one color at a time (a few drops scattered over the film) and then blew the ink with canned air to spread it out and dry it. I repeated the process with a ton of colors until I had a rainbow-y filled sheet of laminating plastic. To break up the pattern a bit, I used a pipette with a tiny bit of rubbing alcohol that I squeezed over the inked circles to create tiny bubbles/circles all over the sheet. Then I set the sheet aside to dry (open). I

Ombre Spray Painted Tea Tin

Image
Over the years I've spray painted many tins to keep them out of the recycling bin. This past week, the weather here was amazing (for early March), so I decided to spray paint another tin that was destined for the trash heap. I had just finished a tin of Harney and Sons tea and decided to spray it in shades of teal. I grabbed a cardboard box and went out onto the deck to with my spray paint. I sprayed the first coats with the tin open. Spraying most of the tin in the middle shade of teal and then coming back with the lighter and darker shades at the top and bottom. I allowed each side to dry and then rotated the tin and sprayed another coat. With dry times and tin rotation, this first coat took an entire afternoon. I let the whole thing dry overnight and then went over the first coat with a piece of sandpaper to knock down any bumps from the first application (if the spray paint is new--you probably won't have anything to sand off, but my spray paint is old and sometimes

Refurbished Alcohol Ink Switch Plates

Image
Last week on the blog, I wrote an update post about a set of stamped switch plates I made several years ago . One of the switch plates had gotten really scuffed up and needed some love. I hung up a switch plate I inked more recently in its place and got to work trying to refurbish the old switch plate. Since it was a smaller project, I grabbed a sheet of parchment paper and selected a few of the more aqua blue inks and a small synthetic bristle  paint brush . I dripped a single drop of ink on the parchment paper at a time and used the paint brush to suck up the ink and dot it onto the switch plate cover. After I covered all the areas that were scuffed off with my first blue, I let it dry for a an hour or so before I came back with the same process and a different shade of blue. I repeated the process with a few different shades until the white areas were mostly covered or disguised. After the white areas were covered, I decided to add some additional gold/brass ink to break up the

Craft Update: Stamped Alcohol Ink Switch Plates

Image
Over 6 1/2 years ago I decorated my first set of switch plate covers with alcohol ink . Since then, I've made a few more sets , but the only ones that were actually hanging up in my house were these two that I made almost 7 years ago. Well the switch cover that was being used for our closet light, which gets used every day (sometimes multiple times) was showing signs of wear. It had gotten scuffed and scratched. When I made my first set of switch plate covers, I didn't know about all of the good sealants to use on alcohol ink. I used matte mod podge spray because it didn't react with inks (at least not noticeably--which is strange because the glossy mod podge spray definitely does react with inks). I put a couple of coats of it on and called it good. Truthfully, it did pretty well. That light switch gets used a lot. We really only started noticing the scuffs in this last year. They were probably slowly accumulating over time and the pattern helped to hide them a bit unt