Posts

Showing posts from 2016

3D Paper Christmas Ornament

Image
I hope everyone is enjoying a Christmas coma of sorts on the day after. I have one last Christmas ornament tutorial to share with you. If you follow the blog, you know that I recently got a Silhouette Cameo. I'm still learning how to use it, but I thought I'd share one of the projects I did just before Christmas. The Silhouette store has been giving away all kinds of holiday designs since Thanksgiving. So I decided to throw a few of them up on the screen and cut them out of some Christmasy scrapbook paper. The ornaments came out great! They were even easy to peel off of the mat. The other two designs I chose to cut didn't work out as well (one didn't cut all the way through one of the letters and the tree design's cut out didn't look right once it was peeled out). But that's ok, we're here about the ornaments anyway. If you don't have a cutting machine, any ornament shaped cutout can be turned into a 3D ornament. You just ne

Recycled Christmas Card Ornaments (Part 2)

Image
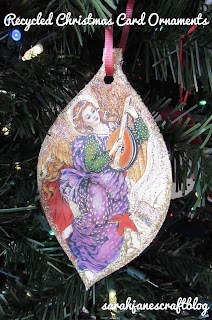
On Monday , I showed you all how I used my Cuttlebug machine to cut a whole mess of old Christmas cards into ornament shapes. Of course, you could just punch holes in them and hang them up or use them as gift tags as they are, but I just had to take it a step further and make them double sided and glittery! I paired up my cut outs as best as I could and punched holes in most of them. I also tried out gluing a silver thread in between the layers on a few--this worked, but was a bit of a pain. After I picked out my two matching halves, I set them on a paper plate and used Mod Podge to glue them together. I spread the glue on with a foam brush. Be sure to put enough glue on that it can absorb a bit and still have enough glue left that you can put the two halves together and slide them around just a bit, but not so much glue that it comes oozing out as you press the halves together. It may take a bit of practice to figure out how much to use. Some of the cards curled up

Recycled Christmas Card Ornaments

Image
I'll admit it, I'm a bit of a hoarder. Especially when it comes to stuff I can use for craft projects. I have a couple of boxes full of greetings cards, just waiting to be turned into something. So I dug out some of my old Christmas cards and some ornament shaped dies that I found a Tuesday Morning earlier this year. If you have a die cutting machine , you could use circles , stars , or ornaments to cut out your cards. If you don't have a die cut machine, a mason jar lid or a star template to trace around would be easy options. I cut out a bunch of different sized ornaments from my cards. I found that it was often easier to run the dies through upside down (A Spacer, C plate , Card, Die, B plate) so I could see what the die was cutting. It worked out fine since the shape was simple and the card stock wasn't difficult to cut. When I was done, I ended up with a pile of paper ornaments. You could hang these on the tree as is or use the ones without wri

Ornament Round Up Volume 2

Image
A couple years ago, I made a post sharing all of the ornaments that I've made for the craft blog over the years. Since then, I've made several more Christmas ornament projects, so it's time to do another round! Shrinky Dink Snowflakes Popsicle Stick Starbursts Button Snowflakes Popsicle Stick Christmas Trees Dremel Engraved Plastic Ornaments Milk Jug Ornaments Check out the rest of my ornament posts on the original Ornament Round Up link. Note: I've been on a bit of a hiatus from crafting due to the end of the semester (this week is finals week) and my grandmother passing away. I'll be back at it next week with a new tutorial!

Milk Jug Christmas Ornaments

Image
So I was browsing the internet looking for some inspiration and came across a couple of projects using milk jug plastic and sharpies . I knew that if sharpies worked, so would alcohol ink . And thus continues my lifelong quest to ink everything that can be inked . So I grabbed a gallon milk jug out of the recycling bin and a scissors and box cutter. You'll need to use a box cutter or craft knife to cut the top off of the jug. After the top has been removed, you can cut the rest of the jug with a scissors. I cut out all the parts that would lay flat. I wasn't left with much. I'm sure there are other types of jugs that would give you more plastic to work with, but I used what I had in the trash. Next, I printed out a star template with 2 and 3-inch stars. Then I used a fine point sharpie and just laid the plastic on top of it to trace. It doesn't need to be perfect. Your scissors will cut a fairly straight line since the material is thick, so yo

Silhouette Cut-Outs and Mod Podge Sign

Image
Last week I made a cut-out on my new Silhouette cutting machine to try it out. It turned out so well that I thought I'd make a little Thanksgiving sign with it. I had originally planned to use a pine board and a brown paint wash or some stain, but when I looked in my stash of supplies, I was all out of boards. I hunted around looking for something to glue the cut-outs to, and my next best idea was stretched canvas. I bought a pack of 6 of them for like $10 at a Michael's sale and hadn't done anything with them for a couple years, so it seemed like a perfect fit. As I was digging through my supplies, I looked at my craft paints. Because my original cut-out was made on an orange leaf-type paper, I was looking for some dark chocolate brown paint. I didn't have any. Before I went into my art paints, though, I saw a pretty dark purple. I held the bottle of paint up to the paper I used, and I thought it looked good in the basement lighting. I brought the paint,

Getting Started with a Silhouette Cameo

Image
Let's start this post off with a bit of a disclaimer. I am a total Silhouette newbie. I've wanted a digital cutting machine for a while. But I'm cheap, so I never caved and bought one until about a month ago when the Silhouette Cameo popped up as an Amazon daily deal. That coupled with enough money in credit card rewards to get it means I totally caved. If you've never seen one of these things, there are several brands, but the big two are Silhouette and Cricut. They allow you to buy or create digital designs and then cut them out on a variety of media (paper, cardstock, thin cardboard, vinyl, thin plastic, etc...). So in this post, I'm going to write about my experience setting up and cutting my first design. So I got my machine in just a couple of days (thanks, Amazon prime ), but I wasn't able to even open it up for about a week. The fall is a very busy time in our house. So when I did finally get it open, I followed the instructions to remove th