Posts

Showing posts with the label 3d printed ornaments

3D Printed Spinning Heart Ornament

Image
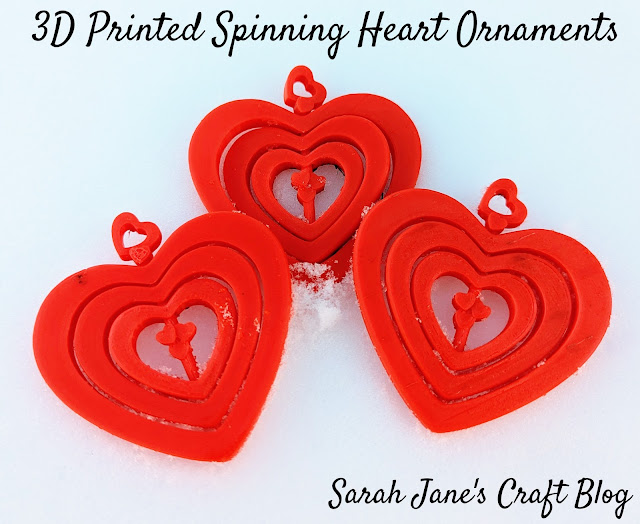
I was looking for a fun Valentine's Day print to try and I came across these cute spinning heart ornaments . They looked like the perfect little decoration to hang in a window or on a Valentine-themed tree. I used the recommended settings from the posted instructions. They called for standard settings (.2 resolution and 20% infil) with supports that touch the build plate (very minimal). The designer also suggested turning on ironing (which was a new setting for me).  I used red PLA on our printer and each heart ended up taking about 3 hours to print. Unfortunately, I'm still struggling with dark areas of filament in my prints. I printed the first two at 195 degrees (nozzle temp) and the last one at 190 (which is the lowest recommended for the PLA). The lower temp helped a bit, and it's hard to see in the photos since I put the best sides forward, but there were still quite a few black marks on the ornaments. Nevertheless, this is a cute pattern that I'd recommend. Asi...

Moon Lithophane Ornament Suncatcher

Image
I had an idea to turn a photo my brother took of the moon into a lithophane, so I thought I'd share with you how I made it happen.  NASA has images of the moon that will totally work for this project, too. I used the website lithophane maker  to crop my moon photo down to a circle and adjusted the size of the frame and hang tag. It took a bit of fiddling to get it set up the way that I wanted. Once I was happy with it, I imported the file into my slicer and just used standard settings (.2 resolution and 20% infil). If I were to do the project again, and I think I will (Pluto is calling my name), I'd set it to 100% infil so you don't get any shadows of the shapes the printer makes coming through in the final print job. I printed it on our 3D printer with white PLA . The print took about 3 hours, and we had to run it a few times because our printer was struggling with burning filament (leaving dark marks on the print). We turned down the temp to 190 degrees, and it seemed to...

3D Printed Gingerbread Man Ornament

Image
Last week I printed a sorting hat ornament, so when I was trying to decide what to print next, I immediately went looking for other ornaments that I could print with brown filament before I switched to another color. So, with that in mind, I found a cute gingerbread man inspired by Gingy from Shrek.  A gingerbread man was the perfect thing to print on our printer with the brown filament I already had loaded! So I sliced the design using .2 resolution and the recommended 80% infil. Gingy took about an hour to print and turned out so well, that I went ahead and printed a second. Of course, I could have gone to the trouble of pausing the print and finishing the icing with white filament, but I've never done that before, so I wimped out and opted to paint the icing. I tried a few methods which failed miserably (see the messy job above). I tried spreading a thin layer on a paper plate and stamping the ornament. It didn't transfer much paint, so I used a foam paint brush to "...

3D Printed Sorting Hat Ornament

Image
If you're a regular blog follower, you may know that I have a small Harry Potter tree that I've been creating ornaments for over the years. This year, I stumbled upon a design for a Sorting Hat ornament and immediately knew I needed to print it.   I used the recommended settings for an earlier version of the Sorting Hat (.2 resolution and 25% infil) and used some brown PLA on our 3D Printer . The print took a bit over 2 hours and came out great! After I took a few photos, I immediately hung it up our our tree!

3D Printed Rudolph the Truffle Nosed Reindeer Ornament

Image
This week I printed a cute design for a reindeer ornament with a nose the perfect size to fit a Lindor Truffle.  I printed the design on our printer using standard resolution (.2) and the recommended 15% infil. I used some matte brown PLA . They took about 50 minutes to print and came out great!   

3D Printed Ghost Ornaments or Suncatchers

Image
Made a quick 3D Printing project this week to share with you. These ghosts were a fast and easy print.  I set up our printer with some white PLA filament and set the pattern to standard default settings (.2 resolution and 20% infil). Since it was a flat print, I opted not to print a skirt or a brim and just sprayed the bed down with hairspray for bed adhesion. The print went fairly smoothly, though there were some dark spots early on in the print. They were mostly covered, but I'm guessing this would work better if your last print job was also with white filament. They took a couple of hours to print all three ornament/suncatcher ghosts and they came out pretty well. The sun's angle didn't make for a good photo in the window, but you can see (below) that the infil shows through when hanging it in the window (to avoid this, set it to 100% infil). These are only a few inches tall, so I might try printing one of them big to see how it goes. If I do, I'll share it with y...

Alcohol Inked 3D Printed Ornament Blanks with UV Resin

Image
A couple of weeks ago, I posted a project where I printed ornament blanks on our 3D Printer and then topped them with recycled Christmas cards and UV resin . The blanks turned out so well, that I thought it would be fun to try to ink them. I've used alcohol ink on tons of ornaments (from plastic to glass to wood to ceramic ) and have had mostly good results, so why not. I have inked on 3D printed plastic before, but I've only stamped it (like these ornaments from last year) on. The reason I've only ever stamped 3D printed plastic is because of the grooves that are left from the printing process. The ink soaks right into those lines. So, I had an idea, why not put a tiny bit of resin on the bottom of the ornament to seal up those grooves. So I printed 3 ornament blanks and two of them got the UV Resin skim coat. As you can see in the first photo, I put very little resin on the ornament. Then I used a small piece of cardboard to swipe it around the ornament. Unfortunatel...

3D Printed Geometric Snowflakes

Image
I'm at it yet again this December. I've fired up the 3D printer and can't help but print any pretty design for an ornament I can find. These little flat ornaments are so satisfying. They take very little time and filament and turn out so cool. This time, I found a set of geometric snowflakes . I printed these using standard settings (.2 resolution, 20% infil) with white PLA on our printer ( Ender 3 v. 2 ). Each snowflake took about an hour and a half to print. I actually was only going to print 3 of these (only, I know, I may have a problem), but they turned out so well, that I grabbed the whole set.

3D Printed Ornaments with Recycled Christmas Cards and UV Resin

Image
Last year I went a bit crazy printing Christmas ornaments on our new 3D printer . This year, I'm being a bit more selective. One of the things I knew I wanted to find a design file for was a good ornament blank. I knew I could do all sorts of fun crafts if I found a good one. Well I found the first one to try from someone who made and advent tree using these blanks . I followed the recommended settings (.16 resolution and 100% infil) with white PLA . The 100% infil made them pretty solid and meant that a fairly simple print still took an hour and a half to complete. After I managed to print a few of the blanks, I went through my stash of old Christmas cards which I save like a total craft hoarder (but it's not the first time I've used them: Recycled Christmas Card Ornaments ). I found a plastic lid that was really close to the the size of the inside ridge of the ornament blanks and used a pen to trace around the circle on the greeting cards and carefully cut them out. In t...