Posts

Showing posts from November, 2019

House Colors Alcohol Ink and Vinyl Decal Decorative Tile

Image
Over the last couple of weeks I've been using some black vinyl decals that I cut using my Silhouette cutting machine to decorate some ceramic tiles. This week I am using a decal of the Hogwarts crest, so I wanted to try to incorporate all of the house colors on the tile. I started out by grabbing my craft mat , some alcohol inks that I thought best represented the house colors, and a can of air . I ended up selecting at least two of each shade (two yellows for Hufflepuff, two reds for Gryffindor, two shades of green for Slytherin, and 3 shades of blue for Ravenclaw). I dripped the ink on the corner that would appear under their house mascot on the crest and then used the can of air to spray it to fill the corner. After I had the colors filling the corners, I used some gold ink in the center of the tile to appear under the H in the decal. I also used the gold ink to finish the edges of the tile. I dripped a little on a foam brush and tapped it onto the edge of

Decorative Vinyl Thanksgiving Tiles

Image
Last week I made a decorative tile using a vinyl decal I cut out with my Silhouette . When I cut that decal out, I cut a couple of Thanksgiving themed decals at the same time. So this week, I needed to figure out what do do with those decals. I decided to apply them to 6 inch tiles, too, but this time, I decorated the tile with alcohol ink. I did a similar project last year with Halloween decals that turned out great, so I knew just what to do. The first thing I did was separate each of my vinyl design and then weed out the cut bits of vinyl. I used a pick  to get all of the tiny bits. This is one of the trickier parts of using these vinyl decals in what I'd describe as a medium size. They are big enough that they can be intricate, but the dots of vinyl in between the letters are tiny and sometimes pull up when you are weeding. So you have to be careful. After my decal was ready, I grabbed my craft mat and all of my orange alcohol inks (and a couple of yellows).

Vinyl Decal Decorative Tile

Image
I'm still a bit of a newbie when it comes to using my Silhouette (even though I've had it for ages), but I keep on making projects, and I learn something with each one. I had a couple of these 6 inch ceramic tiles with a subtle pattern on them that I picked up on clearance at the hardware store. I used one of them for a decal a while back ,  and it worked out perfectly with black vinyl, so I thought I'd try it again. I started out by setting up a few designs in the Silhouette studio. I found a couple through Google searches and a couple were freebie designs from ages ago that I pulled from my library. I set them all up to cut on black vinyl . I used the default settings and let her rip (...er cut). After my vinyl had cut, I used a scissors to cut apart each of the different designs. Then I carefully peeled back the vinyl. There were a couple of thin letters that didn't want to stay on the backing, but I managed to get the design freed from th

Plastic Wrap Alcohol Ink Flower Pot

Image
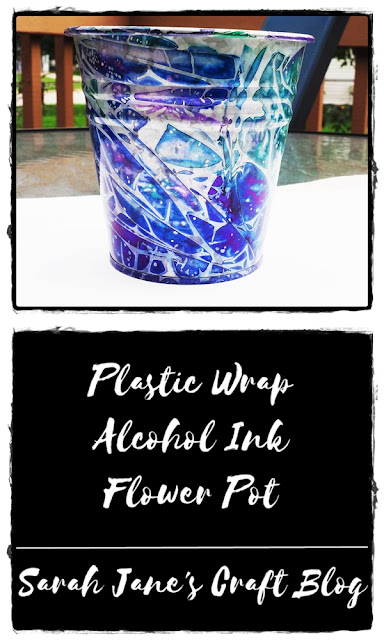
Alright, I might be a bit obsessed with the plastic wrap technique . I keep looking for items I can ink with this method. This week, I found a metal flowerpot in my craft stash that I purchased from Walmart earlier this year that I thought might just work. I laid out my craft mat and a sheet of plastic wrap. I gathered up several bottles of  alcohol ink and dripped the ink out on the plastic wrap. Once the plastic wrap has been covered in ink, I set the flower pot onto the center. Then I folded the plastic wrap up the sides of the flower pot. Then I folded the plastic wrap over the top and bottoms of the flower pot so that the ink would stay neatly in place while it dried over night. The next day, the ink had clearly gotten considerably darker as it dried. It seems like the indigo blue ink has taken over, yet again. I carefully peeled off the plastic wrap and was pleasantly surprised how good the overwhelming blue looked against the silver