Posts

Showing posts with the label 3d printing

3D Printed and Decoupaged Puzzle Box Lid Stand

Image
Our 3D printer has been a bit unreliable lately, so I haven't been making too many projects. One of the last things I printed was this great puzzle box lid holder . When the print didn't turn out perfectly, I took the opportunity to try decoupaging on printed PLA.  I used standard print settings (.2 resolution and 20% infil) using some purple PLA . The print took about 12 hours on our little printer . When it was done, it looked stringy, but otherwise not too bad. When I pulled it off the bed, the base layer was discolored and full of the hairspray I used to help with bed adhesion. I was able to clean up the stringy bits without any issues, but the base level remained marked up no matter how much I cleaned (and lightly sanded) it. Since I used some Tacky Glue to attach some felt to a 3D print project in the past and it has held up really well, I was pretty sure Mod Podge (which has the same base--PVA glue) should work well too. I found a piece of scrapbook paper in my craft...

3D Printed Shark Clips

Image
Just a quick 3D printing project this week. These cute shark clips were a simple hour-long print. I printed them on our printer with black PLA using the recommended settings (.2 resolution and 60% infil).  After the first one went well, I printed one in purple PLA . These were a simple and fun print--just what I wanted for this week's project. :)  

3D Printed Thumb Book Holder

Image
When I saw these nifty thumb book page holders available to print, they looked like a simple and useful project.  I used some black PLA on our printer with standard settings (.2 resolution, 20% infil). The first one came out a bit stringy, but otherwise perfect. It printed in about 30 minutes, so I printed a second one. Now I have two of these lovely book page holders!  

3D Printed Spinning Heart Ornament

Image
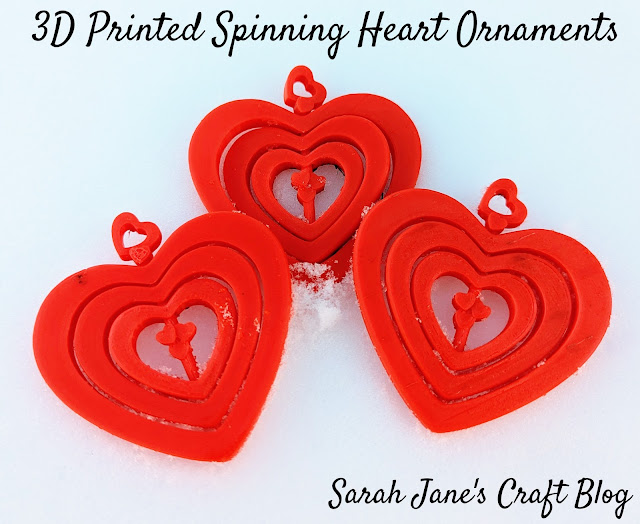
I was looking for a fun Valentine's Day print to try and I came across these cute spinning heart ornaments . They looked like the perfect little decoration to hang in a window or on a Valentine-themed tree. I used the recommended settings from the posted instructions. They called for standard settings (.2 resolution and 20% infil) with supports that touch the build plate (very minimal). The designer also suggested turning on ironing (which was a new setting for me).  I used red PLA on our printer and each heart ended up taking about 3 hours to print. Unfortunately, I'm still struggling with dark areas of filament in my prints. I printed the first two at 195 degrees (nozzle temp) and the last one at 190 (which is the lowest recommended for the PLA). The lower temp helped a bit, and it's hard to see in the photos since I put the best sides forward, but there were still quite a few black marks on the ornaments. Nevertheless, this is a cute pattern that I'd recommend. Asi...

Moon Lithophane Ornament Suncatcher

Image
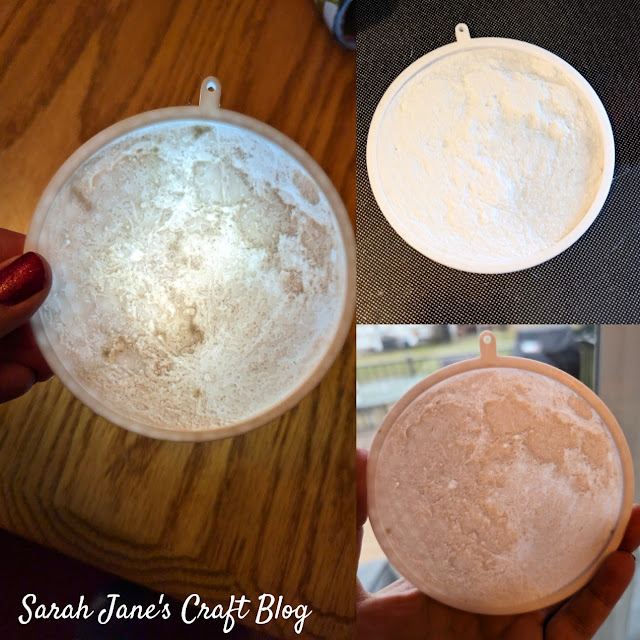
I had an idea to turn a photo my brother took of the moon into a lithophane, so I thought I'd share with you how I made it happen.  NASA has images of the moon that will totally work for this project, too. I used the website lithophane maker  to crop my moon photo down to a circle and adjusted the size of the frame and hang tag. It took a bit of fiddling to get it set up the way that I wanted. Once I was happy with it, I imported the file into my slicer and just used standard settings (.2 resolution and 20% infil). If I were to do the project again, and I think I will (Pluto is calling my name), I'd set it to 100% infil so you don't get any shadows of the shapes the printer makes coming through in the final print job. I printed it on our 3D printer with white PLA . The print took about 3 hours, and we had to run it a few times because our printer was struggling with burning filament (leaving dark marks on the print). We turned down the temp to 190 degrees, and it seemed to...

3D Printed Gingerbread Man Ornament

Image
Last week I printed a sorting hat ornament, so when I was trying to decide what to print next, I immediately went looking for other ornaments that I could print with brown filament before I switched to another color. So, with that in mind, I found a cute gingerbread man inspired by Gingy from Shrek.  A gingerbread man was the perfect thing to print on our printer with the brown filament I already had loaded! So I sliced the design using .2 resolution and the recommended 80% infil. Gingy took about an hour to print and turned out so well, that I went ahead and printed a second. Of course, I could have gone to the trouble of pausing the print and finishing the icing with white filament, but I've never done that before, so I wimped out and opted to paint the icing. I tried a few methods which failed miserably (see the messy job above). I tried spreading a thin layer on a paper plate and stamping the ornament. It didn't transfer much paint, so I used a foam paint brush to "...

3D Printed Sorting Hat Ornament

Image
If you're a regular blog follower, you may know that I have a small Harry Potter tree that I've been creating ornaments for over the years. This year, I stumbled upon a design for a Sorting Hat ornament and immediately knew I needed to print it.   I used the recommended settings for an earlier version of the Sorting Hat (.2 resolution and 25% infil) and used some brown PLA on our 3D Printer . The print took a bit over 2 hours and came out great! After I took a few photos, I immediately hung it up our our tree!

3D Printed Rudolph the Truffle Nosed Reindeer Ornament

Image
This week I printed a cute design for a reindeer ornament with a nose the perfect size to fit a Lindor Truffle.  I printed the design on our printer using standard resolution (.2) and the recommended 15% infil. I used some matte brown PLA . They took about 50 minutes to print and came out great!   

3D Printed Bat Key Chains

Image
Over the last couple of weeks, I've been printing some adorable little Halloween keychains on our 3D printer . I made ghosts and pumpkins , so all that was left was the bats . I printed these bat keychains using the recommended settings (.2 resolution and 15% infil) with some black PLA . I did print one in orange, on accident (I was trying to print the pumpkin, but the file names were cut off and I couldn't tell which was which).  These little bats printed well and finished in about 25 minutes. Now I have to go hunting my craft stash for more keychains to connect to them. I kept the orange mistake bat in my photos of the collection since I knew the black prints would be hard to photograph. It's a bit easier to see the details on the orange. I bet they'd be cute in purple, too.

3D Printed Pumpkin Keychains

Image
It's been a dreary, cool, rainy, and busy week here. So after last week's cute ghost keychains , I swapped out my filament to orange and made the pumpkin keychains from the same designer. These little orange pumpkins brought a bit of brightness into my life on an otherwise dreary week (weatherwise). I set up the print as recommended (.2 resolution and 15% infil) using some orange PLA on our printer. The print took about 20 minutes and came out perfectly. These are really cute and quick. I think they'd make great pins with the hanging circle removed. I grabbed a few more keychains from my craft stash and clipped the pumpkins into place. I look forward to tossing these in with the candy for trick-or-treaters. There's a bat keychain, too. Do you think I should print that one next?