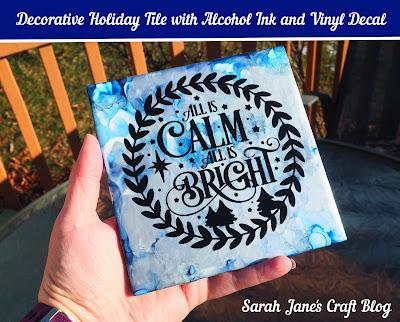
Holiday Decorative Tile with Alcohol Ink and Vinyl Decal
Thought I'd squeak one more holiday craft post in before the end of the year. In November I cut a bunch of vinyl decals and ended up making Thanksgiving tiles and a Hogwarts Crest tile, but I had one leftover decal from that cutting session.
So I weeded my vinyl decal (pealed up all the excess vinyl) and set it aside and got out my alcohol inks, a craft mat, some canned air, and a 6 x 6 inch white ceramic tile.
In between other inking projects, I made several attempts and creating a winter night sky with my alcohol inks. All of them failed miserably. Most of the time on these craft tutorial websites, they don't share the mistakes, but I thought I'd show you a bit of my process. After each spectacular failure, I sprayed it down with rubbing alcohol and wiped it off with a paper towel.
After some initial irritation, I decided I shouldn't use any blacks or grays so the black decal would show up. I also nixed the northern lights and sunset attempts (all of my pink, purple, and green made it look more like under the sea than the night sky) and decided to opt for blues and silvers. I got out my Stonewashed and Denim ink and some Silver, White and Pearl inks.
After failing at my usual method of layering the ink and blowing it around with the canned air (it was too dark and busy), I decided to put a ton of inks on (seen in the first photo) and then gently blow it around the tile (seen in the photo above).
I was getting closer! Finally! So I lightened up some of the darker areas and smoothed out some of the busy spots so the decal would really pop on the tile. Then I set the tile aside to dry. I left it two days to dry because it had quite a bit of ink on the tile with all of the metallic inks.
After the tile had dried, I sprayed it with some Kamar Varnish so that I wouldn't peel up any of the ink when applying my decal. I left the varnish to cure for a day.
After the ink and varnish had dried, I got my decal back out and cut a square of transfer tape to size.
I applied the transfer tape to the decal and burnished it (rubbed it with my nail and sometimes a scissors handle) to make sure all of the small bits would peel up. Then I carefully peeled the decal off of the paper backing and applied it to the tile and burnished it yet again.
Then my favorite part! I peeled the transfer tape back slowly to reveal the design on my tile. It did pull a bit of the silver paint up as the tape pulled up, but with all the ink on the tile, it wasn't noticeable (hooray!).
After all of the attempts at the ink, I was really pleased with how it turned out with the decal. I've already found the perfect ledge for it to live on for the rest of the Holiday season.


Comments
Post a Comment