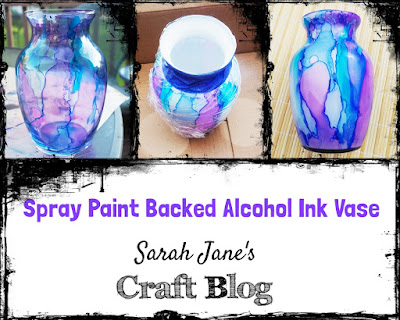
Spray Paint Backed Alcohol Ink Vase
A few weeks ago I decided to try to spray paint a candle jar after I had inked it. It turned out pretty well. The ink popped and was bright and vivid instead of the usual translucent result. I was excited to try it again. When I cleaned out my stash of vases and sent several off to the thrift store, I had a couple of plain glass vases that would be perfect for inking. So my first thought was to try the spray paint method again.
This time, I figured I would go for something a bit more subtle; since usually when inking glass, you go for the brightest most saturated colors so they show up well on the glass. I opted for a beachy set of light blues and some purple alcohol ink. I started by swirling a bit of rubbing alcohol around the vase and then letting it drip out. Then I applied some blue inks and swirled them around. Unfortunately, there was too much rubbing alcohol still in the vase, so I had to pour the ink out onto my craft mat to get a surface that the ink would stick to.
The surface was still wet, but I was able to start coloring the vase, so I dripped more light blue into the vase around the top rim and let gravity drip it down. I swirled the ink and tried to get it to dry, but as you can see, I still had quite a bit of ink pooling at the bottom, so I turned it upside down on my craft mat again to drip most of the alcohol and the ink out of the vase. A light wash of blue stuck.
I added more darker blues and some purple and tipped the vase around to swirl the colors around. The vase was still pretty wet, but the ink was starting to stick. And I got some fun patterns while the ink was dripping down the sides. Unfortunately, none of the patterns lasted.
Once the ink was finally sticking, I dripped my shades of blue and purple around the vase until I had most of the vase covered in ink. It was fairly light but pretty, and didn't really stand out on the glass of the vase. Which was exactly what I was going for.
I let the vase dry overnight and then covered the vase in plastic wrap to avoid over spray and taped the rim with painters tape since it would be most likely to get sprayed. I didn't take a picture of it, but I did spray the inside of the jar with Kamar Varnish before spray painting it just in case the spray paint would react with the ink. I let it dry for probably 10 minutes--which was not as long as I should have, but it seemed to work out ok. Then I grabbed my white spray paint.
I gave the vase a good coat of white spray paint and then let it dry for about 20 minutes and came back for a second coat. Because of the shape of the vase, I did have to pick it up to get the spray paint in all of the angles of the vase. Keep your hand on the bottom of the vase to avoid spraying your hand. If you do spray your hand--nail polish remover works to clean it off. I could immediately tell that I had achieved the desired affect of emphasizing a softer set of colors as I sprayed the paint into the vase.
Once the paint had dried to the touch, I peeled the plastic and the tape off to reveal my colors. I was very pleased. I got a beachy mix of blues and purples, and successfully featured a softer set of colors than what I usually use on glass. For now I don't know how well this paint will hold up on glass, so I'll probably just set the vase out decoratively, but the method is definitely one I hope to try again.


Comments
Post a Comment