Posts

Collection of Mod Podge Projects

Image
Over the years I've made many projects with Mod Podge decoupage glue. Check out the entire collection here: Mod Podge Collection .

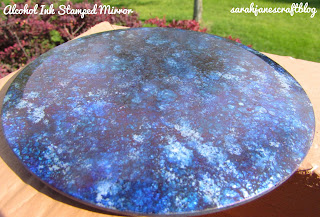
Alcohol Ink Stamped Mirror

Image
In January I bought a mirrored candle plate from Dollar Tree because I hadn't used alcohol ink on a mirror yet. I used bright colors and canned air and it didn't quite turn out the way I had hoped. I wiped the plate off several times with rubbing alcohol and restarted. After several months with color splotches, I cleaned it off again (some surfaces don't clean off easily after months--the less porous the better) and it came completely clean. After the initial rinse with rubbing alcohol and then with water, I wet down a paper towel with some rubbing alcohol for any spots that were stubborn and left it on the mirror to soak for a couple minutes and it wiped right off. This time I had the idea that I wanted to create a sort of galaxy pattern. I would cut stars out of painters tape and sprinkle them across the plate. Then after stamping and a little spattering of rubbing alcohol, it would look like outer space. First I tried cutting the stars with a scissors...they...

Alcohol Ink Dyed Silk Flowers Refresh

Image
3 years ago I made a wreath with some cheap silk daisies (I think I bought them at Dollar Tree eons ago). After a summer out on the door, I noticed that the wreath was starting to fade a bit in the sun. I even posted an update to watch the changes. It lasted 2 more summers before it became so faded that the purple had turned almost all back to white, so it was a time for a refresh before I hung it on the door for this summer. The green and the blue seemed to fade the least, but the wreath was definitely in need of an update all around. I started with the most faded flower. I tore up some small pieces of parchment paper to protect the wreath itself and applied my alcohol ink along the edge of the felt applicator . My flowers were dyed with ink from the Summit View  and  Dockside Picnic sets by Ranger. The flowers soak up quite a bit of ink as you stamp it on, so I was only able to cover about 1/3 of the flower with the ink from my first application....

Deck Refresh Part 2

Image
So, a couple weeks ago we started our deck refresh project . Then after it dried for a day...it rained for like 5 days straight. So we couldn't do the recommended second coat of the DeckOver we used to paint our deck (click the link above to read all about our first coat). Well this week it was nice again, and I just finished submitting grades at school, so we figured it would be a good time to get another coat on. Deck after one coat of DeckOver On Saturday we cleared the deck off, swept and hosed it down. Then we went to Home Depot to get more paint and brushes . Note about the quantity of paint to buy: We used way more of the DeckOver than we expected. Our deck isn't that big and we figured we'd be able to use one gallon to cover the whole deck--but we were way wrong. We barely got a single coat on the deck with the two gallons we bought. So back we went. The DeckOver is the consistency of pudding and fills in cracks and gouges, so if your deck is in kinda rough s...

Perler Bead Fail

Image
I'm not sure how I managed to make it to 36 without ever having used Perler beads, but here I am. I saw some cute projects using the melting plastic beads while I was browsing Pinterest and craft blogs, so I figured it might be fun to give them a try. I found a kit that included a mix of different colored beads, peg boards, ironing paper, and instructions for creating mandala patterns. I figured that would be a little more grown up than some of the other options and bit the bullet. The kit costs $6-8 and contained everything I needed to give these beads a whirl. After reading some tutorials online, I sprung for the tweezers (I have big hands and figured I'd be swearing if I didn't). The first thing I found out is that the bucket looks bigger in photos online than it appears in real life. The bucket is about 6 inches by 5 inches. They do manage to cram a lot of stuff into the little bucket though. It even comes with 3 peg boards (one is shrink wrapped to the li...

Deck Refresh

Image
I teach at a local community college, so it's crunch time grade wise....and we had a lightning in a bottle kind of weekend where it was sunny with no rain forecasted, low humidity, and with warm but not hot temperatures for both days of the weekend. So, we had to do yard work. After our mowing and trimming on Saturday, we decided to refresh our deck. Between the deck and grading....I didn't get much else done, so instead of a craft tutorial, you get to see our deck painting project. Our deck was beyond beginning to get ragged. It hadn't been sealed since before we bought our house and there was a lot of mildew, cracking, and even some lichen on it. So we opted for a deck filler type product at our local Home Depot (because it was the closest hardware store). We bought Behr Wood Cleaner and followed the instructions (wear gloves, mix with an equal part water, wet deck, scrub or swab on solution, rinse off).   We scrubbed it on as we knew there were some...

Tissue Paper "Stained Glass" Jar

Image
At one of my recent Dollar Tree runs, I got a package of tissue paper squares in their craft section. The package contained multiple bright colors of squares that were a little over an inch in size.  I had already done a faux stained glass project  using pieces of tissue paper glued onto glass candle holders with mod podge. I knew it would be easy to recreate that project with a new twist. So I grabbed my mod podge , a foam brush, and a cleaned pickle jar. I painted a stripe of glue onto the bottom of my repurposed jar and started applying my squares of tissue paper. I made sure to overlap them a bit so that there was no glass showing between. I continued randomly alternating colors and tapping the tissue paper onto the glue. Don't worry if it's not perfectly smooth or if a few edges are not completely glued down, you can add glue as you go. The more you fuss with your tissue paper, the more likely it is to tear, so just tap it on and move on. ...