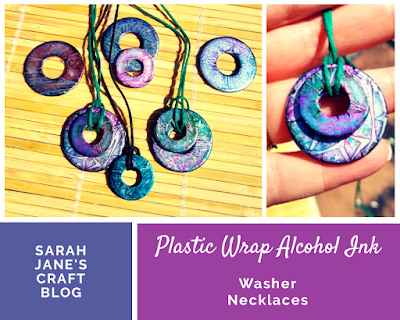
Plastic Wrap Alcohol Ink on Washers
After last week's success with using the plastic wrap application method on glass gems, I decided it would be fun to try it on metal washers. Washer necklaces are my second most popular post on the blog, so it only seemed appropriate to give them the plastic wrap treatment too.
I laid out a sheet of crumpled plastic wrap on my craft mat and selected some washers and some coordinating colors of ink so they wouldn't turn too brown.
I ended up selecting some blues and greens and then some purple as a pop of color. I squirted the ink onto the plastic wrap until I had good coverage.
Then I plopped my washers down onto the ink making sure they had good contact. Then I wrapped the edges over the top to secure them for drying.
I set them aside for a day to dry. When I came back to them, the dried ink was a bit darker. I was optimistic since the last couple attempts at this method have been pretty successful.
So I peeled my first washer off of the plastic and was disappointed. The color didn't really stick to the washer.
After peeling them all off, I had very little color transfer. Undeterred, I decided I could try to add more color with a second attempt.
So I chose some saturated colors and a new piece of plastic wrap and plopped them down into the ink.
A day later I ended up with much better transfer. Two of the washers had a slightly pitted surface--they did not pick up the ink well. The others did ok. Definitely well enough to seal them up and make a few necklaces.
I thought I'd try the DecoArt by Americana Triple Thick Gloss glaze on these washers to seal them.
It's hard to see in the photo, but it worked pretty well. It gave me a bit more of a shiny finish than mod podge, but less of a raised glaze than dimensional magic or diamond glaze would. However it was also a bit more of a pain to apply than mod podge and a bit less than the fussy dimensional glazes. So it falls smack dab in the middle. I had to use two paper plates--one to apply the glaze, then pick them up out of the excess glaze that sloshes down into the center of the washer as you brush it on and then plop them onto a second plate to dry, and they still sort of glued themselves to the plate as they dried. You might have better luck with parchment than I did with a paper plate (I had to pry pieces of paper plate off of the back of a few of them).
But in the end, most of the washers turned out cute. I'm not sure why I had such bad transfer of the color on the first attempt. It may be that the surface of the washers just needs two applications, I'm not sure, but I'm definitely intrigued enough by how they turned out to try again!


Do you think if you sanded the washers a little that they might pick up the color better? Thank you for sharing your art. I never tried this. I did decorate a few washers with permanent markers.😊
ReplyDeleteProbably not. The washers that had the smoother surface picked up the ink better than the ones with the slightly pitted surface.
DeleteI am looking forward to trying this! I am going to hang my washers to try clothesline style with sliced poolnoodle and toothpicks to separate them. I will let you know how it goes.
ReplyDeleteThat sounds really interesting! Let me know how it works!
Delete