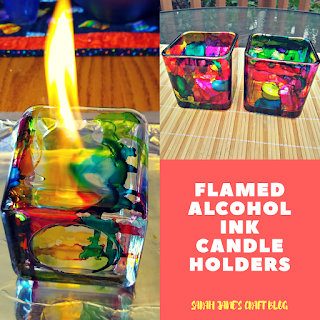
Flamed Alcohol Ink Candle Holders: Bright Colors
I've been a bit addicted to setting alcohol ink on fire. Last month I tried my first set of candle holders and had so much fun that I thought I'd try some with more colors. So, when I went to Dollar Tree and saw the square candle holders, I knew their flat-ish sides would be a great choice for some flame inking.
I set up my work station with a Teflon craft mat to protect the table from heat and ink splashing. I then put a cork trivet under an old aluminum cookie sheet that I covered in foil. Then I filled a small container with some 91% rubbing alcohol and an eye dropper. Then I wiped off my candle holders with a paper towel that had a little rubbing alcohol on it and grabbed a lighter and some bright colored alcohol inks.
After I set out everything I needed, I cleared all of the alcohol based liquids away from my cookie sheet and dripped a bunch of ink on one of the sides of the candle holder. Then I squirted a bit of rubbing alcohol onto the ink and lit it on fire.
As you can see, it made a pretty decent sized flame. It also mixed a bit brown, so after the flame died down (be careful to watch the ink moving/drying--sometimes it's hard to see a flame but it's still burning) I added in dots of ink and flamed each one to minimize the mixing a bit.
After I felt pretty good about the coverage and mixture of ink, I waited for the glass to cool a bit and turned it to expose the next side. Quite a bit of ink dripped along the edge, so I didn't need to apply as much ink to cover the side.
Just like last time, I applied/dripped ink and sometimes rubbing alcohol and lit it on fire. I kept repeating the process until I liked the way it looked.
But as I continued the process, I rushed a bit and didn't let it cool down and dry enough between turning the sides. Also the rolled edges meant that ink was always dripping off the sides and not always getting flamed/fired....and the act of dripping and flaming the ink created some places where the ink was really sticky. So by the time the candle holder was sitting on the first side to get inked, it smeared together and turned dark brown/black.
Fortunately, alcohol ink on glass is really forgiving. I put a little rubbing alcohol on a paper towel and wiped off the part of the candle holder that had smeared and set it aside to dry.
So, I started up on the second one. It seemed to work pretty well to switch back and forth between candle holders to let the sides dry. I had one more side stick, but wiped it clean and re-inked both locations. If I had been more patient with dry times I wouldn't have had the problem...and the whole project probably would have taken a little less time.
When they were mostly complete, I set them upside down and wiped the ink off that had dripped onto the bottoms of the candle holders with a paper towel soaked in rubbing alcohol. It was less about getting the bottom sparkling clean than it was about removing any gummy ink so it wouldn't leave marks on the table.
These turned out really cool. Whenever you mix bright rainbows of colors you run the risk of them turning muddy and brown, so I knew there would be some color mixing that I had to be careful of. Watch out for blue/orange and red/green combos as they turn brown easily. I hadn't expected, though, all of the stickiness and dripping. They took longer than I was planning, but they still ended up being a success. Thank goodness the ink wipes off so easily!
I put some l.e.d. candles in these candle holders, but they should be safe for a real candle since the alcohol has all been burned out of the ink (but I have no idea how the color holds up to regular heat--it may fade). I opted not to seal these since they were decorative pieces. If you plan to handle your alcohol ink pieces or if they will be put someplace where they might encounter any sort of alcohol (hairspray, perfume, cocktails, etc...), they'll need to be sealed to keep the color from running (but if you plan to put real candles in your candle holders, be sure to use a heat safe sealant like clear engine enamel).


Great tips thank you. I have been doing votive candles and I shall now go and try setting them on fire!
ReplyDeleteI hope they turn out awesome! Thanks for stopping by the blog!
DeleteHi! This is a fantastic idea! Which clear glossy engine enamel would you recommend for this project? Any help is greatly appreciated.😊
ReplyDeleteRustoleum Clear Engine Enamel.
Delete