Duct Tape Covered Canister
Totally true confession: It took me three tries to get this project right. What started out as a quick easy recycle craft to decorate a dishwasher pods container turned into three different attempts and a trip to the store to buy more black tape. But, in the end, I was completely satisfied with how it turned out, so I guess it was worth the trial and error. And of course it means I can show you the best of my different attempts so you can do it in one attempt (hopefully) if you try it.
As awesome as duct tape is, it's not terribly forgiving--sticky, yes; strong, yes; water resistant, yes--forgiving, not so much. Based on my previous experience working with duct tape, I knew that my best bet was using a rotary cutter and a cutting mat and and making sheets of duct tape. Rotary cutters work wonders on duct tape. Since you're cutting from the non sticky side, they roll right through the tape, cut a nice straight line, and you don't have to deal with the it sticking to scissors. Laying out the tape to create sheets on the mat allows you to work with larger areas of tape with fewer wrinkles (attempt #2 involved me applying strips to the container to deal with the tapering corners--wrinkle city) and minimizes seams. It also gives you the opportunity to see what your tape will look like and line up patterns or create straight stripes, etc...
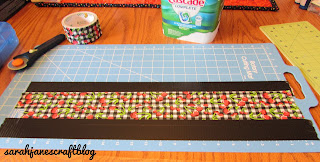
So I measured out my container and knew I needed 21 inches of tape (I believe this one holds 90 pods--it's the one from Costco). So I laid out a top border of black duct tape on my mat along the 6 inch line (as my finished sheet needs to be 6 inches tall). I went a bit over the edges of the 0 line and the 21 inch line on the sides so I could trim it to a clean straight edge when I was done making my sheet.
Next I put two stripes of the cherry patterned tape down, each with the edge overlapping the piece I just stuck to the mat by about a quarter of an inch. I tried to match up the stripes in the tape, but I didn't bother with the cherries. I picked the cherries because I needed a fairly busy/dark pattern so the printed label wouldn't show through and one with a bit of darker green in it to match with the green lid of the canister.
Once my sheet of duct tape was finished, I used my straight edge (any sturdy ruler will do) to trim the the tape sheet to exactly 21 inches long and 6 inches tall with neat and tidy edges.
My first attempt at covering the container used a solid sheet like the one I just made. I measured wrong (2 inches short because I measured the bottom of the container not the top and it tapers) and was having problems with the tape wrinkling on the corners. So I remeasured and came up with a solution for the corners--cut the large sheet into 4 smaller sheets, one for each side of the container. For this sized container, I cut two 6 inch by 6 inch sheets and two 4.5 inch by 6 inch sheets.
I peeled up the shorter sides first and placed them both on the containers. I started with the shorter sides so that the seam at the corners would end up on the short sides when we were finished and look a bit more polished.
I lined up the tape along the bottom edge of the container and smoothed it out towards the top. It worked perfectly, so I applied the other short side.
Then I peeled up the longer sides from the craft mat and applied them to the container from the bottom up.
When I was done, the old label was completely covered and the duct tape was completely smooth. It may have been a bit of a pain to get to this point, but I am really happy with the way it turned out. This container would work great for storing craft supplies like washi tape or wooden spools, but I think I'll use mine as a little trash can for my car. If you have any other ideas for great uses for these dishwasher pods containers after they've been gussied up, let me know in the comments!


Comments
Post a Comment