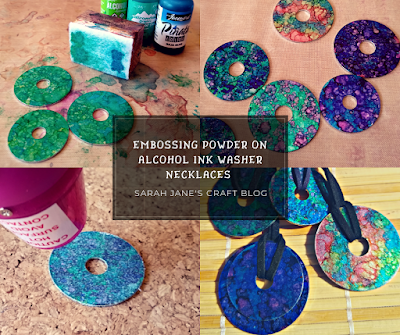
Alcohol Ink Washer Necklaces Sealed with Embossing Powder
I recently read a comment on one of my several attempts to perfect washer necklaces. The comment said they used embossing powder to seal their alcohol ink washer necklaces. I thought that was a fantastic idea--one definitely worth trying.
So I got my alcohol inks, a craft mat, and an applicator with felt out along with a few washers from the hardware store.
I grabbed a lime green ink (limeade), a teal ink (clover), and the blue from the pinata ink set (baja blue) and put a couple drops of the blue on one end of my felt and mixed the two greens on the other end of the felt (a couple drops of both). Then I stamped the washers by alternating the sides of the felt that I was stamping with until I got a nice cover of blue and green on the washers.
Then I came back in with other colors to add contrast. I added denim blue to this washer. I added the purple from the pinata set to some of the other washers. I then added a bit of indigo blue and used that color as the main color on my other two washers.
I just kept on inking until I liked the color combos. If you're not liking the way it's going, use some rubbing alcohol to clean most of the ink off the washer and start again.
I let my washers dry for about 20 minutes before proceeding to sealing. The ink needs to be dry enough that it won't smudge when handled. I grabbed my clear ink pad and some clear embossing powder and a heat gun to seal my washers.
I put my washer on the ink pad ink side down and pressed, pealed it off the ink pad, and then put it on a paper plate and poured embossing powder over top. The clear ink allows the powder to stick to the washer. Then dump off the excess powder and put it on a heat proof surface to melt the embossing powder. I kept all of my extra powder on the paper plate and then dumped it back into the jar when I was done.
Keep moving the heat gun around the washer until the powder turns clear. Then leave it alone until it's cool. The washers hold the heat and get quite hot, so they need to be left alone for 5-10 minutes before you try to pick them up. I started getting some burn marks on my cork trivet because I was holding it a bit close to the surface. A layer of tinfoil might have been a good idea.
I wasn't completely satisfied with the surface after the washers were done. They were sealed, but they were a little bit bumpy and the surface wasn't as thick and shiny as I had hoped. So I tried to add another layer of embossing powder after they cooled. Once the embossing powder turned liquid, it started moving the ink. Which could be cool, but was not what I was looking to do. So a single layer and heating until it just turns clear is as good as it gets.
I did end up with some nice washers out of the project and they look about as shiny as being sealed with mod podge (and take less time to finish than sealing with glue). If you have tried embossing powder over alcohol ink with different results--let me know about it in the comments!


Wow great idea with the necklace, adorable thanks for sharing
ReplyDeleteThanks!
DeleteI tried this once (without embossing powder) and I would get one side to look great, but then as the washer was drying the ink/alcoholwould seep onto the backside of the washer and make it blank. Did this happen with you?
ReplyDeleteI only ink one side of the washer, and I use metal washers (steel, I think) from the hardware store. I've never had the ink soak in or seep through.
Delete