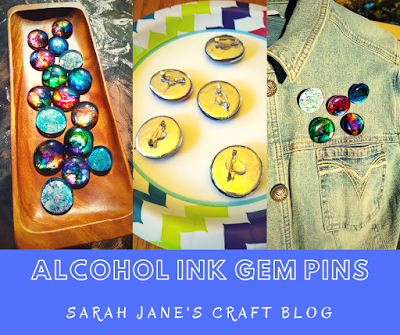
Alcohol Ink Glass Gem Pins
I've made quite a few necklaces for the blog. One of my favorite necklace projects is decorating glass gems from the floral department with alcohol ink. I've revisited this project several times (glass gems). The last few times I've decorated glass gems, I've been testing various application and sealing methods, so I didn't even end up making the gems into anything. I had a pretty big stash from the last few projects (flaming ink on glass gems, dripping ink onto glass gems, and sealing gems with enamel paint) that I hadn't done anything with. So, when my sister messaged me and said: You make a lot of necklaces, why not make some pins. I said: Sure!
I decided the best way to seal the gems was to use aluminum foil tape. It provides an opaque background which makes the colors pop and adds a bit of shimmer. It's also pretty easy to work with. I used a round toothpick to trace around the gem and cut it out with a scissors. If your gems are one inch and fairly regularly shaped--you can use a 1 inch paper punch on this tape and it works perfectly. My gems were all odd shapes and sizes, so I opted for tracing.
Cut on the inside of the trace line with a regular scissor and you'll be left with a little circle sticker. Peel the backing off and apply it as centered as you can to the gem.
Smooth the tape out with your fingers and you're all done. It's pretty fast and easy.
The finished product is so shimmery and pretty.
I repeated it for a bunch of gems that I had stashed in with my alcohol ink, just waiting to be finished into something. I even put the tape onto the back of a few of the gems I had painted with white enamel paint (top left). It didn't really add any shimmer to the gem, but it did cover the slightly lumpy and oddly colored paint and provided a more finished appearance.
The gems looked so pretty when I was finished with the aluminum tape that I took them outside for a little photo shoot (It doesn't hurt that it was 75 degrees and sunny today, either).
Now that I had them finished and sealed off, I could turn them into pins. My pin back stash was running a little low, so I chose 5 that I thought would make good pins and grabbed some E6000 glue.
I decided on which direction each gem looked best and then dabbed two little dots of glue on each pin back and stuck it down on the gem. I added a little dot of glue over the top of each one to make sure it would stick. Then I left them alone for about an hour and a half before I touched them again. They dry to the touch before that, but the glue remains a bit soft, so let them dry for a while before trying to pin them into anything.
I pinned them to my trusty jean jacket to get an idea of what they looked like. I can't wait to make more pins! One tip--glue the pin backs toward the top of the gem. They are bit a heavy and tend to tip forward.


Hi again!! Absolutely love these! So you think that there is any way to add lettering to these? I’m trying to come up with new ideas for making pins, etc for my daughter’s sorority. Thanks you so much for your time!!
ReplyDeletePerhaps. If you have stickers or vinyl decals you could put them on first, then ink the gems, let them dry and then peel the stickers off. Then the letters would show up as silver with the foil tape on the back. But the gems aren't very big, so it might be a squeeze to get more than one letter to come through clearly.
Delete