Posts

Showing posts from February, 2016

Rubbing Alcohol as Blending Solution with Alcohol Ink

Image
I have been using alcohol inks for a couple of years, but I'm too cheap to buy the official Ranger Blending Solution (since it costs $6-8 for a 2 oz. bottle), so I have been using regular Rubbing Alcohol  (70% alcohol) forever. I bought two 32 oz. containers at Costco (I think for about $6) and they have lasted me forever. I kept reading on alcohol ink tutorials that the 90% alcohol was the stuff to buy as a substitute for the blending solution, but whenever I looked for it, the store didn't carry it (most drugstores have it, but I never remembered to look at the drugstore). So, low and behold, I was at Target picking up the weekly necessities, and I glanced in the direction of the rubbing alcohol on the bottom shelf, and they had 90% alcohol rubbing alcohol. So for about $3 for a 32 oz container, it cost the same as the stuff I bought in bulk. So I thought I better compare the two and see if one is really better than the other. I grabbed two white ceramic tiles t

Pint Mason Jars Hold Small Rawhide Twists

Image
Thought I'd share a quick lifehack/storage solution today-- small rawhide twists fit perfectly into a pint sized mason jar .

Alcohol Ink Button Necklaces

Image
In last week's post, I made some button pendants with some old mother of pearl buttons. While I was going through my stash of buttons, I found several mother of pearl wannabee buttons made with shiny plastic. And of course the first thought from someone who is addicted to alcohol ink: "I could ink that!" I picked out some plastic buttons and drug out my craft mat and alcohol inks . I found out quickly that the flatter buttons worked the best, but that one with a recessed area for the buttonholes actually looked kind of neat in contrast. So you can probably make most buttons work. I also have a layer of craft foam between the wood and my felt on my homemade applicator , so I could press down firmly to get into some of the nooks and crannies. I started out thinking I'd dye the buttons one color, or with a few related colors, but after my first pass with the applicator, I knew I wanted to add more colors. I dabbed ink on until I liked the way they l

Wire Wrapped Button Pendants

Image
I acquired my grandmother's button collection when she moved into assisted living last year, and I've been trying to come up with creative ways to use them. There were quite a few mother of pearl buttons, so I wanted to try to turn them into some jewelry. The quickest way to do that was to wire a few up to make a simple pendant. I used this post from Craftsy.com as a guide (she used a much thicker wire and jewelry making pliers in her tutorial). I have no idea what kind of wire I have. I think I picked it up at Wal-mart several years ago. It's bends easily by hand (probably similar to this wire ). It might not be the best for holding it's shape over the long term, but it did the trick for me as I don't have any pliers that don't leave grooves on the wire, so being able to make almost all of the bends by hand was convenient for me. Use whatever wire you've got available to use. Cut a piece that's 5-6 inches long. If your wire is less benda

Valentine's Day Craft Project Collection

Image
Check out my collection of Valentine's Day craft projects .

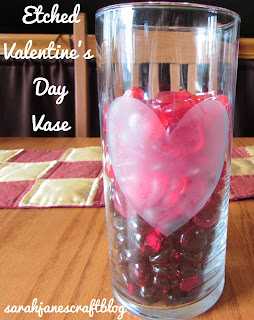
Etched Glass Valentine's Day Vase

Image
On my last trip to Walmart, I picked up a couple of these inexpensive (97 cents) glass cylinder vases. I figured I could whip up some cute Valentine's Day decoration. After a little thought, I remembered I had a jar of Armour Etch in my craft stash that I hadn't used yet. I was itching to do an etching. So here goes nothing! I gathered some contact paper (it doesn't need to be clear, but I keep the clear stuff around for covering books and what not), a sharp scissors, a foam brush, the armour etch, and the glass cylinders. You'll also need a covered surface to work on and some gloves ( vinyl , dish gloves, etc...). The last time I etched glass was for a 4-H project in junior high, so I knew I wanted to keep it simple. Also, I don't have a cutting machine (like cricut or silhouette) to make this process a snap. So, I went with a heart. I cut two pieces of contact paper about the length of the vases and stacked them on top of each other and folded