Posts

Showing posts from November, 2012

Adventures in Dehydrating: Kiwi

Image
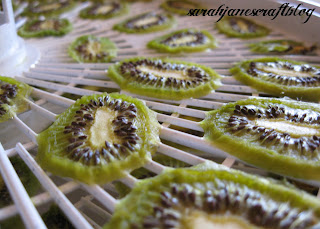
My husband received a food dehydrator from his mother for Christmas last year.  In the past year we've dehydrated lots of fruits and some meat for Jerky.  And during those experiments, most of what we dried turned out great.  Of course, it's always trial and error when cooking, and that's especially true of dehydrating because of all of the factors that keep recipe books from having definitive times, widths to cut things, and even temperatures to set your dehydrator at.  Much of these estimations and ranges have to do with your dehydrator--they don't all have the same motors or settings.  Air temperature and humidity also play a part, and so do variations in the food you are drying (ex: different types of apples grown in different climates harvested at different times are going to have different water content).  That being said, I hope I can share a few of the things we've learned about dehydrating by showing some of the things we have been successful at dryin

Painted Glass Ornaments

Image
Several years ago, I was shopping at the Ben Franklin in Wilmar, MN (yeah, that long ago), and I saw a flyer for a craft project where you drip craft paint into a glass ornament and swirl it around to create nifty marble effects.  Well, that day I bought some glass ornaments and grabbed the flyer.  I then went to grad school and moved 3 times before I actually completed the project....but the ornaments survived the moves and I finally did the project. :)  All you need for this project: Glass ornaments craft paint a tray lined with paper towels to let the ornaments dry in My craft flyer from 2002 said I should clean the ornaments out with rubbing alcohol before I painted them, and since these were older ornaments, I went ahead with this step to remove any dust.  If your ornaments look clean, you can probably skip that step. Next, take the metal caps off and drip some paint into the ornament.  The amount you see in the photo below would probably be plenty to cover

Snowflake Punch Ornament

Image
I saw an adorable ornament on Pinterest made with flowers from a paper punch pinned onto a Styrofoam ball.  I thought a ball covered in snowflakes would be even more Christmas-y....that and I have a snowflake punch, some nice blue scrapbook paper, and a spare Styrofoam ball on hand.  I love crafts where I don't have to buy anything! This project requires: a Styrofoam ball (I bought mine at Wal-mart) a shaped paper punch (mine is a snowflake, but you could do stars or flowers--whatever you prefer) paper  a ribbon to hang the ornament and a scissors After I gathered my supplies, I punched a bunch of snowflakes out of some light blue scrapbook paper.  I had planned on using white card stock to contrast with the blue, but the thickness was a bit much for my cheap paper punch (which was most likely picked up in the dollar bin at Michael's), so I ended up using plain old copy paper.  It was a bit flimsy but worked fine. After you've punched a bu

Transparency Christmas Ornaments

Image
Last year I picked up a couple of boxes of plain glass ornaments at Hobby Lobby or Michael's at 50% off after Christmas.  So this year, I get to figure out what the heck to do with them.  My first project was to print out a couple of designs on transparency paper to create a cool translucent effect.  Of course, the real trick with this project was getting decent photographs.  The rest of the project was super easy.   I had some leftover printable transparencies lying around from back when teachers still used overhead projectors (5+ years old).  You may have better luck photocopying your designs onto regular transparency film as I have no idea where you can get ink jet transparencies anymore (perhaps office supply stores or here ).  I found a few designs online that I thought would work.  The first was a black and white silhouette of a nativity scene.  The second was a snowman with a blue background (think snow globe effect). The third one I found was a snowy scene that did