Posts

Showing posts from May, 2013

Card Making: Punched Layers

Image
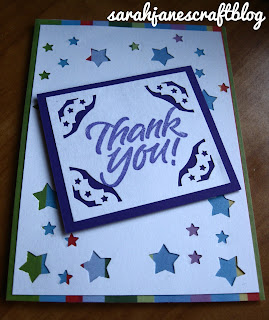
I used to make cards all the time in high school and college.  When I had less money and more time it was a great way to give personalized gifts.  Well, I'm out of school for the summer--so I have less money and more time :).  I just happened to have two different small sized star paper punches, so I thought that would be a good place to start.  I layered the white card stock over striped paper, but any brightly colored paper--solid or with a small pattern--would work great.  Since I was just using cheap little paper punches, I got around not being able to punch the middle, by putting the card's message there (which I stamped). Everything got layered together using double stick tape. The other card I made using this method was made with circle punches and circle paper.  I wish I had had a circle punch in between those two sizes, but it still turned out pretty well.  I tried to make them looked randomly placed--I'm not so sure how successful I was with that. :)

Alcohol Ink Coasters

Image
The first time I saw projects done with alcohol ink, I was amazed.  I knew I had to try this stuff out.  I'm still a newbie though.  This was my very first project.  I had some extra tiles leftover from my scrapbook paper tile coaster projects , so I thought that would be a good place to start.  You can use alcohol ink on any smooth surface.  It is alcohol soluble as long as it isn't dry--so you can start over or clean up with a bit of rubbing alcohol. I had the " Farmer's Market " color collection of Adirondack Inks.  They are bright green, dark red, and indigo in color--the actual names are all named after food, but you get the idea. I started out by wetting the tiles with rubbing alcohol (they do sell a special blending solution that I haven't purchased yet to see how it works). Then I dropped colors on. As the colors were added, they started to bleed and mix.  I just kept on trying to cover the whole coaster and still end up with somethin

Card Making: Layered Stamping

Image
When I started to make my own cards again, I realized I had quite a few stamps just collecting dust in a plastic bin in my crafting closet.  I put some of them to good use by creating some simple layering.  The card above was created using a dark green ink.  I stamped across the strip of paper rotating the leaf, but re-inking it each time.  Afterwards, I stopped inking and stamped in between the leaves, letting the stamp get lighter each time. With this second card, I used a leaf stamp--flipping it and angling it slightly differently each time to create a realistic flower bed look.  Then I used a mum stampin different colors to top of the stem.  I then layered the stamped flower beds on a patterned paper and a solid paper to create a springy feel. These were both Mother's day cards for my Grandmas (who are both in their 90s and both told me they liked their special cards--but I mean, what else would a Grandma say to their granddaughter :)).

Paint Chip Bookmarks

Image
If you follow craft posts online, you know that projects using paint chips have been very popular lately.  This is my first foray into the paint chip project world.  I am painting our extra room in a shade of lavender.  So we went to the local Home Depot and snagged every card in a shade of purple that they had.  Needless to say...I ended up with about 10 extra paint chips after I had narrowed it down to my favorites (that's a lot of shades of light purple!).  So I thought I'd make a simple project with the leftovers. Behr Paint Chips are larger than most (almost 5 inches wide!) which allowed me to cut off the parts with text on either side and still make a 2 inch wide bookmark.  After I cut them with my paper cutter, I decorated them with some stamps and ink.  Then I searched for some paper to cover the writing on the back of the bookmark.  I just happened to have this lovely shade of purple in a scrap pack that was exactly the right size (but I could have cut up any