Posts

Burner Cover Magnet Board

Image
I've always wondered if I could make something fun out of those electric burner covers you can find at dollar stores (and Walmart). So when I saw some projects floating around turning them into little magnet boards, I knew I wanted to try it out. You will need the following: a metal burner cover  (or cookie tin lid) spray paint (optional) nail and hammer or a drill for making a set of holes in the cover scrapbook paper Mod Podge and brush to apply a ribbon to hang fine grit sandpaper scissors pen or pencil I started out by trying to drill holes into the lip of the burner cover, but either I had the wrong kind of drill bits or my drill is a weakling because it didn't work at all.  So I switched to the method you see below of poking a hole in the metal with a large nail. The nail went through pretty easily, but it left the edge of the burner cover with pretty unsightly metal shards poking up.  I did my best to sand these down with some sandpaper and even ...

Linoleum Block Printing

Image
I have done linoleum block printing before, but I was 13. I actually still have the print I made. I thought I had kept the block too, but who knows where that ended up at....now where did I put that...oh there it is: It's a masterpiece, I know. 13 year old me was quite proud of this, so don't crush my spirit. :) Now that I've revealed my pack rat tendencies, on with the post. I was reminded of block printing when I saw this project on Pinterest. I thought, hey, I can totally still do that and it will be just as awesome as last time (I hadn't dug the old print out yet when I thought that last bit). So I looked at the craft store and was a little surprised by the prices to buy the tools to get started...but thankfully Amazon saved the day. A starter kit costs about $20 bucks. Fortunately the linoleum is fairly cheap (especially if you're buying smaller pieces), so I picked some extras up at the craft store. For this project you will need: ...

Terra Cotta Coasters

Image
I saw this cute idea for making coasters out of the saucers you put under terra cotta pots. I had most of the supplies to make them already, and I had just bought a big jar of Outdoor Mod Podge to use on coasters (as it's more water proof). So I made these coasters to match our patio set, thinking that they would be handy on hot days. You will need the following: 4-4 inch terra cotta saucers (I bought mine at Walmart) a 12 inch sheet of scrapbook paper pen or pencil scissors spray paint or craft paint in a coordinating color Mod Podge (regular or outdoor) and a foam brush to apply felt circles (if you don't have a sheet of the sticky kind, you'll also need fabric glue) Optional: Acrylic Sealer if your Mod Podge is still tacky after drying for a few days Start out by spray painting your saucers. I applied many coats as the terra cotta is porous and soaks up quite a bit of paint. You could paint these with craft paint, but you get a ...

Spring Wreath

Image
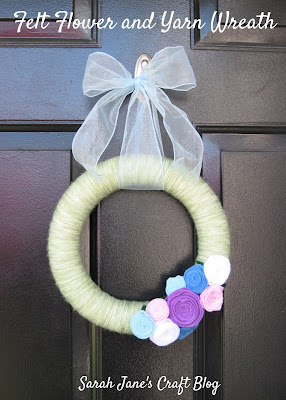
I wanted to make something to hang on the door after Easter and I have seen lots of yarn wreaths and tutorials for making felt flowers floating around the internet, so I thought I'd give one of those a try. I picked up a foam wreath form fro m the dollar store and gathered up my felt squares and got to work. You'll need the following: a wreath form (I used a foam one, but I've seem these done on straw and wire forms as well) yarn of your choosing (mine is Vanna's Choice --yeah Vanna White has yarn--in Seaspray Mist) straight pins a few squares of different colored felt fabric glue scissors ribbon for hanging Start out by tying your yarn to your wreath form. I also pinned it to the foam form so that it wouldn't slip as I wound the yarn around the form. Just keep winding and pushing it tight to completely cover the wreath. This was by far the most time consuming part of the whole wreath project. Not difficult at al...

Easter Wreath

Image
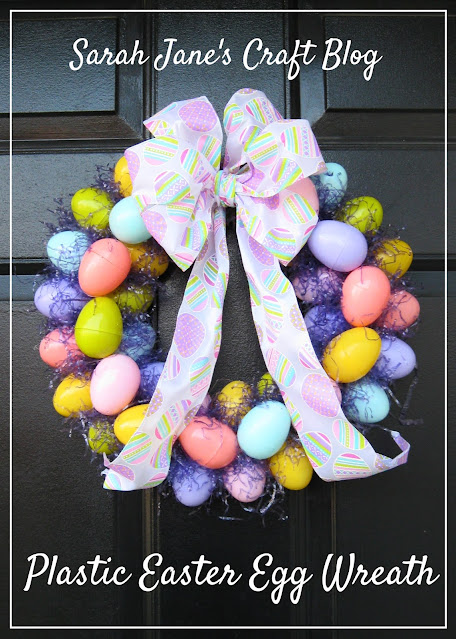
I took down my three St. Patrick's Day decorations (Hubby and I aren't Irish, so it's no big to-do around here) and put up my Easter decorations this week. Most of my decorations were purchased during the short time that I worked at Wal-mart (between college and Grad School) about 10 years ago. I have upgraded my Easter baskets since then, but I have a bunch of tired plastic eggs and plastic grass that I was getting sick of unpacking each year, so when I saw this adorable idea , I knew it was time re-purpose some of the old decor into something new and fabulous. The only new thing I had to buy for this project was some cute Easter ribbon (that was half off at JoAnn's for $1.99 for the roll, and I still have enough left to make another smaller bow). For this project you will need: two 12 inch rounds of cardboard (I used an old cardboard box)  42-46 plastic Easter eggs a bag of plastic grass hot glue gun and glue (be sure to have about 10 sticks on h...

Scrabble Tile Necklace

Image
There's a wealth of crafting ideas out there that use scrabble tiles. I just happen to have an incomplete set of scrabble tiles that came from my husband's house...so I thought I'd give one of those ideas a try. You will need the following: Scrabble tiles pictures, clip art, or scrapbook paper your favorite paper glue (I used rubber cement  but mod podge  or Tom Bow mono multi glue  would work well too) an emery board or fine sandpaper Paper Glaze  (or Dimensional Magic , Diamond Glaze , or Glossy Accents ) Glue flat-backed bails (available at most craft stores) glue for the bail (I used E6000 but super glue would also work well) cording or a chain for the pendant Start out by finding some good pictures or art that you want to put onto a pendant. I found some art using a Google search. Remember that art found this way should only ever be used for personal use. An even better option would be to use some of your own photos or ar...