Posts

Showing posts with the label magnets

Magnetic Pin Dishes

Image
I've made homemade pin dishes before for the blog. The first time I made them , the post got picked up by some listicle websites and got extra traffic from all over the internet. So I revisited the craft  a while back when I thought I found some good magnets online, since the ones from the craft store were kind of pricey. Unfortunately, those magnets were a bit small, and not strong enough. So, here I am today with a stack of saucers from an orphan set of teacups that my Grandma had in her china cabinet that no one wanted and some new magnets from Amazon. There's only one thing to do--make some more pin dishes! After my last batch of pin dishes suffered from weak magnets, I set about finding some larger ones to use on the back of my next set of pin dishes. I ordered these 20 mm (about 3/4 of inch) magnets on Amazon hoping that the larger size meant they would be stronger magnets. After they arrived, I set about testing them on my plates. Sometimes the plates will...

Crafting Revisit: Glitter Magnets

Image
I've been going through some of the oldest posts on this blog to update them a bit (make sure the links work, etc...) and after updating my post on Glitter Magnets , I knew I needed to try it out again. It was only the second craft I did for the blog over 7 years ago, so I thought I'd give it a revisit this week. You'll need: Glass Gems /Flat Marbles Mod Podge and a foam brush glitter of your choice a work surface (a paper plate works well to contain the glitter) magnets and glue to attach (I used e6000 ) I grabbed some glass gems from my craft stash and a bunch of old glitter and put the gems flat side up on a paper plate. Then I painted all of the gems with a layer of mod podge. Then I started covering them in glitter. After the gems all had a layer of glitter on them, I let them dry for about an hour before coming back and repeating the process. This time I poured some mod podge into the cap to paint onto the gems and started with t...

Crafting Revisit: Magnetic Pin Dishes

Image
One of my most popular posts on this blog was from way back when I was just starting the blog about 6 years ago (has it really been that long!?!). I had seen a picture on Pinterest of a thrift store plate being turned into a magnetic pin dish. I though this was a fantastic idea. The original post I was inspired by has long since been taken down or disappeared into the ether of the internet, but my original magnetic pin dish post is still available. At some point or another, I revisit all of my most popular posts to see if there are ways I can improve on the original. This project I've never revisited because I hadn't come across a decent deal on the neodymium magnets needed to make the pin dishes. But I recently picked up a batch in an Amazon order, so there were no more excuses! The next step was to get some plates or bowls that would work for this project. I stopped at the neighborhood Goodwill and had several options. The plates or bowls need to have a few feat...

Sticker-Backed Alcohol Ink Glass Gem Magnets

Image
Decorating glass gems with alcohol ink is one of my most popular projects on the blog. I've been fine-tuning my process and trying out a bunch of different variations. One of the biggest issues with using alcohol ink on glass gems is that you can't really see the colored ink, it gets a bit lost as you look through the gem at the colors. One way around this problem (or to at least diminish it) is to back the glass gem. I've tried paint , aluminum foil , and aluminum tape . All have worked, but the easiest was the aluminum tape. I punched circles out and placed them on the back of the gems like stickers....so it donned on me as I was looking at some basic office supplies-- 3/4 inch color coding stickers --that the white back of stickers would be a great way to bring out the color in my glass gems.  I started by laying out a craft mat and my alcohol inks , and I cut up a bunch of squares of felt for my applicator as I knew I'd want to change colors several tim...

Popular Post Recap: Alcohol Ink Glass Gems

Image
One of my most popular projects on the blog are these glass gems that I decorate with alcohol ink. Over the years, I've revisited the project several times and gotten several questions in the comments, so I thought I'd combine all of the different variations of the project into one post and answer the most frequently asked questions. Original Alcohol Ink Glass Gem Post If you've used alcohol inks before, this is a super easy project. If you're new to inking, it's a good first or second project. All you need is an ink proof surface (I use a craft mat , but parchment paper would be a good substitute), a set of inks , and an applicator  (you can make your own in a pinch with a scrap of wood and some velcro). I bought my glass gems at Dollar Tree, but they sell them pretty much everywhere that sells craft/floral arrangement supplies. All you need to do is apply some ink to the felt on the applicator (just drip a couple colors on) and stamp at the back...

Alcohol Ink Backed in Spray Paint Glass Gems

Image
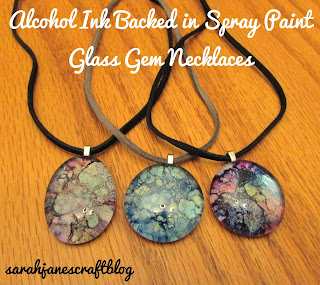
Ok, so I know I've done the alcohol ink glass gem thing a couple of times , but I got this idea in my head that it would turn out even cooler if I was able to cover the ink with something so that it was less transparent. I tried aluminum foil; it sort of worked . Then I had a stroke of genius...why not spray paint them. I figured white would be the biggest contrast, so that was the winner for this first attempt. I dug out my glass gems (time to head to the dollar store, my stash is getting low--only had ones with weird shapes and flaws left) and my alcohol inks. I set up my mat and my applicator with felt. Then I stamped them like crazy. I was reminded how the darker colors work a ton better on this project. I'd recommend using the Earth Tone Ranger inks on this project, but since they are being spray painted, I tried all kinds of different colors. I always gravitated back to the darker ones. I even tried splattering one (bottom left), but I ended...