Posts

Showing posts with the label buttons

Alcohol Ink Button Necklaces

Image
In last week's post, I made some button pendants with some old mother of pearl buttons. While I was going through my stash of buttons, I found several mother of pearl wannabee buttons made with shiny plastic. And of course the first thought from someone who is addicted to alcohol ink: "I could ink that!" I picked out some plastic buttons and drug out my craft mat and alcohol inks . I found out quickly that the flatter buttons worked the best, but that one with a recessed area for the buttonholes actually looked kind of neat in contrast. So you can probably make most buttons work. I also have a layer of craft foam between the wood and my felt on my homemade applicator , so I could press down firmly to get into some of the nooks and crannies. I started out thinking I'd dye the buttons one color, or with a few related colors, but after my first pass with the applicator, I knew I wanted to add more colors. I dabbed ink on until I liked the way they l...

Wire Wrapped Button Pendants

Image
I acquired my grandmother's button collection when she moved into assisted living last year, and I've been trying to come up with creative ways to use them. There were quite a few mother of pearl buttons, so I wanted to try to turn them into some jewelry. The quickest way to do that was to wire a few up to make a simple pendant. I used this post from Craftsy.com as a guide (she used a much thicker wire and jewelry making pliers in her tutorial). I have no idea what kind of wire I have. I think I picked it up at Wal-mart several years ago. It's bends easily by hand (probably similar to this wire ). It might not be the best for holding it's shape over the long term, but it did the trick for me as I don't have any pliers that don't leave grooves on the wire, so being able to make almost all of the bends by hand was convenient for me. Use whatever wire you've got available to use. Cut a piece that's 5-6 inches long. If your wire is less benda...

Popsicle Stick Button Snowflakes

Image
Last week I made some cute Christmas tree ornaments with my stash of popsicle/craft sticks , this week I'm making some button snowflakes. Last year I made some  starburst ornaments  using a similar method, but this time, instead of decorating my sticks with paint and glitter, I used a hot glue gun and buttons. I started with 4 popsicle/craft sticks. Glue them into a starburst buy layering them and putting down a drop of hot glue (or you cute use white glue or wood glue too). Next I grabbed my box of white buttons. My mom rescued these lovelies from my Grandma's house when she moved into an apartment and got rid of most of her stuff. My mom was nice enough to gift them to me (yay cool old buttons!). There are all kinds of buttons in this box, but I saved the real mother of pearl buttons for another project and focused on different sizes and shapes of white and off white plastic buttons. I glued a larger button in the center and then alternated size...

Craft Stick Christmas Trees

Image
My mom gave me a giant box of popsicle/craft sticks a while back, so I have been trying to come up with crafts that use them ever sense. Last year I made a great giant snowflake for our door and some starburst ornaments , so this year I'm making Christmas trees. You'll need 3 popsicle/craft sticks for each Christmas tree (and a 4th if you decide to use popsicle sticks for the trunk). I laid out 9 sticks on a paper plate to paint. I painted them a shade of dark green with some craft paint and a foam brush. I thinned the paint by wetting the foam brush before loading it with paint and then painted both sides of the sticks. After they had dried, I touched up the edges of each one. I also cut about an inch off of both ends of another three sticks (so 6 one inch pieces) and painted them brown. I tried to take a picture of this step, but they turned out blurry--so you'll have to use your imagination. I cut them with a pair of  diagonal pliers , it didn...

Ribbon Bookmarks

Image
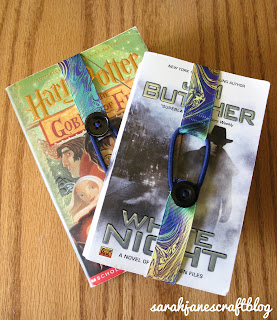
I bought this awesome swirly grosgrain ribbon from Michael's in the Dollar Bins last year.  I thought it was cool, but I had no idea what I'd use it for.  Bookmarks are perfect. I've been on a reading binge lately (all fluffy YA novels--delightful summer reading), so I knew I'd put them to good use. I started out by measuring the lengths on a trade paperback and a mass market paperback to get a couple of different sizes.  I wrapped them around each sized book and just snipped them when the ends met.  The next time I make these bookmarks, I'll probably cut them just a bit shorter to allow for the stretch of the hair tie. I folded over the raw end that was going to get a button later and double stitched it.  Then I moved on to the side with the hair tie.  I folded over about an inch of ribbon and pinned the hair tie in place.  Then I sewed with the presser foot right along the pin.  Then I pulled the pin out and sewed again with the p...

Button Ornament

Image
This is a super easy project. I bought two bags of cheap buttons at Wal-mart and attached them to the Styrofoam ball with stickpins. I wished I had more variety in the sizes and colors of the buttons, so if you had some lying around in a jar at home, that would probably work even better. I used a T-pin to attach some red and green ribbon to the top of the ball because the weight of the ball was too much for a regular pin.  The T-pin solved the problem and kept the ribbon from pulling free of the ball.