Posts

Showing posts with the label Christmas

3D Printed Gingerbread Man Ornament

Image
Last week I printed a sorting hat ornament, so when I was trying to decide what to print next, I immediately went looking for other ornaments that I could print with brown filament before I switched to another color. So, with that in mind, I found a cute gingerbread man inspired by Gingy from Shrek.  A gingerbread man was the perfect thing to print on our printer with the brown filament I already had loaded! So I sliced the design using .2 resolution and the recommended 80% infil. Gingy took about an hour to print and turned out so well, that I went ahead and printed a second. Of course, I could have gone to the trouble of pausing the print and finishing the icing with white filament, but I've never done that before, so I wimped out and opted to paint the icing. I tried a few methods which failed miserably (see the messy job above). I tried spreading a thin layer on a paper plate and stamping the ornament. It didn't transfer much paint, so I used a foam paint brush to "...

3D Printed Sorting Hat Ornament

Image
If you're a regular blog follower, you may know that I have a small Harry Potter tree that I've been creating ornaments for over the years. This year, I stumbled upon a design for a Sorting Hat ornament and immediately knew I needed to print it.   I used the recommended settings for an earlier version of the Sorting Hat (.2 resolution and 25% infil) and used some brown PLA on our 3D Printer . The print took a bit over 2 hours and came out great! After I took a few photos, I immediately hung it up our our tree!

3D Printed Rudolph the Truffle Nosed Reindeer Ornament

Image
This week I printed a cute design for a reindeer ornament with a nose the perfect size to fit a Lindor Truffle.  I printed the design on our printer using standard resolution (.2) and the recommended 15% infil. I used some matte brown PLA . They took about 50 minutes to print and came out great!   

Using a Scorch Marker on Wooden Ornament Blanks

Image
During the fall Prime Days, there was a sale on Scorch Markers . I saw these online a while back and thought that they looked super cool--you can burn wood without using a wood-burning tool, and since it's a marker, you can use stencils. This is not a sponsored post, I purchased this marker and thought I'd share how it went when I used it for the first time. A few weeks ago, I cut a bunch of designs out of vinyl with my Silhouette Cameo . So far I've made a bunch of signs , but this time I just used a star cut-out as a stencil. You could easily just cut a star out of some sticky shelf liner or contact paper to achieve the same results without needing to own a cutting machine. I applied my vinyl to some wooden ornament blanks  and got out my Scorch Marker. The marker needed to be primed like a paint marker, but after that, it worked really easily. I colored inside the star outline and outside of the star itself to see how the vinyl worked as a stencil and how the marker w...

Dollar Tree Metal Signs with Cut Vinyl Decorations

Image
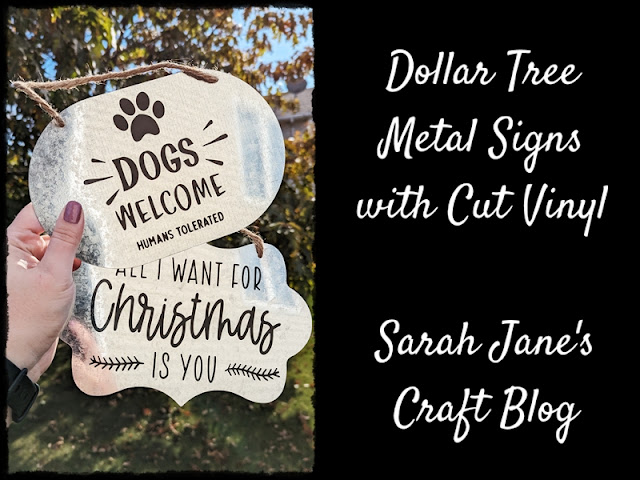
Well, it's official. The window for creating holiday crafts has opened. To start off with, I decided to drag out my old Silhouette Cameo 2 and cut some designs. I decided to ease into it, though, by sneaking in a dog lovers sign, too. If you follow the blog, you may remember that the last time I used my Silhouette, I swore I wouldn't use it again to cut vinyl until I got a new blade. Well, I got a new blade , so here we are ready to swear while weeding yet again. I printed a mix of designs and tried to cram as much in as possible. I have some Thanksgiving/fall projects in the works while squeezing in some Christmas designs. The "All I want for Christmas" design that I'll be using on a sign for today's project was a freebie from the Silhouette Studio from a previous year that I hadn't cut yet. I had meant to use the bottom "Dogs Welcome" design, but even though I measured the sign, the design was way too big once I cut it out. I'm not sure w...

Turning Perler Beads Characters into Christmas Ornaments

Image
Earlier this year, I made some Perler bead characters from a kit off of Amazon . Since I've been slowly but surely making ornaments for a small tree themed after Harry Potter , I thought it would be fun to turn the Perler bead characters into ornaments. This is a pretty quick project. On most of the characters, there was a center bead in the top rows of beads. I used a vinyl pick (but an awl or large metal needle should do the trick too) to poke a clean hole through the middle beads. For some characters, there isn't a middle bead, so to keep the ornament hanging mostly straight, I made a new hole between two beads in the middle. This required using a lighter to heat up the metal of the vinyl pick and then to poke a hole. Once the holes were poked, then I added a jump ring (small metal rings that are sold with the jewelry supplies) to the hole and pinched it closed with a pliers. Once the jump rings are added, you can use a cord or thread or, like I did, just an ornament hange...

Alcohol Inked 3D Printed Ornament Blanks with UV Resin

Image
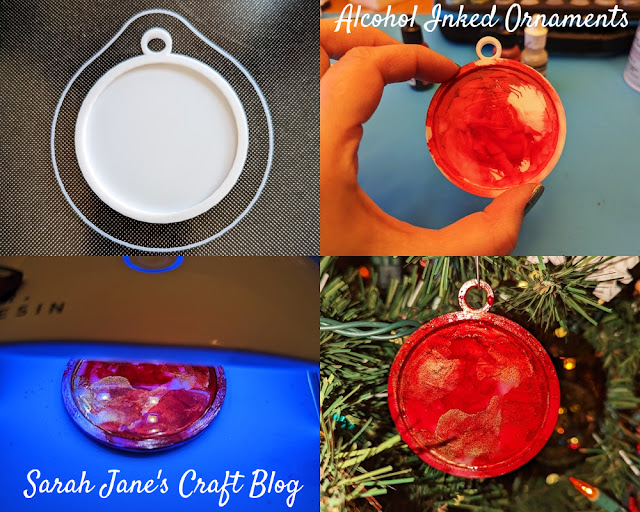
A couple of weeks ago, I posted a project where I printed ornament blanks on our 3D Printer and then topped them with recycled Christmas cards and UV resin . The blanks turned out so well, that I thought it would be fun to try to ink them. I've used alcohol ink on tons of ornaments (from plastic to glass to wood to ceramic ) and have had mostly good results, so why not. I have inked on 3D printed plastic before, but I've only stamped it (like these ornaments from last year) on. The reason I've only ever stamped 3D printed plastic is because of the grooves that are left from the printing process. The ink soaks right into those lines. So, I had an idea, why not put a tiny bit of resin on the bottom of the ornament to seal up those grooves. So I printed 3 ornament blanks and two of them got the UV Resin skim coat. As you can see in the first photo, I put very little resin on the ornament. Then I used a small piece of cardboard to swipe it around the ornament. Unfortunatel...