Posts

As Seen on Pinterest: Spray Oil Manicure

Image
I'm testing out another one of the popular Pinterest DIY posts today.  This time I'm trying out the spray oil manicure.  The original pins suggest that spraying Pam (or a similar aerosol spray oil) will "instantly dry your manicure."  Well, it doesn't do that--not even close.   What it does do is create an oily buffer on your nails that makes them a little less likely to get nicked or smudged.  Awesome, right?  Well sure if you're hands weren't covered in slippery oil....and it only works if you put on a relatively thin coat of nail polish....glob on too much polish and the Pam will leave little bubbles in your manicure...not to mention that things that would normally be a no-no when your nails are drying are still a no-no--it's no magic bullet.  But heck, if you have a bottle of spray oil that's about to expire, chuck it in the bathroom cabinet, it could help save your manicure on a busy day--but be warned it's slippery stuff. ...

Silver Sea Shells

Image
In a pile of stuff destined for a thrift store, I rescued a bag of sea shells.  I wasn't sure what I was going to do with them, because let's face it, there's a lot of really tacky sea shell art out there, but I knew I wanted to craft something.  I saved a few of the prettiest shells and put the rest in some cardboard boxes to spray them silver (like you see at Pottery Barn and what not). I sprayed them with my Rustoleum Metallic Silver spray paint.  I applied two light coats on the tops. I left them outside for about an hour in between coats. Then I flipped them over and put a good coat on the bottom side.  They were pretty well covered at that point.  I set most of them aside to finish curing inside.  Some of the shells had more nooks and crannies and needed to be sprayed again to get into all of the little corners. I let them dry inside overnight and then put them into a glass vase.  I picked up this one (which is about 10...

Food Coloring Spray Paint

Image
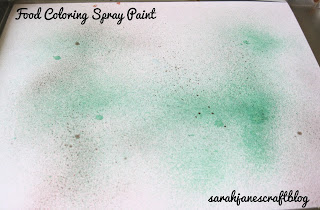
For my last post, I marbled paper with food coloring, today I'm going to create a spray paint with it. I had no idea that food coloring could be used so easily with paper--the possibilities seem endless. This project is a super cheap and easy way to create that misty air-brushed look. You'll need: Liquid food coloring Small spray bottle  Water Paper Put about one inch of water into your spray bottle (you can find these for about a dollar in the travel section of most big box stores).  Add several drops of food coloring and shake.  About 3 drops will create a water pastel, 5 or 6 drops will create a more saturated color.  I used white cardstock on a cookie sheet to help with overspray.  You'll want to wipe down your table after every few sheets (or put down some newspaper).  As long as the food coloring is still wet, it wipes up easily.  Be sure to run clean water through the sprayer before switching to new colors. After you've...

Shaving Cream Marbling

Image
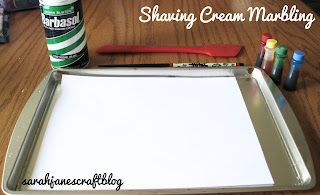
I wanted to do some paper marbling, but after reading several online tutorials, they all required special products (thickeners, special paints, powders to make the paint stick, etc...) and tools (combs, trays, etc...).  So when I read a tutorial for using shaving cream, I figured it was worth a whirl since I had all the stuff on hand. You'll need: Shaving cream A tray or cookie sheet Liquid food coloring Spatula or plastic ruler Chopstick or skewer Paper (I used cardstock) Squirt a layer of shaving cream onto your cookie sheet or tray.  I used a cookie sheet that I picked up for less than a dollar--pretty worthless for cooking on--but good for craft projects. I smoothed it out using a spatula.  You could use a ruler or piece of cardboard. Start by dripping your food coloring on and starting to drag your chopstick or skewer through the shaving cream. Once you have a pattern that you like, you can make a print.  Just dr...

Dowel Rod Loop Turner

Image
This summer I've been making neck coolers .  The most annoying part of the whole process was turning the loop the right side out.  I fiddled with them for what seemed like forever.  I tried making my own loop turner out of a chopstick and a wire, but it didn't really work. So I presented the problem to my husband.  He likes to solve problems. Within minutes, he came up with this idea. He grabbed a 5/8ths inch dowel rod from the garage (I'm sure a half inch dowel rod would work just fine too).  He slipped the neck cooler tube onto the dowel (in picture above). Then he used a tack to attach the fabric to the top of the dowel rod.  He later discovered that a push pin (with it's slightly longer pin) worked a bit better.  He also determined that pushing it through the fabric where the seam is (and consequently more layers of fabric) help to keep it attached to the dowel. Once it's attached comes the fiddly part.  Carefully pull the sur...

Egg Carton Campfire Starters

Image
It was the summer of 1990 (give or take a year).  My family went camping at Pickerel Lake State Park in  northeast South Dakota.  It rained a lot on that trip.  So much so that I went to one of the park organized events for kids just to have something to do.  The campground hosts were having some craft project like making candles or something...I don't remember the specifics.  But what I do remember vividly is that they had their fire blazing in the pouring rain, and my Mom asked them how they got their fire started.  They said they used egg carton fire starters.  We had no idea what they were, so they showed us.  As an adult now, I've tried store bought starters and various homemade varieties.  If I'm strapped for space, I make the Cotton Rounds starters that I made a few weeks back, but otherwise--these always come with us camping.  They light easily and burn forever.  Plenty of time to get things started, even in windy...

As Seen on Pinterest: Vinegar and Listerine Foot Soak

Image
I am one of those people who stops wearing socks as soon as it hits 65 degrees out.  I'm a sandals and barefoot kind of girl.  Which means that I was really excited about the prospect of a foot soak that would allow you to rub loose skin right off of your feet and leave them smooth!  The original instructions call for 1/2 cup vinegar and 1/2 cup listerine and 1/4 cup water.  Now, I know that I have big feet, but I can't see how this would possibly be enough for anyone to soak their feet in for 30 minutes.  I doubled the batch.  It still wasn't enough.  I ended up with 1 1/2 cups listerine (thank goodness I had the cheap generic stuff) and 1 1/2 cups vinegar and 3/4 cup water. I then soaked my feet for the full 30 minutes.  After which, they were blue. Alright so that's not that surprising--it is, afterall, blue listerine that I was using.  So I rubbed the solution off with a towel (this is when the dead skin is supposed to jus...