Posts

As Seen on Pinterest: Bar Keepers Friend

Image
My knives are rusty.  I used to only hand wash my knives--but aint nobody got time for that.  I noticed that my knives were getting rusty in the dishwasher...or sometimes even if they sat in the dish rack drying for too long they'd get rusty.  I started seeing solutions to the problem on pinterest.  Lemon juice was one...but I thought it might pit the surface.  Then I saw someone recommend Bar Keepers Friend (which I picked up at my local Home Depot for less than $1.50) for cleaning rust and hard water stains off of several different types of surfaces.  I figured I was in for some scrubbing, so I used a blue 3M sponge for my first try.  The rust spots disappeared almost immediately.  So for the knife above (which was one of my rustiest), I used only a paper towel and a little water to wet the powder.  I had it completely clean in about 30 seconds.  So this is one pinterest pin that gets the seal of approval--totally works and i...

Adventures in Dehydrating: Strawberries

Image
Strawberries are in season, so time to buy in bulk and dehydrate!  We bought a 4lb box of strawberries at Costco and used about half to fill up our dehydrator . I setup my work station with a small knife for hulling, a cutting board to work on, a colander for washing, and a strawberry slicer . I rinsed the berries and cut off the stems and plopped them in our strawberry slicer.  It made quick work of the job.  I know it's a bit of a unitasker , but I picked it up at TJ Maxx for even less than they sell it for at amazon, and it sure speeds things up.  You could always use a mandolin or even just cut them by hand (but try to keep them relatively uniform in width). Place the strawberry slices close together (as seen in the fresh photo above) but not so close that they are touching.  The air needs to be able to circulate, but they can be close together because (as you can see in the dried photo below) they shrink as they dry. We set ours to...

Crafting Revisit: No Sew DIY Fleece Rope Bones

Image
My very first craft blog post was about making braided fleece dog toys.  In the year and a half since that post, I've learned a lot about how to take better photos with my little point and shoot camera, and how to adjust the photos that aren't so great on my computer. Lets just say that me and the macro setting are best buddies now.  I still have a lot to learn, but I can easily see how much the posts have improved. Needless to say, I recently happened across some fleece in the remnant basket at the local Walmart (our closest Walmart still has a fabric section--I know many don't anymore). About 20 inches of a bright blue fleece and 15 inches of a thicker light green fleece were each marked at about $1.00.  Those widths of fabric aren't good for much, but they are perfect for making rope bones.  So I figured it was about time to make some more.   I pulled out my cutting mat and rotary cutter.  For medium sized bones, cut your strips 2 inc...

Card Making: Multi-Colored Stamping

Image
I got a new stamp set that included the bird cage, bird, musical notes, and a heart (which I didn't use).  I thought it was a super cute little set, so I gave it a whirl on some white paper to get a feel for it.  I knew that my new silver ink would work great for the bird cage, but if I wanted the bird inside it, I needed to stamp it first.  I stamped the bird and the musical notes, then stamped the cage over it.  I paired this with a stamp that I used two different colored small ink pads to create a two-toned stamp. Yet another situation when applying the ink to the stamp and not the other way around, makes a huge difference.  On this smaller card I used just the two-toned stamp for a cute little note card. I paired these with purple paper and this watercolor themed scrapbook paper in similar colors.  I figured the pattern wouldn't overwhelm since the stamps were on plain white paper.  I think they turned out really cute and I look forward...

Card Making: Square Cards

Image
New adventures in card making started out with a new stamp and silver ink pad, but turned into an opportunity to create these cute square cards.  My new stamp is the swirly background stamp.  I picked it up in the dollar basket at Michaels last week.  I also used a coupon to pick up a silver stamp pad (I was disappointed that the silver didn't work well on dark paper though). After I created my layered squares, I searched for a way to attach them to the inexpensive blank cards I had....but nothing looked quite right.  So I decided to make square cards instead.  I simply attached my layered squares and chopped off the excess card with my paper cutter.  They turned out super cute and can be mailed in the old envelop.  I may try my hand at envelope making though. :)

Alcohol Ink Votive Holders

Image
I had picked up these little votive holders at the thrift store for 79 cents a piece.  I probably didn't save much by buying them second hand, but they seemed like a great size for tea lights.  Then when I got my alcohol ink, I thought I'd try it out on some glass.   I wiped the votives clean with a makeup sponge and some rubbing alcohol, then carefully dripped ink down the sides of the candle holders.  I tried to keep it from looking too "drippy" and still cover most of the surface.  It pooled at the edge and did look drippy in places.  It's tricky with a rounded surface to control the ink--which is part of the point of this look--a free form stained glass.  They turned out pretty neat when the light shines through them, and I've added another alcohol ink project to my repertoire.  

Card Making: Punched Layers

Image
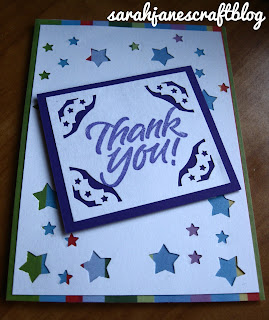
I used to make cards all the time in high school and college.  When I had less money and more time it was a great way to give personalized gifts.  Well, I'm out of school for the summer--so I have less money and more time :).  I just happened to have two different small sized star paper punches, so I thought that would be a good place to start.  I layered the white card stock over striped paper, but any brightly colored paper--solid or with a small pattern--would work great.  Since I was just using cheap little paper punches, I got around not being able to punch the middle, by putting the card's message there (which I stamped). Everything got layered together using double stick tape. The other card I made using this method was made with circle punches and circle paper.  I wish I had had a circle punch in between those two sizes, but it still turned out pretty well.  I tried to make them looked randomly placed--I'm not so sure how successful I...