Posts

Showing posts from April, 2019

Dishwasher Pod Mini Trash Can (or Storage Canister) with Duct Tape

Image
I always enjoy a good duct tape project . Duct tape is durable and bright and fun to play with, but trying to get it to look professional can be a bit of a pain. A few years ago, I covered a  Cascade pod canister  with duct tape to create a little storage canister. After much trial and error, I figured out how best to approach the project, which saved me a ton of time when I raided my stash of recyclables for a new project. I had two dishwasher pod canisters in my saved for crafts recyclables box, so I dug out some fun new duct tape that I hadn't gotten a chance to use yet and got ready to work. I highly recommend using a cutting mat and a rotary cutter when working with duct tape, you can measure and uses scissors, but it will be much easier with a rotary cutter. The tape sticks to even the non-stick scissor blades, but doesn't seem to stick to the rotary cutter (probably because you're only cutting it on the non-sticky side). It's also a lot easier to ke

Alcohol Ink Galaxy Tile

Image
Months ago, I cut a bunch of shapes out of some dark blue vinyl with my Silhouette cutting machine. I made some monograms for our electric toothbrushes and some meeple coasters , but I still had a Tardis (Dr. Who's time machine) cut out and waiting for a project, so I decided to put it on a ceramic tile and try to do some galaxy alcohol ink. I have played around with galaxy spray paint  and had a lot of fun, but I hadn't tried to make space-y nebula-y alcohol ink patterns. So I got out my craft mats , alcohol inks, a six inch ceramic tile, my Tardis vinyl decal, and some canned air . I weeded (peeled the excess vinyl off) my decal and set it aside and located my space-y colors ( pitch black , indigo , purple twilight , a couple other shades of blue and some silver and gold) . I started with the metallic inks in the center of the tile so they would show behind the vinyl decal. I squirted some ink onto the tile and thinned it a bit with rubbing alcoho

Alcohol Ink Splashed Mugs

Image
I've been itching to ink some white ceramic stuff that wasn't tiles for a very long time, so when I came across these plain white mugs at Big Lots, I picked them up knowing that I was going to ink them. The mugs were a fairly matte finished white. I pealed the price stickers off and gave them a quick washing. I wanted to keep the ink fairly minimal and let it flow onto the mug in stripes just along the bottom. I picked Turquoise ink from Ranger and dripped it onto the mugs. I kept the mugs horizontal while I was inking so the ink would drip around the mug. If it wasn't flowing as much as I wanted, I used a very small paint brush dipped in rubbing alcohol to get the ink flowing a bit more. Once I had a few stripes with some interesting blobs, I set it aside to dry and repeated it with the other mug. I had a few stray ink trails that I had to clean up with a paper towel soaked in rubbing alcohol, but otherwise, it was pretty simple. To break up the

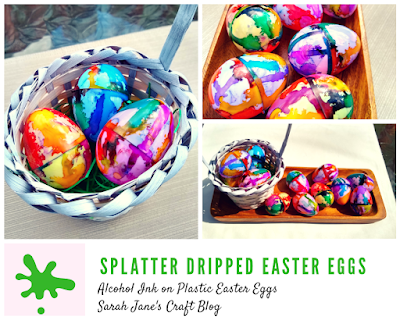
Splatter Dripped Alcohol Ink Easter Eggs

Image
This isn't the first time I've used alcohol ink to decorate plastic Easter eggs ...and I assure you, it won't be the last. It's a ton of fun. But before I talk about the splatter eggs (shown above), I need to share a story about a craft experiment that fizzled. I first set out to test a weird idea I had about dipping plastic Easter eggs in the alcohol ink much like you'd dip a regular egg in egg dye. I figured it could be a cool looking project, and I love testing out new application methods. So I cut the top off of a plastic solo-type cup (I think this one was Hefty brand, so you know, whatever you've got). Then I squirted some rubbing alcohol in the cup followed by 4 or 5 drips of the most saturated alcohol ink color I had ( indigo ) to see if it even sort of worked. I dropped the plastic eggs in the ink and swirled them around and some ink transferred. That was good enough for me. So I went full steam ahead with a Pink-y red made with Pinat

Alcohol Ink on Iridescent Plastic Easter Eggs

Image
A few weeks ago, I went to the Goodwill Outlet and picked up a cart full of stuff. One of the things I picked up was a package of large (like about 4 inches tall) iridescent plastic Easter Eggs. They were pretty and light (it's pay by weight at the Goodwill Outlet), so I tossed them in the cart. After getting home and taking a closer look at them, I knew I wanted to ink them. Since Easter eggs are usually used to hide treats, these don't do a very good job of that. Some ink would make them more colorful and perhaps hide contents. I had used alcohol ink on plastic Easter eggs in the past (both stamped and blown ), so I knew inking would work, but I had never worked with these iridescent eggs before. After looking at the eggs, I decided that inking the inside would be a better choice. The shimmery coating was on the outside of the eggs and if I inked over it, it would probably be less shimmery. I started by opening the eggs up and giving them a color