Decoupaged Plastic Easter Eggs
Last week I used washi tape to decorate some plastic Easter eggs. This week I wanted to use decoupage to decorate the eggs.
So this craft post starts out with a craft fail. I wanted to make comic book eggs. I thought they'd be adorably geeky. I had a bunch of free comic book day comics in a stack, and I thought as long as I cut out the small panels and perhaps spritz the paper with water (a trick to make the paper more malleable and less likely to wrinkle), it'd work perfect. I even grabbed a larger plastic egg to try it out on. But no matter how much mod podge I used, the paper just wouldn't wrap around the egg, and, therefore, wouldn't stick.
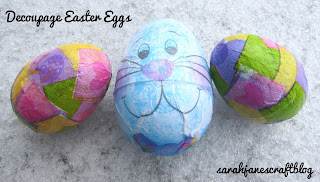
So I had to switch gears. I knew I needed to use tissue paper or a napkin to get the paper to adhere to the egg. So I used what I had on hand--some old Easter napkins. They had design that consisted of a big bunny surrounded by pastel colored squares.
I used a larger egg and applied glue to the whole egg and carefully applied the big bunny. I wrapped the large square around the egg. I had to cut the napkin in a few places to get it to lay sort of flat. I did also end up having to cut a couple small squares of blue from the napkin to fill in the gaps. It was a bit lumpy, but it worked. The blue egg did end up showing through a bit though.
I knew it would work a lot better to apply smaller pieces of paper to the eggs, so when I was decoupaging the regular sized eggs, I used the pastel border of the napkin cut into squares.
I painted on a bit of glue, stuck on a square and smoothed out the paper as carefully as possible. Then I repeated the process a gazillion times. One of the main struggles with the eggs is that they don't have a side you can hold onto or set down, so your hands are always in the glue. When your hands have glue on them, they stick and can tear the paper or smudge the design. I ended up doing the top half of two eggs, then letting them dry for about 45 minutes before doing the bottom half so that I had some dry areas to hold onto as I finished.
When the eggs were completely covered, I let them dry before attempting to seal them with more glue.
Then when I sealed the eggs the first time, I slathered them in enough glue that my fingers would slide around on the paper and didn't stick. I then smoothed the paper down as best as I could with my fingers (washing my hands between each egg). Then I let the eggs dry again and painted on a second sealing coat with my foam brush. I tried to turn them regularly as they dried so they didn't stick to the plate.
In the end, they turned out pretty cute, especially the patchwork eggs. But they were a pain.
Here's what I learned: Decoupaging small plastic Easter eggs needs to be down with thin flexible paper (like napkins or tissue paper) cut into small pieces for the best results (say an inch or less). Apply the paper and glue to half the egg and allow to dry before trying to finish covering the egg or your fingers will stick and tear the paper up.
I hope these tips help you if you choose to decoupage plastic Easter eggs!


Comments
Post a Comment