Posts

Showing posts from March, 2016

Spring Dollar Store Altar Candles

Image
I've made decorated altar candles for most of the holidays, but I saw this adorable tissue paper the last time I was at Dollar Tree, and I knew I needed to decoupage something with it. Since they also sell the altar candles and Dollar Tree, it seemed like fate. To make this project, all you need is a couple of dollar store altar candles, a jar of mod podge , a foam paint brush, some patterned tissue paper, and a scissors. Using the candles as a guide, I cut out two squares of tissue paper. It's sometimes hard to cut, so I recommend folding it and using that as a line to cut along, or you could use a rotary cutter and a cutting mat. I've found that cutting it about a half inch longer than you think you'll need allows you to select the straightest edge along the top of the candle, and to wrap the bottom edge of the paper over the bottom edge of the candle for a finished look. Once your paper is cut out, paint a line of mod podge along one of th

Etched Glass Candle Holder

Image
In February I made my first etched glass project since I was a teenager, and it was so much fun that I've been thinking about what to do next ever since. I decided to make some candle holders, and after lots of thought, I decided on a bird design. I googled bird silhouette and looked through lots of designs before settling on one that was simple enough that I thought I could cut it out while still be detailed enough to be interesting. I ended up finding a design that I couldn't track down the original owner of (which is why I don't have a link to it). I pasted the image into Word so that I could easily resize it and flip the image so that I could have the birds facing each other in the final project. I printed out my birds onto some regular copy paper. I grabbed a cutting board, my xacto craft knife , some contact paper , two square candle holders from Dollar Tree and got to work. I cut my paper templates and a square of contact paper so they were all t

Dripped Alcohol Ink Dish

Image
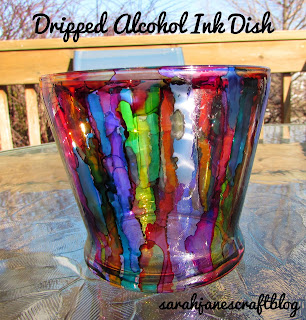
It's been unseasonably warm here for the beginning of March. Most of the days have been cloudy, though, so as soon as we had a nice sunny day, I went outside to work on a craft. I really loved the results I had when I dripped alcohol ink on a vase , so I decided to use the same technique on this dish I bought at Dollar Tree. It's conveniently shaped and sized to be a candy dish or candle holder or a bud vase, whatever you like. I laid out my craft mat and grabbed my rubbing alcohol for cleanup. Then I picked some bright colors and flipped the dish over. I dripped them from the bottom edge of the dish and let gravity do it's job. For some of the colors I traced the tip of the ink bottle down the length of the dish to help gravity along. And for some, I started a drip half way down the dish to provide some variety and depth. I kept turning the dish and adding colors as I went along. The sun cast pretty rainbow colored shadows on the table as I worke

Alcohol Ink Backed in Spray Paint Glass Gems

Image
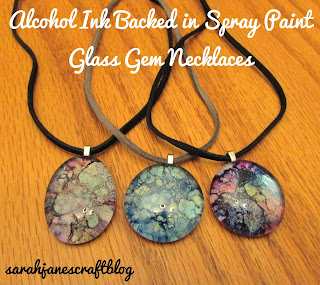
Ok, so I know I've done the alcohol ink glass gem thing a couple of times , but I got this idea in my head that it would turn out even cooler if I was able to cover the ink with something so that it was less transparent. I tried aluminum foil; it sort of worked . Then I had a stroke of genius...why not spray paint them. I figured white would be the biggest contrast, so that was the winner for this first attempt. I dug out my glass gems (time to head to the dollar store, my stash is getting low--only had ones with weird shapes and flaws left) and my alcohol inks. I set up my mat and my applicator with felt. Then I stamped them like crazy. I was reminded how the darker colors work a ton better on this project. I'd recommend using the Earth Tone Ranger inks on this project, but since they are being spray painted, I tried all kinds of different colors. I always gravitated back to the darker ones. I even tried splattering one (bottom left), but I ended