Posts

Showing posts from 2015

Getting Started with Alcohol Inks

Image
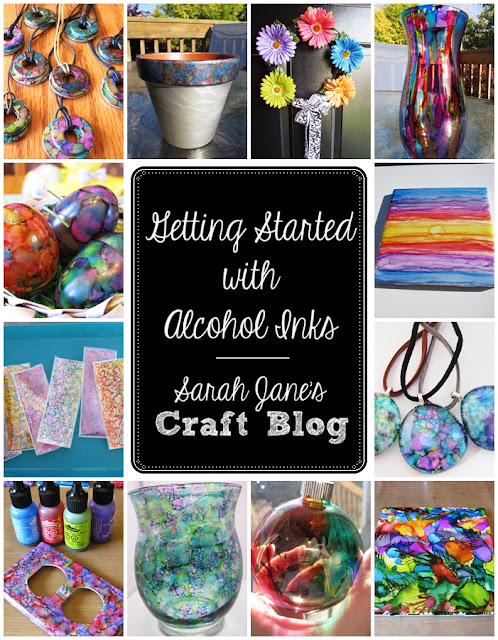
Some of my most popular projects posted to the blog have been alcohol ink projects . I've been playing around with them for several years now (and completed dozens of projects on all types of surfaces) and feel fairly confident that I can share some advice for folks who are considering trying them out for the first time. So what are alcohol inks? They are alcohol based dyes that can be used to dye any number of different surfaces but often work best on smooth/nonporous surfaces (like glass, metal, plastic, glossy paint, etc...). The ink is a lot like the ink used in permanent markers (think Sharpies). It's permanent once it dries as long as it doesn't come in contact with alcohol based liquids (though just like permanent markers, some very smooth surfaces like high gloss ceramic, can smear even once dry). Alcohol Inks are often stamped or dripped onto surfaces and can create a translucent stained glass effect when used on clear surfaces (like glass and plastic

Floral Christmas Centerpiece

Image
Happy Christmas Week! Here's wishing you all a great week of wrapping, baking, crafting, packing, etc...in preparation for the holidays. This week I made a fairly quick project out of a floral arrangement that was given to me a few Christmases ago but was not really my taste and starting to fall apart a bit. Unfortunately, I forgot to take a picture of what it looked like before. I was a bit excited to tear the thing apart. I grabbed any floral accessories that I had that might fit a Christmas arrangement and piled them on the table with the parts from the original arrangement. It used to be all blue and green, but I ditched most of the blue and any of the overly rustic looking greenery and replaced it with some red roses and ornaments.  I replaced the floral foam with some fresh foam, stuck some of the tall pieces in the back and then trimmed the 3 roses to be different heights and stuck them in the foam...then it was just putting the pieces back in until I liked t

Dremel Engraved Plastic Ornaments

Image
There's a post floating around with plastic  ornaments engraved with a dremel . They are beautiful. These--are not. For starters, she managed to find plastic ornaments that are white underneath. All of the ones I had in my stash were made of gray plastic. I also only have one engraving tip size for my dremel--but I figured I'd give it a whirl.  It's really hard to get anything resembling a smooth line. The dremel wants to shoot right off of the ornament. After ruining a couple red ones, I was left with some small gold and silver balls. I opted for a quick starburst/asterisk design as I thought I could manage it given how excitable the dremel was on the surface of the ornament. The starburst was easy enough and would probably look good no matter what color the plastic is underneath the paint. Just be sure to work on a covered surface to catch all the little paint/plastic filings. Clearly this is one of those "as seen on pinterest" projects that is w

Retro Christmas Pin Refashion

Image
This week is finals week at the school I teach at, so I'm just sharing a really quick project before I get back to grading finals. This summer my Grandma past away. She had lots of costume jewelry--especially pins and broaches. This beauty was one of the unclaimed after everyone took whatever they wanted. Now, I like a bit of Christmas kitsch as much as the next gal, but it was a bit over the top--I mean the charms hanging off the wreath are bigger than the wreath--but I could tell it wouldn't be hard to fix it. The dangly bits on this pin were just attached with jump rings, so all I needed was a pliers. I pulled each of the rings attaching the charms to the wreath apart and now I have one wreath pin and 3 charms. The charms on their own are kind of cute, and I can't wait to find a new purpose for them, but for now I have this lovely retro wreath pin. It went from kitschy to almost understated (if there was such a thing in a Christmas pin). I can't wa

Popsicle Stick Button Snowflakes

Image
Last week I made some cute Christmas tree ornaments with my stash of popsicle/craft sticks , this week I'm making some button snowflakes. Last year I made some  starburst ornaments  using a similar method, but this time, instead of decorating my sticks with paint and glitter, I used a hot glue gun and buttons. I started with 4 popsicle/craft sticks. Glue them into a starburst buy layering them and putting down a drop of hot glue (or you cute use white glue or wood glue too). Next I grabbed my box of white buttons. My mom rescued these lovelies from my Grandma's house when she moved into an apartment and got rid of most of her stuff. My mom was nice enough to gift them to me (yay cool old buttons!). There are all kinds of buttons in this box, but I saved the real mother of pearl buttons for another project and focused on different sizes and shapes of white and off white plastic buttons. I glued a larger button in the center and then alternated sizes

Craft Stick Christmas Trees

Image
My mom gave me a giant box of popsicle/craft sticks a while back, so I have been trying to come up with crafts that use them ever sense. Last year I made a great giant snowflake for our door and some starburst ornaments , so this year I'm making Christmas trees. You'll need 3 popsicle/craft sticks for each Christmas tree (and a 4th if you decide to use popsicle sticks for the trunk). I laid out 9 sticks on a paper plate to paint. I painted them a shade of dark green with some craft paint and a foam brush. I thinned the paint by wetting the foam brush before loading it with paint and then painted both sides of the sticks. After they had dried, I touched up the edges of each one. I also cut about an inch off of both ends of another three sticks (so 6 one inch pieces) and painted them brown. I tried to take a picture of this step, but they turned out blurry--so you'll have to use your imagination. I cut them with a pair of  diagonal pliers , it didn

Shrinky Dink Snowflakes

Image
It's that time of year again--time to start crafting Christmas ornaments! I decided to give something a little different a try. A while back I used #6 clear plastic from cookie containers and take out containers to make homemade shrinky dinks . I decided it would be fun to make ornaments using this process. Snowflakes seemed like a good idea since they are clear-ish in the real world. So I gathered up some supplies--a craft knife (I used an xacto brand craft knife , the box cutter also in the picture didn't make the cut--literally), a scissors , a cutting board, my #6 plastic sheets harvested from the flat bottoms of bakery containers (you could use real Shrinky Dink sheets ), and some print outs of snowflake templates that weren't too intricate. I picked some from a Google search that used all straight lines, and then I blew them up in Word so they were about 5-6 inches wide. I knew from experience that this recycled plastic shrinks a lot (to less than half th

Printable Thanksgiving Banner

Image
I needed a little something to decorate my mantel for Thanksgiving. It's always easy to find Halloween and Christmas decor, but Thanksgiving is often left out. Well, time to show Thanksgiving some love. I found the printable banner/garland on the At Second Street blog that read "Give Thanks." With just a little bit of tweaking, I had a great banner for my mantel. I printed out the letters (which print 2 to a sheet) on some cardstock . All I had was white, so that's what I went with. The inspiration website used some brown card stock. I used to have some off white card stock with speckles that would have worked perfectly, so just use what you've got. I cut the letters out with a scissors leaving a 1/4 inch border of white along the edge. After the letters were cut out, I cut a slit along the brown border on each side towards the top with a craft knife to run some ribbon behind each letter to string it up. I'm sure there are other ways to do