Posts

Showing posts from August, 2013

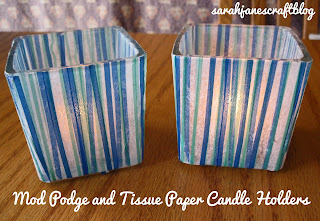
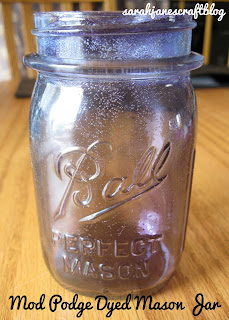
Mod Podge Dyed Mason Jars

Image
I started seeing people post about coloring their own mason jars.  They would usually be to a shade of blue--reminiscent of the classic teal colored Ball Jars .  Why dye them blue when you can still buy them that color?  My favorite color is purple, so I thought I'd try to make a purple Ball Jar. You'll need: Mod Podge A Mason Jar (I picked mine up at the thrift store for 89 cents, but you can get cases of them everywhere this time of year) Liquid Food Coloring Foam Brush Something disposable to mix the paint on/in (I used a paper plate) I dumped a good pile of Mod Podge onto my plate--you'll need quite a bit in order to get good coverage.  Then I used 4 drops of red and 2 drops of blue food dye to get the desired saturated purple color. I stirred the color together until there weren't any streaks of blue or red. Then I quickly brushed the inside of the jar to make sure that everything would get covered even if the rest of the M

Homemade Shrinky Dinks

Image
As soon as I heard you could use any clear #6 plastic to create your very own homemade shrinky dinks, I've been checking the bottoms of food containers.  I finally got one with some flat surfaces that was labeled #6! I knew right away what today's project would be.  I should preface this with the fact that this project was very much a learning process for me; I've never used real shrinky dinks, so I was excited to try out the recycle version.  I grabbed a bunch of Sharpies and lined a pan with foil.  I preheated the oven to 350 degrees and got to work. I cut out all of the flat surfaces of the container and a couple of the ridged edges just to see what would happen.  I got to work drawing and quickly learned that the fine tip Sharpies didn't draw very well on the plastic.  I switched to regular Sharpies and drew some hearts and leaves and some cute stick figures.   Then I did some artsy patterns on the ridged plastic.  I didn't put too much thought into

As Seen on Pinterest: Roasted Starburst

Image
This spring, I started seeing a photo someone posted of roasting a Starburst circulating Pinterest.  My first thought--yum! My second thought, well, how does that work?  So, when we went camping last weekend, I used the opportunity to give this post a whirl.   I had lots of questions that I was seeking to answer, so here's what I found out: Do the Starburst roast?  Not really.  They mostly just melt. Do they caramelize? A tiny bit, but as soon as they get warm, the starburst start dripping off of the fork. Does it catch on fire?  Nope.  It just melts off the fork. We sacrificed one to find out....it will completely drip off the fork and won't catch on fire. Is it too hot to eat?  At first perhaps. I waited about a minute after bringing mine out of the fire before eating. Does it come off the fork?  Yes, it leaves less residue than a marshmallow if you let it cool a minute before pulling it off. Does it taste good?  It tastes like a warm-gooey Starburst, s

Tissue Covered Canister

Image
I love a good recycle craft, and when I saw the change they made to the French's Fried Onions container a while back, I knew that container could be used for storage. The tricky part was covering it since it has these nice indented sides so you can get a good grip on the container. After my experience covering the  candle holder , I knew how to handle the tissue paper and Mod Podge a bit better, and since it's cheaper and a little easier to work with than gluing fabric, I decided tissue paper was the way to go. You'll need: a clean plastic container patterned tissue paper a rotary cutter and mat (or a scissors) Mod Podge and a brush to apply glue safe work surface (I used a paper plate) I started off by cutting the vacuum sealed label off.  There was no glue to clean off or anything--just a quick snip.  Then I cut my strips of tissue paper.  I ended up with two pieces that measured 4 1/4 inches by 14 inches.  Next I covered half of the contain

Alcohol Ink Washer Necklaces

Image
I received a package of alcohol inks for Christmas and then bought a second set with a 50% off coupon at Michael's.  I've used them now to make coasters and to decorate some candle holders .  I was just getting my sea legs with these inks to begin with.  I applied the ink directly onto the surfaces and played around with rubbing alcohol as a blending solution.  But I thought it was high time that I used an applicator to use them the way they were intended.  Of course, the applicator is just a stamp with some velcro on it and it costs 6+ dollars....not to mention buying the pre-cut pieces of felt. So I figured I'd make my own.  I was very much in a use what you've got mentality, so I grabbed a scrap piece of wood and a couple of strips of velcro (hook and loop tape).  I used the hook side and lined two pieces up next to each other.  Luckily they were just the right width. I had the sew-on kind of velcro, so I spread some tacky glue thinly onto the surface

10 Great Ways to Save Money on Craft Supplies!

Image
I think most folks who are crafters are frugal. The whole mindset of making something from scraps or parts is right in line with saving money. I am definitely frugal. I love making things, but I have a hard time spending money on something that I'm supposed to be making or creating. So, with that in mind, I thought I'd share some of the ways I've found to keep crafting costs to a minimum. 1. Garage Sales Buying secondhand requires patience, but can really pay off. Use Craigslist and your local newspaper’s website to look for garage sales near your neighborhood where crafting, scrapbooking, or stamping supplies are listed.  Be careful, though, as sometimes the folks selling stuff off have hoarded over-priced supplies and will be trying to get some of their money back. Do your research and be knowledgeable about prices. 2. Thrift Stores Some thrift stores will carry more crafting supplies than others, so shop around and find ones that you can hit up regularl

Duct Tape Water Bottle Holder

Image
I've been searching for a simple, cheap, and easy solution to carrying water bottles with you when you're hiking or at the county fair.  I knew I could sew a holder, but stitching in that small round bottom made it seem a bit like too much work for what it's worth.  But then I figured it out--what's waterproof, downright super strong, and easy to shape, and cheap?  Duct Tape! You'll need: 2 sheets of duct tape large enough to wrap around your water bottle (about 10 inch x 5 inch) 2 squares of duct tape large enough to cover the bottom of the bottle (about 3 inch x 3 inch) 2 small straps of duct tape to make loops (3 1/2 inches long but folded in thirds width wise and some extra tape to hold them in place) optional: duct tape to finish top edge length of gross grain ribbon for strap  and 2 carabiners to attach ribbon to duct tape straps After making a few prototypes, I decided that I needed a form that was just slightly bigger than the wa

Adventures in Dehydrating: Cherries

Image
Cherries were on sale last week.  $1.98 a pound.  That's about as cheap as they get around here.  My husband loves cherries and loves dried fruit.  So we gave dehydrating cherries our first try.  We bought two big bags of cherries, rinsed them off, and pulled their stems.  Then we set about pitting them.  If you want to stay sane, you'd better use a Cherry Pitter , but if you're a glutton for punishment, you could slice them in half and pry the pit out of every little cherry.  Once they are pitted, we sliced them in half and set them on the dehydrating trays.  I was surprised that we used both bags to fill our  dehydrator . I was also surprised that it took so long for them to dry.  We left the dehydrator running for about 30 hours on the fruit setting (135 degrees).  Some of the cherries were still a bit tacky, but the smaller ones were dry to the touch.  They come out looking almost like big raisins, but not quite as shriveled. When we were all done, the two b

Mod Podge and Tissue Paper Candle Holders

Image
I was inspired to Mod Podge some tissue paper onto glass candle holders from the dollar store by a cute post I saw online with carefully punched tissue paper. I brought out a bunch of colored tissue paper and my paper punches in hopes of creating a masterpiece. Guess what--my paper punches won't punch tissue paper--not even my more expensive paper punches. I tried several of my paper punches, and then I tried neatly folding the paper over to provide a thicker punching surface--no luck, it just mangled the tissue paper (Update: I totally figured out how to do it! ). Well, I already had all of the stuff out for this project, so I switched gears and tried something else. You'll need: Mod Podge and a brush for applying A scissors and/or rotary cutter Glass votive holders Patterned tissue paper Work surface you can get glue on (I used the paper plate in the photo above) Cut strips of your chosen tissue paper the right size for your candle holder.  My tissue