Posts

Showing posts from June, 2013

Fun Foam Stamps Part 2

Image
When I left off, I had just crafted some great stamps made out of fun foam from the dollar store glued onto cardboard.  The leaf shape and the circle shapes proved the concept, but after I saw how they stamped, I knew I needed to make some geometric background patterns. I started out with some strips cut on my paper cutter--half inch and quarter inch. I glued them carefully onto cardboard--eyeballing them as parallel as possible (hey, the end result will look imperfect even if I measure, so why not, right?).  Next up, the ever popular chevron.  I tried just free-hand cutting the shapes, but they were very uneven.  I thought for sure I'd have to measure or print out a pattern...then I had a pretty genius idea (ok, just clever, not really genius). I cut my long narrow rectangle shape, folded it in half, then  cut at an angle.  I then made cuts at the same angle about the same distance apart (again, I eye balled it because I'm impatient and knew the result would

Fun Foam Stamps Part 1

Image
I found this lovely pack of Fun Foam from Dollar Tree in my craft room.  I don't even remember when I bought it, but I knew exactly what I wanted to make with it first: homemade stamps. I cut up some spare cardboard from a box (the non corrugated kind would work even better, but use what you've got). Then I used a scissors to cut out some shapes.  Then I used some tacky glue to glue them onto the cardboard.  Super easy! Next I thought I'd try out some paper punches.  The dollar store fun foam is very thin, so I figured it might work.  I could only fit the fun foam into one of my paper punches--the circle, so I punched out four circles and made a single stamp and a grouping of three the same way as I made the leaves. After the glue dried, I tested out the stamps.  They create rustic impression--a bit imperfect. I immediately got some ideas for other designs (which you'll see in my next post). These are so much fun to make--very cheap and very ea

DIY Cotton Rounds Campfire Starters

Image
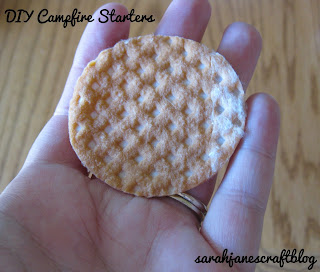
The best part of camping is the campfires. Who doesn't love making s'mores and roasting hotdogs over a fire? Sometimes the fires are a bit difficult to get going though. If it's a bit breezy or if your wood is a bit wet or even if you're just in a hurry, getting a fire started can be a real pain. We use fire starters most of the time when we're camping.  We've tried lots of different kinds (including the store bought variety). Of all of the homemade ones I've tried, these pack the most bang for their size. They are also very easy and inexpensive to make. To make your own Cotton Rounds Campfire Starters you'll need: Quilted Cotton Rounds Wax Something to melt the wax in--I used a tinfoil pie tin Your stove top or a hot plate Tongs Cooling Station--I used a cookie sheet lined with nonstick tinfoil I bought a pumpkin candle on sale at Wal-mart a while back.  It is a lousy candle.  The wick burns faster than the wax, so the wa

Ribbon Bookmarks

Image
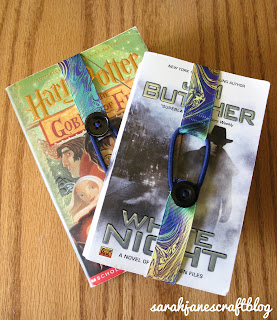
I bought this awesome swirly grosgrain ribbon from Michael's in the Dollar Bins last year.  I thought it was cool, but I had no idea what I'd use it for.  Bookmarks are perfect. I've been on a reading binge lately (all fluffy YA novels--delightful summer reading), so I knew I'd put them to good use. I started out by measuring the lengths on a trade paperback and a mass market paperback to get a couple of different sizes.  I wrapped them around each sized book and just snipped them when the ends met.  The next time I make these bookmarks, I'll probably cut them just a bit shorter to allow for the stretch of the hair tie. I folded over the raw end that was going to get a button later and double stitched it.  Then I moved on to the side with the hair tie.  I folded over about an inch of ribbon and pinned the hair tie in place.  Then I sewed with the presser foot right along the pin.  Then I pulled the pin out and sewed again with the presser foot up tigh

Neck Coolers

Image
The first time I visited the Iowa State Fair, I saw someone wearing a neck cooler. I thought, I'm uncomfortably warm (as it almost always is at the State Fair), I want one of those. I started looking online for instructions and found that I needed a specialty item to make them work: water absorbing crystals. I didn't really want to buy them in bulk on Amazon when I had no idea if I'd like the neck coolers or if they'd really store water the way they said they would. Fast forward a few years, and a post from a fellow blogger reminded me of making my very own neck coolers. She said she got her crystals in a little packet at Michaels. So I did a little searching online this time and found out that the crystals are available in a lot more places now. Miracle Grow is selling these Water Storing Crystals for use in potted plants....and they are for sale anywhere that sells planting supplies. I picked up a bag at my local Wal-mart and dug out my little sewing machine. Fo

Wooden Photo Plaques

Image
For this project you'll need: Wooden Plaques from a craft store (I got mine at Michael's) Print outs of photos Mod Podge and a foam brush to apply Black Craft Paint and a brush to apply Sandpaper for distressing Hanging brackets I started out with these inexpensive wooden plaques from Michaels.  I painted two coats of black craft paint right onto the wood. Once the paint had dried, I was worried it was too flat looking, but then I remembered I would be applying Mod Podge, and stopped worrying about it. :) I used some fine sandpaper to rough up the edges.  The photo below is from just a quick swipe of the edge. I had to work a little harder on the corners and any areas that were rough before I painted. When they were all done, they looked pretty rustic, just like I wanted.  There isn't a whole lot you can do to mess this up.  If you take too much off, just repaint and try again. Next I used a paper cutter to cut out photos th

Dr. Who Guess Who

Image
I love board games.  I love crafting. I love Dr. Who.  This project was made for me.  A lovely blogger and designer, Karen Kavett , was amazing enough to design a set of Dr. Who themed cards for the classic game, Guess Who.  She then made the designs available to print for anyone who wanted to make their own copy. I started out by spray painting the bright blue and red Guess Who frames and the yellow pegs. Just pop out the white frames and set them aside. I used Rustoleum Navy Blue on the base frames.  It's a bit dark to be for Tardis Blue, but it was the best I could find. I used some cheap silver spray paint on the pegs.  I sprayed them laying down first, then I poked holes in the box to finish them off.  I'm still working on how to keep the paint on the bottoms of the pegs as they fit tightly into the base frame and the paint has a tendency to flake off. After spray painting everything, I printed out Karen's cards on white cardstock.  She also includ